Complete manual: www.niceforyou.com
SERIAL NUMBER: ..................................................................................... DATE: .............................
• IT - Da consegnare all’utilizzatore • EN - To be given to the user • FR - À remettre à l’utilisateur • ES - Para entregar al usuario • DE - Dem Endnutzer zu übergeben • PL - Do przekazana użytkownkow • NL - Te o verhandigen aan de gebruiker • RU - Передается конечному пользователю
AVVERTENZE GENERALI / GENERAL WARNINGS / INSTRUCTIONS GÉNÉRALES / ADVERTENCIAS GENERALES / ALLGEMEINE HINWEISE / OGÓLNE OSTRZEŻENIA / ALGEMENE
AANBEVELINGEN / ПРЕДУПРЕЖДЕНИЯ ОБЩЕГО ХАРАКТЕРА
IT
Questo manuale è una sintesi delle fasi d’installazione e della messa in funzione
con i valori di default: il manuale istruzioni completo (installazione, collegamenti, pro-
grammazon parametr, dagnostca, ecc.) è scarcable dal sto www.niceforyou.com
IT
Pericolo da emissione ottica! Guardare la luce a LED da vicino e per un periodo
prolungato può abbagliare la vista. Può ridurre temporaneamente le facoltà
visive e causare incidenti. Non guardare direttamente i LED.
EN
This manual is a summary of the installation and commissioning instructions,
using the default values: the complete user manual (installation, connections, program-
mng, dagnostcs, etc.) s avalable or download rom www.niceforyou.com
EN
Danger due to optical radiation! Looking into an LED at short range for an
extended period may cause optical glare. This may temporarily reduce vision.
This may cause serious or fatal accidents. Do not look directly into a LED.
FR
Ce manuel est un résumé des phases d’installation et de mise en service avec les va-
leurs par déaut : le mode d’emploi complet (installation, raccordements, programmation des
paramètres, dagnostc, etc.) peut être téléchargé sur le ste Internet www.niceforyou.com
FR
Rsque d’émsson optque ! Fxer la lumère LED de près et longtemps peut
éblouir. La faculté visuelle peut être emporairement réduite et cela peut
provoquer des accidents. Ne pas regarder directement les LED.
ES
Este manual es una síntesis de las fases de instalación y de la puesta en fun-
cionamiento con los valores predeterminados: el manual de instrucciones completo
(nstalacón, conexones, programacón de parámetros, dagnóstco, etc.) se puede des-
cargar del sitio www.niceforyou.com
ES
¡Pelgro por emsón óptca! La fjacón de la vsta en la luz LED de cerca durante
un lapso prolongado puede enceguecer. Pueden reducirse temporalmente las
facultades visuales y pueden ocurrir accidentes. No mirar directamente a los
LED.
DE
Diese Anleitung gibt einen Überblick über die Einrichtungs- und Inbetriebnahme-
phasen mit den Standardeinstellungen: Die vollständige Anleitung (zu Einrichtung,
Anschlüssen, Programmerung der Parameter, Dagnose, usw.) kann au der Websete
www.niceforyou.com heruntergeladen werden
DE
Gefahr durch Lichtstrahl! Der Blickkontakt mit LED-Leuchten aus direkter Nähe
und überlängere Zeit kann das Sehvermögenbeeinträchtigen. Das Sehvermögen
kann vorübergehend eingeschränkt sein - dadurch besteht Unfallgefahr. Einen
direkten Blickkontakt mit LED-Leuchten vermeiden.
PL
Nnejsza nstrukcja jest streszczenem etapów nstalacj uruchomena z zasto-
sowanem wartośc domyślnych: pełną nstrukcję obsług (nstalacja, podłączena, pro-
gramowane parametrów, dagnostyka, td.) można pobrać ze strony nternetowej www.
niceforyou.com
PL
Zagrożene zwązane z emsją śwetlną! Spoglądane z blska przez dłuższy okres
czasu na źródło śwatła LED może spowodować oślepene. Może te skutkować
chwlowym ogranczenem zdolnośc wdzena spowodować wypadk. Ne
należy spoglądać bezpośredno na dody LED.
NL
Deze handledng s een samenvattng van de stada van nstallate en nbedri-
stelling met de standaard waarden: de complete handleiding (installatie, bedrading,
het programmeren van parameters, dagnostek etc.) kan worden gedownload van de
website www.niceforyou.com
NL
Gevaar door optsche transmsse! Door langere tid van dchtbi n een LED-
lamp te kiken s verblndng mogelik. Dt kan tidelik het gezchtsvermogen
beperken en ongevallen veroorzaken. Kik net rechtstreeks n LED’s.
RU
Данное руководство являет собой синтез фаз монтажа и пуска в работу согласно
стандартно заданным значениям: полное руководство с инструкциями (монтаж,
подключения, программирование параметров, диагностика и пр.) может быть за-
гружена с веб-сайта www.niceforyou.com
RU
Опасность оптического излучения! Смотреть на свет СИДа с близкого
расстояния в течение долгого времени опасно для зрения. Может временно
сократить возможность видеть и привести к авариям. Не смотрите прямо
на СИД.
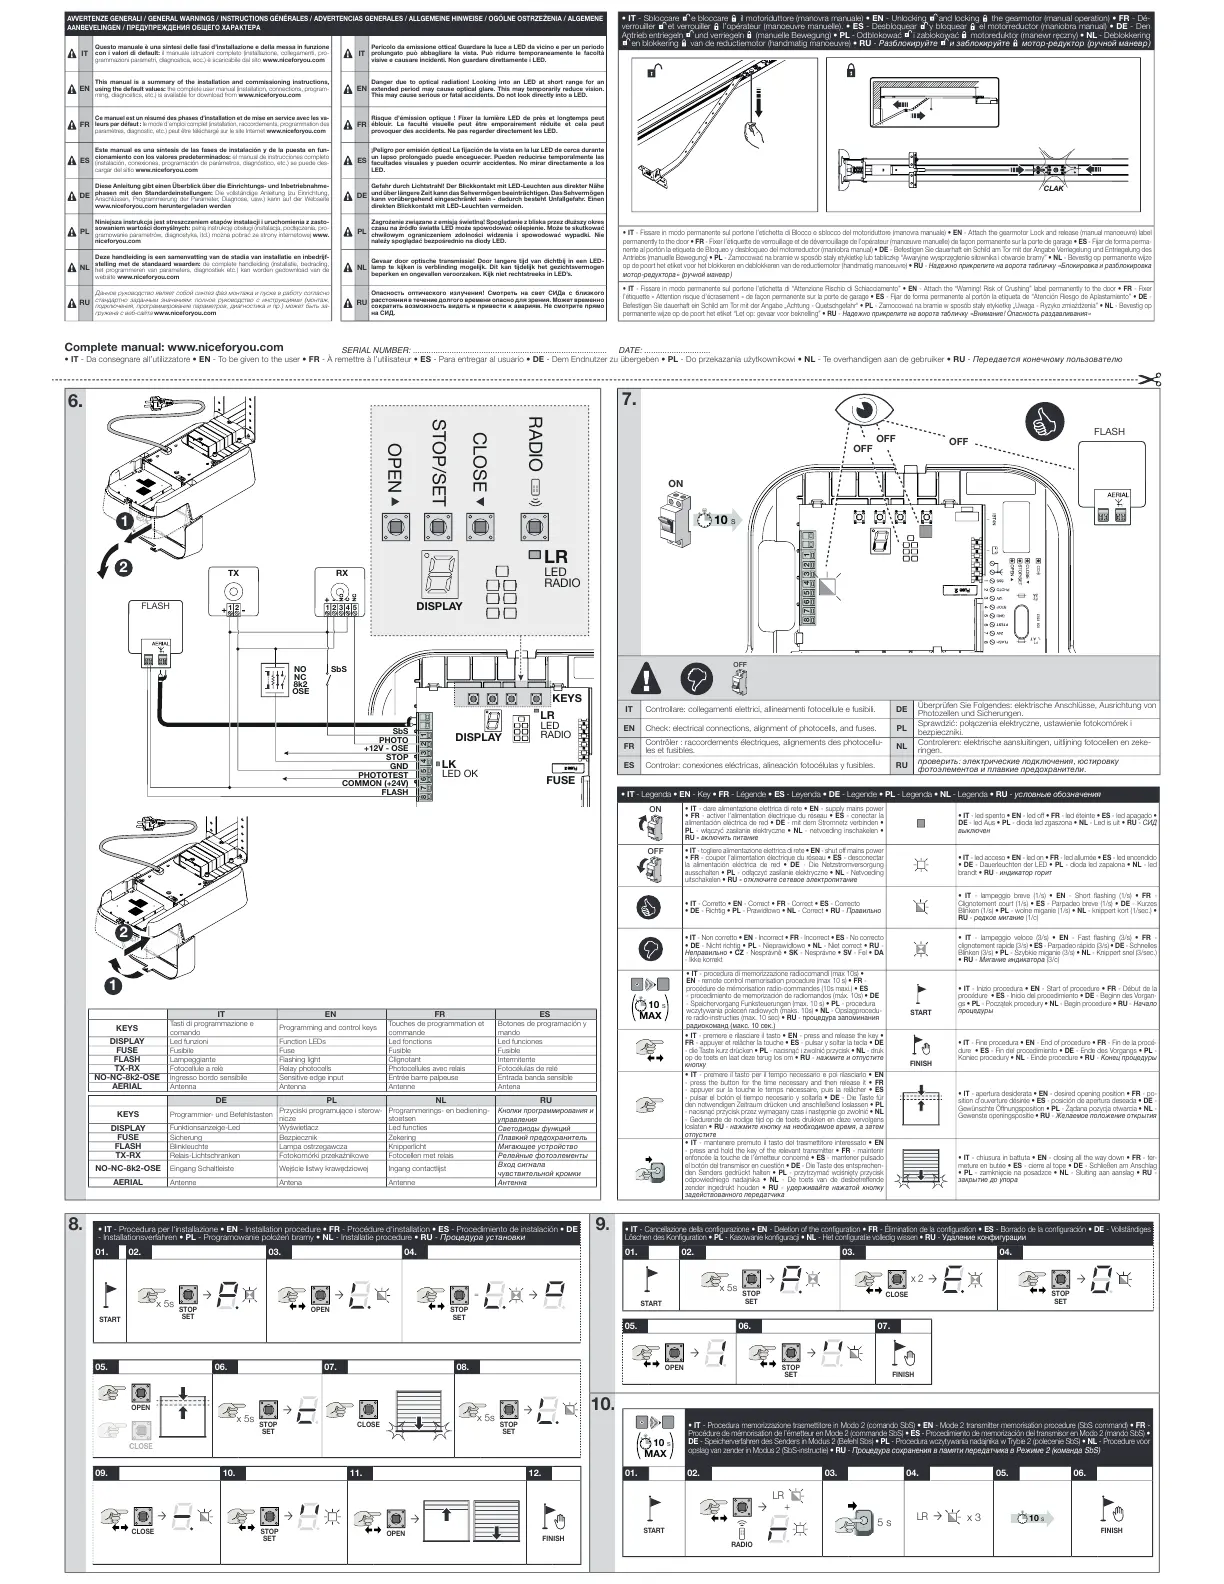
6.
IT EN FR
ES
KEYS
Tasti di programmazione e
comando
Programming and control keys
Touches de programmation et
commande
Botones de programación y
mando
DISPLAY
Led funzioni Function LEDs Led fonctions Led funciones
FUSE
Fusibile Fuse Fusible Fusible
FLASH
Lampeggiante Flashing light Clignotant Intermitente
TX-RX
Fotocellule a relè Relay photocells
Photocellules avec relais
Fotocélulas de relé
NO-NC-8k2-OSE
Ingresso bordo sensibile Sensitive edge input Entrée barre palpeuse Entrada banda sensible
AERIAL
Antenna Antenna Antenne Antena
DE
PL NL RU
KEYS
Programmier- und Befehlstasten
Przycsk programujące sterow-
nicze
Programmerings- en bediening-
stoetsen
Кнопки программирования и
управления
DISPLAY
Funktionsanzeige-Led Wyśwetlacz Led functies
Светодиоды функций
FUSE
Sicherung Bezpiecznik Zekering
Плавкий предохранитель
FLASH
Blinkleuchte Lampa ostrzegawcza Knipperlicht
Мигающее устройство
TX-RX
Relais-Lichtschranken Fotokomórk przekaźnkowe Fotocellen met relais
Релейные фотоэлементы
NO-NC-8k2-OSE
Eingang Schaltleiste Wejśce lstwy krawędzowej Ingang contactlijst
Вход сигнала
чувствительной кромки
AERIAL
Antenne Antena Antenne
Антенна
• IT - Sbloccare e bloccare il motoriduttore (manovra manuale) • EN - Unlocking and locking the gearmotor (manual operation) • FR - Dé-
verrouiller
et verrouiller l’opérateur (manoeuvre manuelle). • ES - Desbloquear y bloquear el motorreductor (maniobra manual) • DE - Den
Antrieb entriegeln
und verriegeln (manuelle Bewegung) • PL - Odblokować zablokować motoreduktor (manewr ręczny) • NL - Deblokkering
en blokkering van de reductiemotor (handmatig manoeuvre) • RU - Разблокируйте и заблокируйте мотор-редуктор (ручной маневр)
CLAK
• IT - Fissare in modo permanente sul portone l’etichetta di Blocco e sblocco del motoriduttore (manovra manuale) • EN - Attach the gearmotor Lock and release (manual manoeuvre) label
permanently to the door • FR - Fixer l’étiquette de verrouillage et de déverrouillage de l’opérateur (manœuvre manuelle) de façon permanente sur la porte de garage • ES - Fijar de forma perma-
nente al portón la etiqueta de Bloqueo y desbloqueo del motorreductor (maniobra manual) • DE - Befestigen Sie dauerhaft ein Schild am Tor mit der Angabe Verriegelung und Entriegelung des
Antriebs (manuelle Bewegung) • PL - Zamocować na brame w sposób stały etyketkę lub tablczkę “Awaryjne wysprzęglene słownka otwarce bramy” • NL - Bevestig op permanente wijze
op de poort het etiket voor het blokkeren en deblokkeren van de reductiemotor (handmatig manoeuvre) • RU - Надежно прикрепите на ворота табличку «Блокировка и разблокировка
мотор-редуктора» (ручной маневр)
• IT - Fissare in modo permanente sul portone l’etichetta di “Attenzione Rischio di Schiacciamento” • EN - Attach the “Warning! Risk of Crushing” label permanently to the door • FR - Fixer
l’étquette « Attenton rsque d’écrasement » de açon permanente sur la porte de garage • ES - Fijar de forma permanente al portón la etiqueta de “Atención Riesgo de Aplastamiento” • DE -
Befestigen Sie dauerhaft ein Schild am Tor mit der Angabe „Achtung - Quetschgefahr“ • PL - Zamocować na brame w sposób stały etyketkę „Uwaga - Ryzyko zmażdżena” • NL - Bevestig op
permanente wijze op de poort het etiket “Let op: gevaar voor beknelling” • RU - Надежно прикрепите на ворота табличку «Внимание! Опасность раздавливания»
8
.
• IT - Procedura per l‘installazione • EN - Installation procedure • FR - Procédure d‘installation • ES - Procedimiento de instalación • DE
- Installationsverfahren • PL - Programowane położeń bramy • NL - Installatie procedure • RU - Процедура установки
01. 02. 03. 04.
START
STOP
SET
x 5s
OPEN
STOP
SET
=
05. 06. 07. 08.
OPEN
STOP
SET
x 5s
CLOSE
STOP
SET
x 5s
09. 10. 11. 12.
CLOSE
STOP
SET
OPEN
FINISH
9
.
• IT - Cancellazone della confgurazone • EN - Deleton o the confguraton • FR - Élmnaton de la confguraton • ES - Borrado de la confguracón • DE - Vollständiges
Löschen des Konfguraton • PL - Kasowane konfguracj • NL - Het confgurate volledg wssen • RU - Удаление конфигурации
01. 02. 03. 04.
START
STOP
SET
x 5s
CLOSE
x 2
STOP
SET
05. 06. 07.
OPEN
STOP
SET
FINISH
10
.
10
MAX
s
• IT - Procedura memorizzazione trasmettitore in Modo 2 (comando SbS) • EN - Mode 2 transmitter memorisation procedure (SbS command) • FR -
Procédure de mémorisation de l’émetteur en Mode 2 (commande SbS) • ES - Procedimiento de memorización del transmisor en Modo 2 (mando SbS) •
DE - Speicherverfahren des Senders in Modus 2 (Befehl Sbs) • PL - Procedura wczytywania nadajnika w Trybie 2 (polecenie SbS) • NL - Procedure voor
opslag van zender in Modus 2 (SbS-instructie) • RU - Процедура сохранения в памяти передатчика в Режиме 2 (команда SbS)
01. 02. 03. 04. 05. 06.
START
RADIO
LR
+
5 s
LR
x 3
s
FINISH
7.
• IT - togliere alimentazione elettrica di rete • EN - shut off mains power
• FR - couper l’alimentation électrique du réseau • ES - desconectar
la alimentación eléctrica de red • DE - Die Netzstromversorgung
ausschalten • PL - odłączyć zaslane elektryczne • NL - Netvoeding
uitschakelen • RU - отключите сетевое электропитание
• IT - led acceso • EN - led on • FR - led allumée • ES - led encendido
• DE - Dauerleuchten der LED • PL - dioda led zapalona • NL - led
brandt • RU - индикатор горит
• IT - Corretto • EN - Correct • FR - Correct • ES - Correcto
• DE - Richtig • PL - Prawdłowo • NL - Correct • RU - Правильно
• IT - lampeggo breve (1/s) • EN - Short lashng (1/s) • FR -
Clgnotement court (1/s) • ES - Parpadeo breve (1/s) • DE - Kurzes
Blnken (1/s) • PL - wolne mgane (1/s) • NL - knppert kort (1/sec.) •
RU - редкое мигание (1/c)
• IT - Non corretto • EN - Incorrect • FR - Incorrect • ES - No correcto
• DE - Nicht richtig • PL - Neprawdłowo • NL - Niet correct • RU -
Неправильно • CZ - Nesprávně • SK - Nesprávne • SV - Fel • DA
- Ikke korrekt
• IT - lampeggo veloce (3/s) • EN - Fast lashng (3/s) • FR -
clgnotement rapde (3/s) • ES - Parpadeo rápdo (3/s) • DE - Schnelles
Blnken (3/s) • PL - Szybke mgane (3/s) • NL - Knppert snel (3/sec.)
• RU - Мигание индикатора (3/c)
10
MAX
s
• IT - procedura di memorizzazione radiocomandi (max 10s) •
EN - remote control memorisation procedure (max 10 s) • FR -
procédure de mémorsaton rado-commandes (10s max.) • ES
- procedmento de memorzacón de radomandos (máx. 10s) • DE
- Spechervorgang Funksteuerungen (max. 10 s) • PL - procedura
wczytywana poleceń radowych (maks. 10s) • NL - Opslagprocedu-
re rado-nstructes (max. 10 sec) • RU - процедура запоминания
радиокоманд (макс. 10 сек.)
START
• IT - Inizio procedura • EN - Start of procedure • FR - Début de la
procédure • ES - Inicio del procedimiento • DE - Beginn des Vorgan-
gs • PL - Początek procedury • NL - Begin procedure • RU - Начало
процедуры
• IT - premere e rilasciare il tasto • EN - press and release the key •
FR - appuyer et relâcher la touche • ES - pulsar y soltar la tecla • DE
- die Taste kurz drücken • PL - nacsnąć zwolnć przycsk • NL - druk
op de toets en laat deze terug los om • RU - нажмите и отпустите
кнопку
FINISH
• IT - Fine procedura • EN - End of procedure • FR - Fin de la procé-
dure • ES - Fin del procedimiento • DE - Ende des Vorgangs • PL -
Koniec procedury • NL - Einde procedure • RU - Конец процедуры
• IT - premere il tasto per il tempo necessario e poi rilasciarlo • EN
- press the button for the time necessary and then release it • FR
- appuyer sur la touche le temps nécessaire, puis la relâcher • ES
- pulsar el botón el tiempo necesario y soltarla • DE - Die Taste für
den notwendigen Zeitraum drücken und anschließend loslassen • PL
- nacsnąć przycsk przez wymagany czas następne go zwolnć • NL
- Gedurende de nodige tijd op de toets drukken en deze vervolgens
loslaten • RU - нажмите кнопку на необходимое время, а затем
отпустите
• IT - apertura desiderata • EN - desired opening position • FR - po-
sition d’ouverture désirée • ES - posición de apertura deseada • DE -
Gewünschte Öffnungsposition • PL - Żądana pozycja otwarca • NL -
Gewenste openingspositie • RU - Желаемое положение открытия
• IT - mantenere premuto il tasto del trasmettitore interessato • EN
- press and hold the key of the relevant transmitter • FR - maintenir
enfoncée la touche de l’émetteur concerné • ES - mantener pulsado
el botón del transmisor en cuestión • DE - Die Taste des entsprechen-
den Senders gedrückt halten • PL - przytrzymać wcśnęty przycsk
odpowiedniego nadajnika • NL - De toets van de desbetreffende
zender ingedrukt houden • RU - удерживайте нажатой кнопку
задействованного передатчика
• IT - chiusura in battuta • EN - closing all the way down • FR - fer-
meture en butée • ES - cierre al tope • DE - Schließen am Anschlag
• PL - zamknęce na posadzce • NL - Sluiting aan aanslag • RU -
закрытие до упора
1
2
345
6
78
PHOTOTEST
SbS
PHOTO
STOP
GND
COMMON (+24V)
FLASH
+12V - OSE
SbS
NC
OSE
8k2
NO
FLASH
L
ES
L
L
SL
SE
SL
OPEN
STOP/SET
CLOSE
RADIO
LED
RADIO
LED OK
LED
RADIO
 Loading...


