Do you have a question about the Nimbus Water Systems CS-2 and is the answer not in the manual?
Details replacement intervals for RO membrane, pre-filter, and post-filter. Intervals are 12 months for membrane and post-filter, 6-12 months for pre-filter.
Lists production rates (36 GPD membrane, 11.3 GPD system) and TDS rejection (95%) under specific test conditions.
Specifies required operating parameters: pressure (40-80 psi), temperature (40-100°F), TDS (<2000 mg/L), chlorine (<1.0 mg/L), NTU (<1), SDI (<5), and pH (4-8).
Covers parts and factory labor for defects in material/workmanship for the first year, excluding consumables and normal wear items.
Lists warranty exclusions such as misuse, improper maintenance, unauthorized alterations, and specific water quality issues.
Outlines owner's duty to schedule maintenance, perform proper upkeep, and contact the dealer for defects.
Fields for recording Model, Date Code, Install Date, Sold by, Installed By, and Service Center Phone Number.
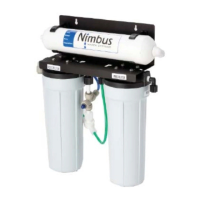
Identifies and labels key components of the RO system, including storage tank, faucet, membrane, and filters via a diagram.
Advises that installation should be performed by a licensed professional, warning of potential water damage from improper setup.
Provides sequential instructions for attaching tubing, mounting the faucet base, securing it to the sink, and connecting drain/product lines.
Illustrates the parts of the faucet assembly, including the polished faucet base, metal base plate, rubber seal, and quick-connect adapter.
Guides on shutting off water, connecting the feed adapter to the cold water line, and securing the feed tubing.
Details the process of installing a drain saddle assembly onto the sink drain pipe, including drilling a hole and securing the assembly.
Instructions for connecting product water tubing from faucet to post-filter and feed water tubing from supply to prefilter.
Connects tubing from the tank valve to the shut-off valve and the drain tubing to the drain connection.
Illustrates the use of a compression nut, ferrule, and insert for secure tubing connections to system fittings.
Guides on checking all tubing connections, opening water supply, observing for leaks, and verifying initial water flow.
Details flushing to remove sanitizer and carbon fines, including tank filling, auto-shutoff, and multiple tankful flushes for safe drinking water.
Verifies system location is protected and feed water pressure is within the 40-80 PSI range.
Confirms all tubing connections are fully inserted and drain tubing runs downhill without loops.
Recommends checking for leaks 1-2 hours after activation and flushing three tankfuls, repeating if chlorine scent persists.
Step-by-step instructions for safely removing and replacing the RO membrane desalinator, including tube connections.
Guides on replacing pre-filter and post-filter cartridges, including housing removal, O-ring care, and reassembly.
| Brand | Nimbus Water Systems |
|---|---|
| Model | CS-2 |
| Category | Water Filtration Systems |
| Language | English |