EasyManua.ls Logo

Ninja Smart Screen CT650 Series - User Manual

Ninja Smart Screen CT650 Series
11 pages
Print Icon
To Next Page IconTo Next Page
Loading...
ninjakitchen.com
INSTRUCTIONS
CT650
Series
Smart Screen™
Blender

Other manuals for Ninja Smart Screen CT650 Series

Questions and Answers

  • S
    Scott PerezJul 27, 2025
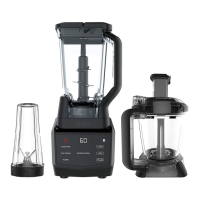
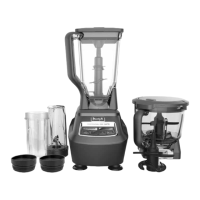
    What to do if my Ninja Smart Screen CT650 Blender motor does not start?
    • S
      shane51Jul 27, 2025
      If the Ninja Blender motor doesn't start or the blade assembly doesn't rotate, ensure the pitcher and lid are securely placed and aligned on the motor base. Verify the unit is plugged in and powered on. If the Power light is flashing, the unit may be overloaded; unplug it and wait 15 minutes. If the unit has overheated, unplug it and wait approximately 15 minutes before using again.
  • T
    Tamara CraneAug 1, 2025
    How to turn off a Ninja Smart Screen CT650 Blender?
    • G
      garciajonathanAug 2, 2025
      To turn off your Ninja Blender, press the selected program to pause operation, or press the power button to cancel the selected program. Wait until the blades have completely stopped spinning, then remove the pitcher from the base by rotating it counterclockwise and lifting it up.
  • M
    Miguel BishopAug 6, 2025
    What to do if Ninja Smart Screen CT650 programs don't run with the lid on?
    • B
      Brandy ObrienAug 6, 2025
      If the programs on your Ninja Blender won't run even with the lid on, make sure the triangle symbol on the lid aligns with the triangle symbol on the pitcher's handle. Press down on the handle until you hear a click to ensure it's properly secured.
  • M
    Martin CookAug 12, 2025
    Why does my Ninja Smart Screen CT650 Blender count up and down?
    • K
      Katelyn GreeneAug 12, 2025
      Your Ninja Blender counts down during AUTO-iQ® programs to show the time remaining until completion. In Manual mode (low or high), the clock counts up from 0 until the auto shutoff is reached or the button for the currently running mode is selected again.
  • J
    jwilsonAug 16, 2025
    What to do if my Ninja Smart Screen CT650 shows an “--” message?
    • J
      Jennifer WilliamsAug 16, 2025
      The “--” message on your Ninja Blender indicates that the Total Crushing® Pitcher is not correctly assembled on the base or the lid is not properly locked. Ensure proper installation to illuminate the available programs on the touchscreen.
  • K
    Kevin DanielsAug 21, 2025
    Why won’t my Ninja Blender stick to the counter?
    • M
      Marcus GuerreroAug 21, 2025
      If the Ninja Blender motor base won’t stick, ensure both the surface and the suction feet are clean before placing the base on the counter or tabletop. The suction feet only adhere to smooth, clean surfaces.

Summary

Thank You and Registration

Record Important Information

Section to record model number, serial number, and purchase details for reference.

Technical Specifications

Details voltage and wattage for the Ninja Smart Screen Blender.

Keep Instructions for Future Reference

Reminder to read and retain instructions for complete understanding of the blender.

Important Safety Instructions

General Operation & Electrical Safety

Precautions for safe operation, electrical connections, and proper usage environment.

Blade Handling & Attachment Use

Exercise care when handling sharp blades and ensure correct attachment usage.

Pre-Use Checks and Cleaning

Ensure all parts are present and clean before operating the appliance.

Supervision and Environmental Safety

Guidelines on supervision near children and avoiding hot surfaces or outdoor use.

Important Safety Instructions (Continued)

Operational Precautions

Rules for safe operation, including container use, lid security, and avoiding hot liquids.

Post-Operation & Maintenance Safety

Proper handling after use, including removing pitcher, emptying, and cleaning safety.

Specific Action & Troubleshooting Safety

Warnings for specific actions, overheating reset, and understanding wattage ratings.

Blade & Cord Safety

Instructions on blade inspection, cord safety, and avoiding blade sharpening.

Getting to Know Your Blender and Parts

Blender Components

Identifies the Pitcher Lid, Total Crushing Pitcher, Motor Base, and Stacked Blade Assembly.

Did You Know?

Highlights that the pitcher, blade assembly, and lid are BPA-free and dishwasher safe.

Features and First Use Preparation

Intuitive Touchscreen

Overview of the illuminated controls guiding program selection without guesswork.

Auto-IQ Programs

Description of intelligent programs combining pulsing, blending, and pausing for various recipes.

Manual Modes

Explanation of HIGH, LOW, and PULSE settings for manual blending control.

Before First Use Steps

Instructions for unpacking, washing parts, and drying the unit before initial operation.

Assembling and Using the Pitcher

Pitcher Assembly

Step-by-step guide for placing the pitcher and locking it onto the motor base.

Stacked Blade Assembly Installation

Instructions on how to carefully place the Stacked Blade Assembly onto the drive gear.

Adding Ingredients and Securing Lid

Guidance on filling ingredients to the max line and locking the lid correctly.

Using the Blender and Serving

Auto-IQ Program Operation

How to start, select, and pause or cancel Auto-IQ programs.

Manual Mode Operation

How to use HIGH, LOW, and PULSE settings for manual blending.

Serving Your Recipe

Instructions for stopping the blender, removing the pitcher, and pouring contents.

Moving Your Base

Guidance on unplugging and safely lifting the motor base from the countertop.

Care and Maintenance

Cleaning Components

Instructions for hand-washing and dishwasher cleaning of pitcher, lid, and blade assembly.

Cleaning the Motor Base

How to clean the motor base and touchscreen safely with a damp cloth.

Storing the Unit

Proper method for storing the blender upright with the assembly inside the pitcher.

Resetting the Motor Thermostat

Procedure to reset the motor if it overheats or is overloaded.

Troubleshooting and Warranty

Troubleshooting Common Issues

Solutions for motor not starting, inability to create snow, and error messages.

Manual Program Operation Issues

Clarification on manual programs not turning off and pulse function behavior.

Suction Feet and Surface Adhesion

Tips for ensuring the motor base suction feet stick to clean, smooth surfaces.

One Year Limited Warranty

Details on warranty coverage, exclusions, and how to initiate a claim.

Ninja Smart Screen CT650 Series Specifications

General IconGeneral
SeriesCT650
ModelCT650 Series
TypeCountertop Blender
MaterialPlastic
Blade MaterialStainless Steel
Dishwasher Safe PartsYes
Warranty1 year
Capacity72 oz
ScreenYes
Speed SettingsVariable

Related product manuals