move the stored food and cleanse interior with luke-
warm water to which a dishwater detergent has been
added (Dawn works well on stubborn grease spots).
A
CAUTION
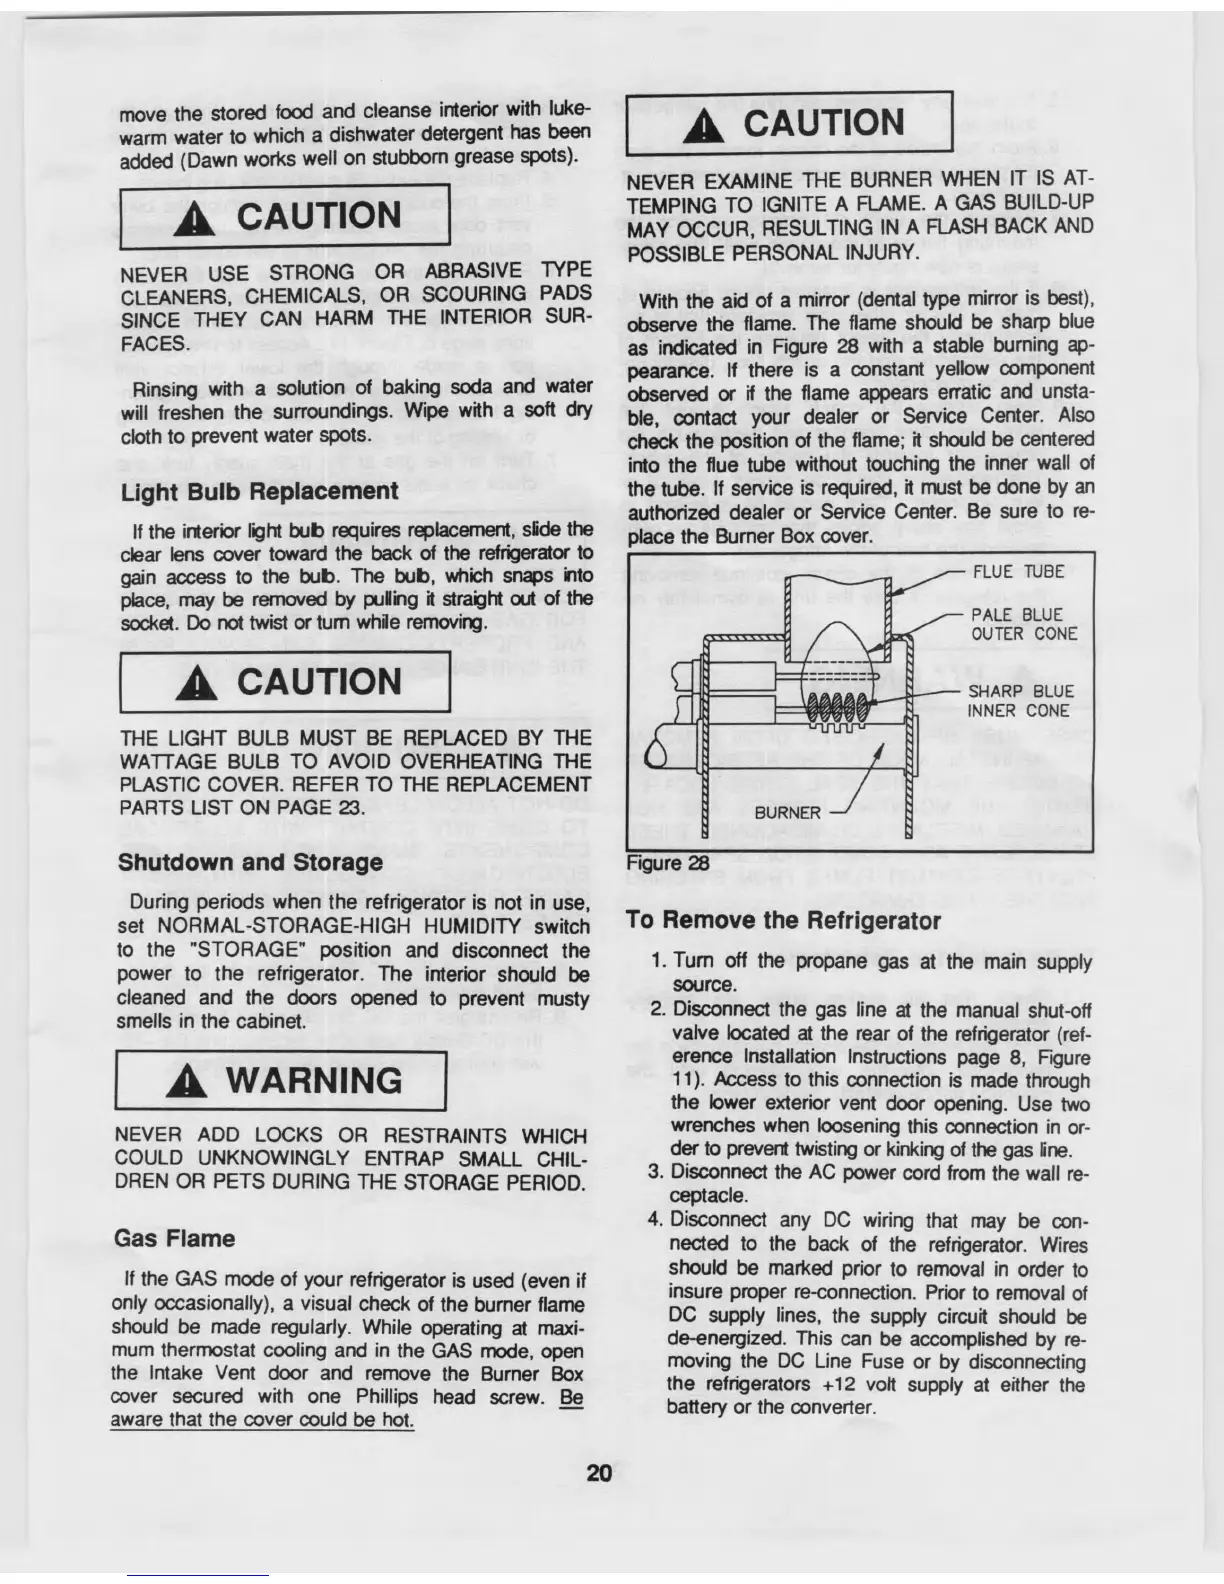
Figure 28
A
WARNING
NEVER ADD LOCKS OR RESTRAINTS WHICH
COULD UNKNOWINGLY ENTRAP SMALL CHIL-
DREN OR PETS DURING THE STORAGE PERIOD.
Gas Flame
A
CAUTION
NEVER EXAMINE THE BURNER WHEN IT IS AT-
TEMPING TO IGNITE A FLAME. A GAS BUILD-UP
MAY OCCUR, RESULTING IN A FLASH BACK AND
NEVER USE STRONG OR ABRASIVE TYPE
POSSIBLE PERSONAL INJURY.
CLEANERS, CHEMICALS, OR SCOURING PADS
With the aid of a mirror (dental type mirror is best),
SINCE THEY CAN HARM THE INTERIOR SUR- observe the flame. The flame should be sharp blue
FACES.
as indicated in Figure 28 with a stable burning ap-
pearance. If there is a constant yellow component
Rinsing with a solution of baking soda and water
observed or if the flame appears erratic and unsta-
will freshen the surroundings. Wipe with a soft dry
ble, contact your dealer or Service Center. Also
cloth to prevent water spots.
check the position of the flame; it should be centered
into the flue tube without touching the inner wall of
Light Bulb Replacement
the tube. If service is required, it must be done by an
authorized dealer or Service Center. Be sure to re-
If the interior light bub requires replacement, slide the
place the Burner Box cover.
clear lens cover toward the back of the refrigerator to
gain access to the bub. The bub, which snaps into
place, may be removed by puling it straight out of the
socket. Do not twist or turn while removing.
A
CAUTION
THE LIGHT BULB MUST BE REPLACED BY THE
WATTAGE BULB TO AVOID OVERHEATING THE
PLASTIC COVER. REFER TO THE REPLACEMENT
PARTS LIST ON PAGE 23.
Shutdown and Storage
During periods when the refrigerator is not in use,
set NORMAL-STORAGE-HIGH HUMIDITY switch
To Remove the Refrigerator
to the "STORAGE" position and disconnect the
1. Turn off the propane gas at the main supply
power to the refrigerator. The interior should be
source.
cleaned and the doors opened to prevent musty
2. Disconnect the gas line at the manual shut-off
smells in the cabinet. valve located at the rear of the refrigerator (ref-
erence Installation Instructions page 8, Figure
11). Access to this connection is made through
the lower exterior vent door opening. Use two
wrenches when loosening this connection in or-
der to prevent twisting or kinking of the gas line.
3.
Disconnect the AC power cord from the wall re-
ceptacle.
4.
Disconnect any DC wiring that may be con-
nected to the back of the refrigerator. Wires
should be marked prior to removal in order to
If the GAS mode of your refrigerator is used (even if
insure proper re-connection. Prior to removal of
only occasionally), a visual check of the burner flame
DC supply lines, the supply circuit should be
should be made regularly. While operating at maxi-
de-energized. This can be accomplished by re-
mum thermostat cooling and in the GAS mode, open
moving the DC Line Fuse or by disconnecting
the Intake Vent door and remove the Burner Box
the refrigerators +12 volt supply at either the
cover secured with one Phillips head screw. Be
battery or the converter.
aware that the cover could be hot.
20