Do you have a question about the Nostalgia Electrics SCC-200 and is the answer not in the manual?
Lists the electrical and approval details for the appliance.
Provides critical safety warnings and usage guidelines for the appliance.
Outlines fundamental safety measures to follow when operating electrical appliances.
Lists further essential safety instructions, including usage environment and electrical connections.
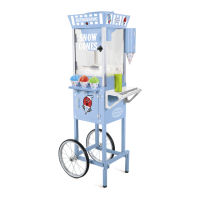
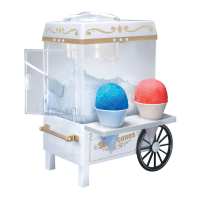
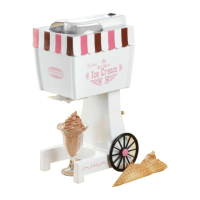
Introduces the SNOW CONE CART™, its vintage design, and its versatility for various treats and locations.
Instructions for initial setup and cleaning before assembling the SNOW CONE CART™.
Lists and illustrates all components included with the SNOW CONE CART™ for assembly.
Details the specific hardware components required for the assembly process.
Guides the user to unpack all parts and verify contents before proceeding with assembly.
Instructions for attaching the push handle to the storage compartment using provided screws.
Details how to connect the base supports using screws and a cross bar.
Instructions for connecting the leg assembly to the base support using studs and nut caps.
Guides on attaching the storage compartment to the base support and adding the bottom plate.
Instructions for attaching the wheels to the base support using wheel rods, washers, and caps.
Guides on mounting the main unit onto the storage compartment using lock screws.
Instructions for placing and securing the clear plastic bowl and lid for proper operation.
Steps for setting up the unit, adding ice, and starting the shaving process.
Tips on preparing ice cubes for the best snow cone shaving performance.
Instructions on how to access and use the shaved ice for making treats.
Outlines the process and precautions for replacing the blade of the snow cone maker.
Details on using the disassembly tool to expose the blade assembly.
Instructions for safely removing and handling the blade assembly, including using clips and a retainer nut.
Steps for safely cleaning the interior and exterior of the unit, including dishwasher-safe parts.
Emphasizes extreme caution when handling the sharp blade during cleaning or maintenance.
Provides creative ideas and recipes for making snow cones, slush drinks, and smoothies.
Instructions for immediate return to the place of purchase if the unit is defective upon arrival.
Information on how to contact customer service for inquiries or support.
Outlines the terms of the 90-day limited warranty, including coverage and claim procedures.
| Brand | Nostalgia Electrics |
|---|---|
| Model | SCC-200 |
| Category | Ice Cream Maker |
| Language | English |