To install the device you will have to follow 4 simple steps:
Step 1. Connect your SL-AT12PR device to one HDMI port on your TV or
using the HDMI extension cable included in the original box.
Step 2. Connect the micro USB cable to your device and an USB port on
your television set.
Step 3. Select on your TV the HDMI input to which the device is connec-
ted.Note that the first boot or the boot aer applying a system update may
take about 5 minutes.
Step 4. If you use a Moon remote controller for your SL-AT12PR device,
plug the receiver into the USB port on your device.
QUICK GUIDE
NPG Technology S.A.
C/ Ecuador 14, 28850 Torrejón de Ardoz - Madrid (Spain)
Tel.: +34 916794790 (Spain)
Tel.: 902 501 406 (Spain)
Tel.: 825 213 238 (France)
prix d'appel 0,125€/min
Tel.: 707 500 272 (Portugal)
preço de chamada 0,10€/min
sat@npgtech.com
www.npgtech.com
ENGLISH
*Download the complete O.S. user’s manual at www.npgtech.com
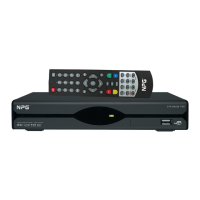
1
1- Card Slot Micro SD
2- USB Port
3- HDMI Port
4- Reset (Recovery Buon)
5- IR
6- DC (Power Connector)
2 3
Wi-fi Connecon
By default the connecon via Wi-Fi is disabled. Go to the "Sengs" icon from
the menu and press the status selector to switch it to "ON" in Wi-Fi sengs
to scan wifi networks.For internet connecon select the name of your Wi-Fi
network, then enter the password to access your network and press con-
nect.
*Note :
*Whenever possible, use “Moon” remote controllers or mouse (USB/Wi-
reless)
*Install applicaons on your device by pressing the Play Store icon.
To access the Play Store you must add or create a google account to be as-
sociated with the device.
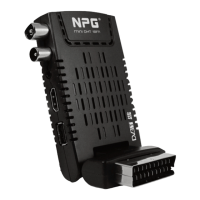
Installaon:
HDMI Port
D
C
-
5
V
US
B
P
ort
US
B P
o
rt
of
t
he device
Remote Receiver
MicroSD- Card slot microSD.
T
he microSD card can store mul-
m
edia files (music, movies, photos).
You cannot install applicaons to
t
he microSD card.
1
HDMI Port- Connects
to an HDMI port on
y
our TV.
USB Port- USB port to con-
nect any peripherals to
y
our SmartLite (mouse,
keyboard, flash drive, re-
mote controller wireless
r
eceiver, etc.)
2
3
I
R
R
eset(Recovery Buon)
DC- Power connector (connects to a USB
p
ort via micro USB cable included in the
box of your SmartLite).
4
5
6