Before checking or refilling with oil, be sure that the generator is
• If oil level is below the lowr level line (B) , refill with suitable
oil to max level line (C). Do not screw in the oil filler cap when
NOTE: THE GENERATOR HAS BEEN SHIPPED WITHOUT
• Do not connect the electric load or equipment before starting
• Turn the AC switch to «OFF». (PIC. 7) (not available on
3. Turn the choke lever to the “closed” position. Not necessary
4. Pull the starter handle slowly until resistance is felt. This is
the «Compression» point. Return the handle to its original
position and pull swiftly. Do not fully pull out the rope. After
starting, allow the starter handle to return to its original
6. Turn the choke
lever back to the operating position. (PI
C.
(a) Check the indicator lamp or the voltmeter for correct
(b) Ensure that electrical equipment is switched off before
(c) Connect the plug(s) of the electrical equipment into the
(d) Turn the AC switch (not available on model NPEGG850)
to the «ON» position and turn on the electric equipment. (PIC.
• Be sure the socket load current is within socket rated
• To take out power from TWIST LOCK receptacle, insert the
27
GB
2 - AC APPLICATION (DUAL VOLTAGE TYPE) (FIG. 3/B)
(OPTION)
(a) Select the correct voltage using the AC OUTPUT SELECT
SWITCH to the same as the rating for the appliance.
(b) Operate in the same way as step (a) through step (d) of
single voltage type.
NOTE: Voltmeter always indicates the lower voltage
whichever the AC OUTPUT SELECT SWITCH is set.
3 - DC APPLICATION (OPTION)
This usage is applicable to 12V battery charging only.
(a) Charging instruction for battery
• Disconnect the leads of the battery.
• Loosen the battery top up caps to prevent the build up of
pressure during chatrging.
• If the battery fluid level is low , top up the battery with distilled
water to the upper limit,.
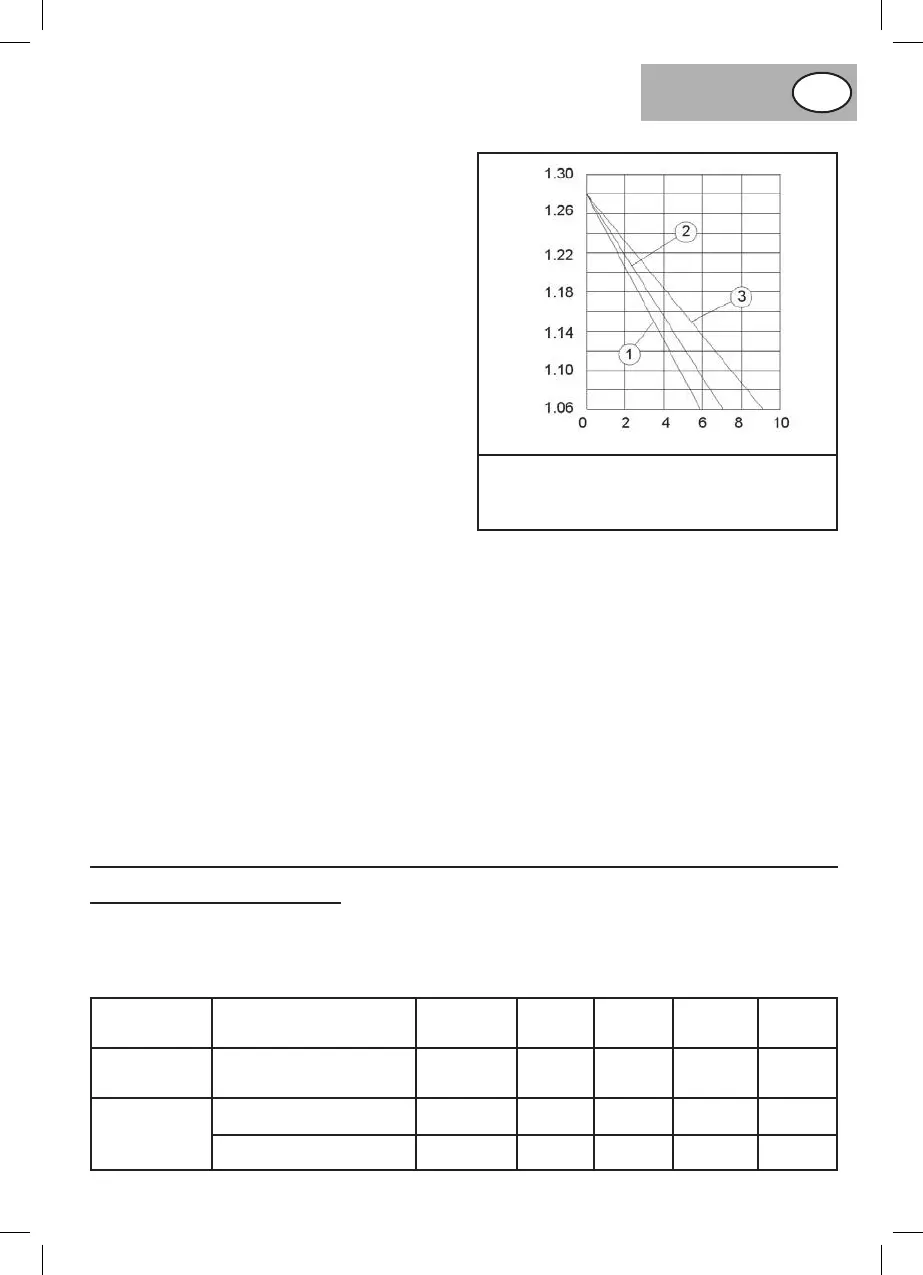
• Measure the specific gravity for the battery fluid by using the
hydrome
ter, and calculate the charging time in accordance
with the table shown on right side.
• The specific gravity for the fully charged battery shall be
within 1.26 to 1.28.
(b) Connect the DC output socket and to the battery terminals
using the charging leadsMake sure that the leads are
connected the correct way round (+) and (-) polarity.
(c) The DC circuit breaker should to be set to the «ON»
position.
3 - STOPPING THE ENGINE (PIC. 14)
1. Turn off the power to the electric equipment or unplug the
mains lead from socket of the generator. Turn the AC switch
to «OFF».
2. Turn the engine switch to «OFF».
3. Turn the fuel cock lever to «OFF».
SPECIFIC GRAVITY AND CHARGING TIME CHART
Specific gravity
BATTERY CAPACITY
1. 30AH 20 HR
2. 35AH 20 HR
3. 47AH 20 HR
Charging time (Hours)
5 - PERIODIC MAINTENANCE
1) MAINTENANCE CHART
Regular maintenance is important for the best performance and safe operation.
Warning: Use protective gloves for the following operations.
ITEM REMARKS
Pre -
operation
check (daily)
Initial
1 month
or 20 Hr
Every
3 months
or 50Hr
Every
6 months
or 100Hr
Every
12 months
or 300Hr
Spark Plug
Check condition adjust gap and
clean.
Replace if necessary.
•
Engine Oil
Check oil level
•
Replace
• •