31
GB
Thetiltinghandleisusedtotiltthebladeforbevelcutting.Turn
the handle clockwise to tilt toward the left, and counter clockwise
totilttowardtheright.
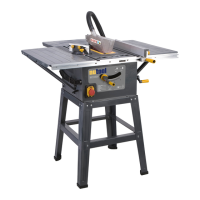
THE LOCKING KNOB. (PIC. 29)
The locking knob is used to lock the required blade height and tilt
positions.Toloosenthelockingknobturnitcounterclockwise.
Beforeturningthetablesaw“ON”,besurethatthelockingknob
is securely tightened so that the blade will not shift during the
tablesawoperation.
THE RIVING KNIFE. (SEE SPECIFIC SAFETY
INSTRUCTIONS FOR CORRECT SETTING)
The riving knife ensures that when a cut is made the two pieces
of timber on either side of the blade do not close up onto the
blade.Thispreventspossiblebindingandkickback.
THE RIP FENCE. (PIC. 30)
The rip fence is used to guide the material when making long
cuts,usuallycuttingalongthegrainNEVERripfreehandwithout
thefenceinplaceandsecurelylocked.
THE MITRE GAUGE. (PIC. 31)
The mitre gauge is typically used to guide the work piece when
crosscutting(acrossthegrain)andcanbesettocutatvarious
angles.Itcanbeusedineitherofthegroovesmachinedinthe
table.Alwaysensurethatitislockedsecurelywheninuse.
CROSS CUTTING (PIC. 32)
Crosscuttingiscuttingwoodacrossthegrainat90°orsquare
withboththeedgeandtheflatsideofthewood.
MITRE CROSS CUTTING (PIC. 33)
Mitre crosscutting is cutting the wood at an angle other than
90°withtheedgeofthewood.Followthesameproceduresas
youwouldforcrosscutting.Butadjustthemitregaugetothe
desiredangle.
BEVEL CROSS CUTTING (PIC. 34)
Bevel cross cutting is the same as cross cutting except that the
woodisalsocutatanangleotherthanat90°withtheflatside
ofthewood.Followthesameproceduresasyouwouldforcross
cutting.Butadjustthebladetothedesiredangle.Usethemitre
gauge in the groove to the right of the blade to avoid the blade
guardfrominterferingwiththecut.
WARNING!
When cross cutting, mitre cutting, bevel cutting and when
rabbeting across the end of a narrow work piece always use the
mitregauge.NEVERmakethesecutsfreehand(notusingthe
mitregaugeortheotherdevices)becausethebladecouldbind
causing a kickback or causing your hand or fingers to contact
theblade.
ALWAYS lock the mitre gauge when in use. Remove the rip
fence from the table when not in use. Make sure the blade
safetyguardismountedforallthroughsawingoperations(the
bladecutsthroughtheentirethicknessoftheworkpiece).The
bladeshouldextendapproximately3.5mm(1/8”)abovethetop
oftheworkpiece.
COMPOUND MITRE CUTTING (PIC. 35)
Compound mitre cutting is a combination of mitre cutting and
bevelcrosscutting.Thecutismadeatanangleotherthan90°
toboththeedgeandtheflatsideofthewood.Adjustthemitre
gauge and the blade to the desired angle and be sure that the
mitre gauge is locked
REPETITIVE CUTTING (PIC. 36)
Repetitivecuttingiscuttinganumberofpiecesthesamelength,
withouthavingto markeachpiece.The safeway toperform
repetitive cutting, is to set the rip fence to give the required
length, and to be clear of the front of the blade (Pic. 36).When
the cut is made, the end of the work piece is clear of the rip
fencebutattherequiredlength.
NEVERusetheripfenceasalengthstopbecausethecutoff
piece could bind between the fence and the blade causing a
kickback.
USING THE RIP FENCE (PIC. 37)
Ripping, bevel ripping, and rabbeting are done using the rip
fence.
RIPPING
Rippingiscuttingapieceofwoodwiththegrainorlengthwise
(Pic. 37).Thisisdoneusingtheripfence.Positiontheripfence
tothedesiredwidthoftheripandlockitinplace.Beforestarting
to rip be sure that the rip fence is parallel to the saw blade, and
thattherivingknifeisproperlyalignedwiththesawblade.When
rippinglongboardsorlargepanelsalwaysuseaworksupport.
Hold the piece against the fence and feed it through the blade
withasmooth,steadypressure.Whentherippingwidthiswider
than150mm(6”)useyourrighthandtofeedtheworkpieceuntil
itisclearofthetable.Useyourlefthandonlytoguide,notto
feedtheworkpiece.
BEVEL CUTTING. (PIC. 38)
Whenbevelrippingmaterial150mm(6”)ornarrowerusethe
fence on the right side of the blade only (Pic. 38).
BLADE REPLACEMENT (PIC. 39)
Removethebladeguardandthetableinsert(Pic. 39.1)After
fully releasing the lock handle, turn the elevating handle in
clockwise direction to raise the blade to its highest position.
Removethebladefixingnutandtheouterflangeandremove
the blade (Pic.39.2).Ensurethatthemotorshaft,blademounting
arbour, inner and outer flanges and the securing nut are clean
andfreefromsawdustbuildup.Fitthenewblade(Besurethat
the teeth are facing downwards when viewed from the front
ofthe machine).Ensurethatthe flangesareclean andfitted
thecorrectwayround.Securethebladeinplacebyusingthe
securing nut (Pic.39.3) Re-fitthetableinsertandsecureinplace
withthecrossheadscrews.Re-fitthebladeguardensuringthat
itoperatescorrectly.Checkthealignmentoftherivingknifeas
detailedinthespecificsafetyinstructions.Beforeswitchingthe
table saw ON, make sure the blade guard is correctly installed
 Loading...