EasyManua.ls Logo

NuWave Oven Pro Plus - User Manual

NuWave Oven Pro Plus
12 pages
Print Icon
To Next Page IconTo Next Page
Loading...
10
Connecting Power Head to Dome
Assembling the Full NuWave Oven
NuWave
®
Oven Pro Plus
Assembly Guide
Lock
1. Place Power Head on rim of the Dome
2. Lock it into place by rotating the Power
Head clockwise until the locking lugs
are engaged.
Place Base Tray on a firm, stable
surface, but never on a stovetop.
Place Liner Pan inside Base Tray. When
doing so, make sure the handles are
in the dropped down position. If the
handles are not fully dropped, the Dome
may not fit over the Base properly.
Place dual level Cooking Rack in
the Liner Pan according to cooking
requirements.
Place food on Rack.
Place Dome with Power Head over food,
connecting to the Base Tray. The Dome
should fit evenly onto the Base.
Set cook time and temperature
according to recipe requirements.
BEFORE USING:
Prior to the first use of your NuWave Oven,
wash Dome, Liner Pan, Base, and Cooking
Rack in warm soapy water or run through a
dishwasher cycle.
IMPORTANT - Do not wash or immerse Power
Head in water or cycle through dishwasher. The
outer surface may be cleaned by wiping carefully
with a damp dishcloth or sponge.
Owner’s Manual
Question and Answer IconNeed help?

Do you have a question about the NuWave Oven Pro Plus and is the answer not in the manual?

Summary

Connecting Power Head to Dome

Assembling the Full NuWave Oven

Before Using

How to Install and Use Dome Holder

Cooking Instructions

Oven Safety Caution

General Use Instructions

Directions for the NuWave Oven Pro Plus

Control Panel Functions

Explains the control panel, quick start, start cooking, and pause/clear functions.

F;C Temperature Conversion

Cook Time Function

Cook Temperature Function

Cleaning and Care Instructions

Manufacturers Warranty Information

Obtaining Service and Warranty Claims

How to Use Pizza Flipper & Liner

Overview

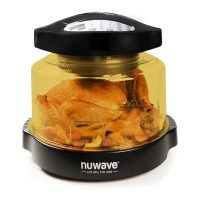
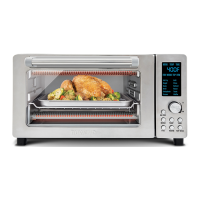
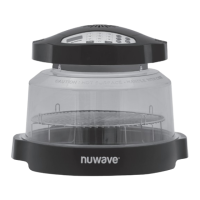
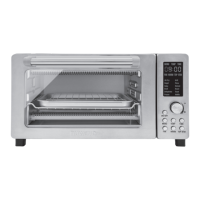
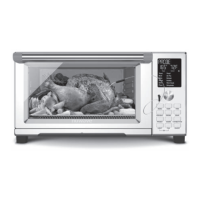
The NuWave Oven Pro Plus is an infrared cooking system designed for household use, offering a versatile and efficient way to prepare a variety of foods. Its primary function is to cook food using infrared technology, which allows for multi-level cooking and the preparation of oversized items when used with an extender ring.

Function Description:

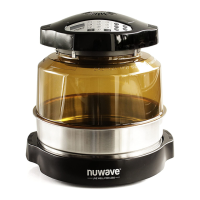
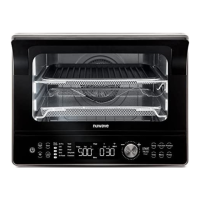
The NuWave Oven Pro Plus utilizes infrared cooking technology to prepare meals. It consists of a Power Head, Dome, Liner Pan, Base Tray, and Cooking Rack. The Power Head, which contains the heating element, is designed to be securely locked onto the Dome. The Dome, made of a transparent material, allows for visual monitoring of the cooking process. The Liner Pan sits within the Base Tray and holds the cooking rack and food. The dual-level Cooking Rack allows for different foods to be cooked simultaneously or for varying cooking heights. The oven can be programmed for specific cook times and temperatures, with a default temperature of 350°F (177°C). It also offers functions for reheating and keeping food warm. The unit is designed to stop cooking automatically once the set time has expired, signaling with a beep.

Usage Features:

  • Assembly: To assemble the NuWave Oven, first place the Base Tray on a firm, stable surface (never a stovetop). Insert the Liner Pan into the Base Tray, ensuring its handles are in the dropped position for proper Dome fit. Place the dual-level Cooking Rack in the Liner Pan according to cooking requirements, then place food on the rack. Finally, position the Dome with the Power Head over the food, connecting it to the Base Tray so it fits evenly. The Power Head is connected to the Dome by placing it on the rim and rotating it clockwise until the locking lugs engage.
  • Control Panel: The control panel features buttons for Cook Temp, Delay, Reheat, Warm, Pause/Clear, Cook Time, and Start, along with a numeric keypad. When the program is clear, "0" appears on the LCD display.
  • Quick Start: To begin cooking quickly, press the Cook Time button, enter the desired time, and then press Start. The oven defaults to 350°F (177°C). If a different temperature is needed, the Cook Temp button must be used.
  • Setting Temperature and Time: To set a specific temperature and time, press Cook Temp, select the desired temperature (adjustable by 1 degree within the range of 100°F/38°C to 350°F/177°C), then press Cook Time, enter the desired time, and press Start. The remaining cooking time will be displayed, and a colon symbol will blink. The oven will automatically stop cooking when the time expires.
  • Pause/Clear Cooking: Pressing Pause/Clear once will pause the oven, with the remaining time displayed but not blinking. Pressing it twice will stop and clear the cooking function, returning the display to "0".
  • °F/°C Conversion: To switch between Fahrenheit and Celsius, press and hold Cook Temp for 3 seconds. The display will show "350" and "TEMP" flashing. Press "0" to toggle between °F and °C. The selected setting becomes the default until changed again.
  • Delay Function: After setting temperature and time, the cooking process can be delayed. Press Delay, input the desired delay time (up to 9 hours and 59 minutes), and press Start. The oven will beep when the delay countdown reaches 0 and cooking begins.
  • Reheat Function: This function is preset to 350°F (177°C) for 4 minutes, ideal for reheating single-portion foods. To activate, ensure programming is clear (display shows "0"), press Reheat, then Start.
  • Warm Function: After cooking, the oven can keep food warm at a default of 155°F for 2 hours. This function is always the last to operate. The warm time can be adjusted up to 9 hours and 59 minutes by pressing Warm and entering the desired time.
  • Extender Ring (Optional): If included, the 3-inch Extender Ring increases cooking space by approximately 440 cubic inches, allowing for multi-level cooking or larger food items (e.g., hams or turkeys over 10 pounds). It is placed between the Dome and the Base, ensuring a snug fit.
  • Cooking Rack Usage: Foods requiring longer cooking times should be placed on the rack closest to the heating element (e.g., potatoes, carrots), while softer vegetables can go on lower racks. When multi-level cooking, combine foods that have similar preparation times. If top layer foods finish earlier, they can be removed, and bottom foods can continue cooking. Shallow or oven-safe dishes are recommended.
  • Resting Food: For best results, especially with meats, poultry, and fish, remove food immediately after cooking and let it rest, loosely covered with foil, on a plate or platter. This allows juices to redistribute, ensuring moist and tender results. Roasts and whole chickens should rest 15-30 minutes, while steaks, chops, and chicken breasts need at least 5 minutes. A general rule is 1 minute of rest for every 3.5 oz of food.
  • Dome Holder (Optional): The Dome Holder provides a convenient way to store the Power Head and Dome assembly when not in use or when checking food. To use, ensure the Power Head is locked onto the Dome. Place the Dome Holder under either side of the Base handle, ensuring both feet are inside the handle and it rests horizontally on a flat surface. Then, place the assembled Power Head and Dome at a 45° angle on the holder. Avoid leaving the Dome in the holder for extended periods.
  • Pizza Kit (Optional): The NuWave Supreme Pizza Kit includes a Pizza Server, Bamboo Cutting Board, Pizza Flipper, and Silicone Pizza Liner. The Pizza Liner is used to cook pizza crusts upside down on the 3-inch rack at 350°F until light brown, then flipped using the Pizza Flipper to cook cheese and toppings.

Maintenance Features:

  • Cleaning: Before first use, wash the Dome, Liner Pan, Base, and Cooking Rack in warm soapy water or run them through a dishwasher. After each use, unplug the unit before cleaning. The Dome and all other parts, except the Power Head, are dishwasher safe.
  • Power Head Care: The Power Head should NEVER be washed or immersed in water, nor cycled through a dishwasher. Its outer surface can be cleaned by wiping carefully with a damp dishcloth or sponge. Avoid abrasive cleaners or scouring pads on any metal or plastic surfaces.
  • Extender Ring Care: The Stainless Steel Extender Ring is dishwasher safe and should not be cleaned with harsh abrasives.
  • Pizza Kit Care: The Pizza Flipper, Pizza Liner, Pizza Server, and Bamboo Cutting Board should be washed with mild soap and water. Do not use harsh abrasives. Allow utensils to dry completely before storing.
  • General Precautions: Do not place the Pro Plus or its parts directly on a stovetop, inside a conventional oven, or in contact with other direct heat sources. Ensure the unit is plugged into a properly grounded outlet and the cord does not touch heated objects. Always ensure the Liner Pan is properly placed within the Base. Metal, glass, or silicone dishes and pans, and other oven-safe materials can be used. Always replace the Dome back onto the Base when finished cooking. Moisture may accumulate inside the Dome if food is not promptly removed after cooking; prompt removal helps avoid steam/moisture buildup. Do not rest the Dome in the Dome Holder for extended periods to prevent warping; always replace it on the Base Tray promptly after removing food.

NuWave Oven Pro Plus Specifications

General IconGeneral
Power1500 Watts
Cooking Rack HeightAdjustable
Control TypeDigital
Dishwasher Safe PartsYes
Cooking TechnologyInfrared, Convection, Conduction
Cooking ModesBake, Broil, Roast, Grill, Air Fry, Dehydrate
Warranty1 year

Related product manuals