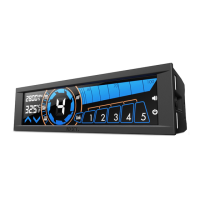
Temperature alarm : Make sure you are notified when your system is overheating
Calendar System: Big letters show you time, date and day of the week
Setting up the Sentry LX
Before installing the Sentry LX into your system, please first install the provided battery into the back of the Sentry
LX. The battery stores the data and settings for the Sentry LX.
Installing the Sentry LX
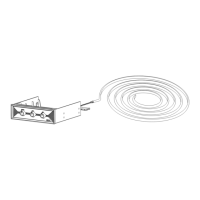
The Sentry LX requires dual 5.25” bays, simply slide the panel in from the front of your chassis and secure the device
via screw less mechanisms or screw. A 4pin power connection is needed to power the Sentry LX, be sure to make
this connection before booting up your system.
Setting up the fans and probes
Sentry LX can support up to 5 fans, please make sure the fans on your chassis come with 3pin connections. The
Sentry LX also comes with 5 temperature probes.
1. Make sure your system is off before making any connections.
2. Connect the 3pin connection on the Sentry LX to the fans on your chassis
3. Note the stickers on the 3pin connections correspond to the number on the meter display
It is recommended that the user tape the temperature probes near the corresponding fans (i.e. Fan 1 is near Temp 1
probe), this optimizes the Auto mode where the fan is automatically controlled.
Auto/Manual Fan Speed Settings
The Sentry LX controls fans in two modes, pushing the “MODE” button changes between these two:
Automatic Mode: The Sentry LX will adjust the fan speed according to the temperature in your system; this is the
best for users who are looking to operate without hassle.
Manual Mode: The Sentry LX gives the users the option to control individual fans and save the settings to memory.
Please follow the instructions below.
1. Press the “Fan Select” button to initiate fan settings. Pushing the “Fan Select” button continuously will scroll
through the connections on the meter.
2. Push the “Up and Down Arrows” to adjust the fan speed, note that doing this will set the meter into Manual
mode. The fan speed range that can be adjusted is automatically detected by the fan controller. Setting a fan to
0 RPM results in turning off the fan. Due to information being passed between the meter and the fan, please
allow up to 1 minute for fans to adjust to the RPM.
3. The Sentry LX will exit the “Fan Select” mode at after idling or at the end of the “Fan Select” scroll.
Temperature Alarm Settings
The Sentry LX allows for alarm setting for temperatures, the default is set at 70C, these settings will be saved. A
sound alarm will go off if the temperature detected rises above the set temperature. Please follow the directions
below:
1. Press and hold the triangular “Down Arrow Key” to initiate temperature alarm setting.
2. Pushing the “SET” button to scroll through the temperature settings for the 5 probes.
3. Use the “Up and Down Arrows” to adjust the temperatures.
4. The Sentry LX will exit the temperature alarm setting mode at after idling or at the end of the “SET” button scroll.
Date, Time, Mode and Alarm Off Setting
In this mode the date, temperature alarm on/off, time, can be adjust.
Please follow the directions below: