EasyManua.ls Logo

OFM ORO100 - User Manual

OFM ORO100
3 pages
Print Icon
To Next Page IconTo Next Page
Loading...
Product Web Page & Video
Assembly Notes:
During assembly, hand tighten screws only. When all screws
are in place, you may then tighten all screws completely.
CAUTION:
1. Do not use this chair as a step ladder.
2. Check for loose screws and tighten them every 6 months.
Model ORO100 Executive High-Back Body Bolster Multi-Task Chair
WEIGHT CAPACITY: 350 lbs.
Parts Listing
919-362-4765 (fax)
www.ofminc.com
161 Tradition Trail, Holly Springs, NC, 27540
800-520-7471 (voice)
919-303-6389 (voice)
support@ofminc.com
05.29.2013
G
Gas Lift
1 Unit
H
Telescopic Bellows
1 Unit
I
0.75” Screws
10 Units
J
1.25” Screws
2 Units
Allen Wrench
1 Unit
K
Arm Caps
8 Units
L
1
H
G
2
B
3
4
B
E
I
6
A
5
L
I
J
K
B
F
D
F
Seat Mechanism
1 Unit
E
Chair Arms
2 Units
E
I
E
C
D
Casters
5 Units
C
Chair Base
1 Unit
A
Chair Back
1 Unit
B
Chair Seat
1 Unit
STOP
Assembly Instructions
Tools Needed: Allen Wrench - included
Please read all instructions before assembly.
Step 1: Insert Casters (D) into Chair Base (C). Insert Gas Lift (G) into Chair
Base (C) and cover with Telescopic Bellows (H).
Step 2: Attach Seat Mechanism (F) to the Chair Seat (B) with .75” Screws (I) at
back of seat and 1.25” Screws (J) at front of seat, using the Allen
Wrench (K) that is provided. Tension control knob should face front.
Step 3: Attach Chair Seat (B) to Chair Base (C) by inserting the top of the Gas Lift (G)
into the center hole of the Seat Mechanism (F), and press down firmly to secure.
Step 4: Attach Chair Arms (E) to Chair Seat (B) using .75” Screws (I) and Allen Wrench (K).
The tablet arm goes on the right side.
Step 5: Attach Chair Back (A) to Chair Arms (E) using .75” Screws (I) and Allen Wrench (K).
Step 6: Cover screw holes with Arm Caps (L).
front
Question and Answer IconNeed help?

Do you have a question about the OFM ORO100 and is the answer not in the manual?

Summary

Assembly Instructions

Step 1: Insert Casters and Gas Lift

Insert casters into the chair base and cover the gas lift with bellows.

Step 2: Attach Seat Mechanism

Attach the seat mechanism to the chair seat using screws.

Step 3: Connect Seat to Base

Insert the gas lift into the seat mechanism on the chair base.

Step 4: Attach Chair Arms

Attach chair arms to the chair seat using screws.

Step 5: Attach Chair Back

Attach the chair back to the chair arms using screws.

Step 6: Install Arm Caps

Cover screw holes with provided arm caps.

Open Tablet Arm Operation

Step 1: Extend Tablet Outward

Pull the tablet outward 180° from its tucked position.

Step 2: Rotate Tablet 270°

Lift and rotate the tablet counter-clockwise 270°.

Step 3: Release Tablet Lock

Push the tablet lock/release button to allow rotation.

Step 4: Final Tablet Positioning

Pull tablet 90° and adjust its distance from the body.

Close Tablet Arm Operation

Step 1: Rotate Tablet 90° Clockwise

Press the lock button and rotate the tablet clockwise 90°.

Step 2: Rotate Tablet 270° Clockwise

Lift and rotate the tablet clockwise 270°.

Step 3: Tablet Ready for Tuck

Tablet is now straight out and ready to be tucked away.

Step 4: Return Tablet to Tucked Position

Pull tablet 180° towards the chair arm to return to tucked position.
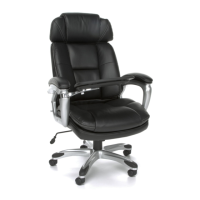
OFM ORO100 Specifications

General IconGeneral
Product NameOFM ORO100
CategoryIndoor Furnishing
TypeOffice Chair
ColorBlack
Adjustable HeightYes
Tilt MechanismYes
ArmrestsYes
WheelsYes
Wheel TypeCaster
MaterialMesh

Related product manuals