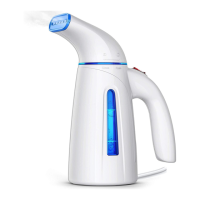
This document is a user manual for the HL6-steamer, a garment steamer designed for clothes.
Function Description
The HL6-steamer is a handheld garment steamer used to smooth wrinkles and creases from fabrics using steam. It is designed for household use and is not intended for industrial purposes. The device produces hot, pressurized steam to remove wrinkles from garments.
Important Technical Specifications
- Unit Weight (Bare): 0.568 kg
- Water Tank Capacity: 240 ml
- Steam Output Time: Approximately 130 seconds
- Steam Duration: 14-18 minutes
- Voltage: 110-120V, 50/60Hz
- Wattage: 700W
Usage Features
Safety Features:
- Automatic Shut-down: The steamer automatically shuts down if it gets too hot or if the water runs out, ensuring safety and preventing burning without water.
- Contact with Hot Water: Users are advised to check the appliance before each use by holding it away from the body and operating the steam button to reduce the risk of contact with hot water emitting from steam vents.
- Upright Use: Always hold the unit upright and do not fill past the Max mark to avoid burns from splashing water.
- Tilted Angle: Use with extreme caution with a tilted angle not more than 35 degrees in any direction to avoid excess water spilling from the steam head.
- Direction of Steam: Always hold the unit away from the body and do not aim at people or animals.
- Blocked Steam Opening: Do not operate the appliance if the steam opening is blocked.
Operating Instructions:
- Filling the Water Tank:
- Ensure the garment steamer is unplugged and cooled before refilling.
- Place the steamer on a flat, stable surface.
- Hold the handle and twist the nozzle section clockwise to release it.
- Fill the water tank with clean water, distilled, or de-mineralized water up to the MAX mark. Do not overfill.
- Replace the nozzle and twist to secure it into place.
- Caution: After each use, allow the unit to cool for 14-18 minutes before adding cold water; adding cold water to a hot boiler may cause hot water and steam to shoot from the fill hole.
- Attaching Accessories:
- Ensure the unit is turned off and no steam emits from the nozzle.
- Choose the required attachment (e.g., Fabric Brush) and slide it onto the steam nozzle.
- Ensure the holes on the steam nozzle are aligned with the open slots on the accessories so that steam does not get blocked.
- Caution: Do not attach accessories to the nozzle whilst steam is emitting to avoid burns.
- Steaming Linens and Fabrics:
- Ensure the water tank is filled and the desired accessory is connected.
- Plug the unit into the mains power supply and switch it On (if switchable).
- Steam will emit from the nozzle after approximately 130 seconds.
- Direct the steam nozzle with an accessory towards the material to be steamed.
- Keep the flow of steam focused on the material.
- Use a slight back and forth motion over the area to enhance the process.
- Caution: Always ensure the steam nozzle and any attachments are pointed in a safe direction away from the user, other people, and animals when steam is being emitted.
- Steaming Garments:
- Place the garment on a clean, rust-free hanger.
- Direct the steam nozzle towards the bottom of the garment.
- Steam will rise on both the inside and outside of the fabric, removing wrinkles and creases.
- Slowly slide the steam nozzle upwards from the bottom to the top of the garment.
- Direct the steam nozzle away from the garment and smooth the fabric with your free hand.
- Repeat as necessary until the garment is crease-free.
Troubleshooting:
- Unit fails to heat:
- Possible Reasons: Not plugged in, switch not activated.
- Solution: Plug into mains power supply, press On/Off switch.
- Unit heats up but fails to steam:
- Possible Reasons: Water tank empty, mineral build-up, thermo-fuse breakdown.
- Solution: Refill water tank, follow mineral build-up guide, take to certified service center.
- Steam output is intermittent:
- Possible Reason: Mineral build-up in unit.
- Solution: It is normal for the unit to stop steaming periodically for a few seconds. If the steam remains off for longer periods, follow the mineral build-up guide.
Maintenance Features
Cleaning and Dirt Removal (after period usage):
- Use a solution of clean water and vinegar, citric acid, or lemon juice.
- Pour the solution inside the steamer and boil it for 3-5 minutes.
- Pour off the water.
- Finally, pour clean water and boil for another 2-3 minutes to remove any unwanted dirt or precipitant, extending the life of the steamer.
Removing Mineral Build-Up:
- Recommendation: Use distilled or de-mineralized water to avoid mineral build-up.
- Procedure (if build-up occurs):
- Unplug the unit and allow it to cool completely (at least 60 minutes).
- Remove all accessories.
- Remove the water tank cap and drain any remaining water.
- Slowly pour the cleaning mixture (e.g., vinegar solution) into the water tank.
- Allow the unit to stand for 1-2 hours.
- Drain the solution from the water tank.
- If mineral build-up remains, repeat the steps until it is removed.
- Rinse the water tank with fresh water, drain, and repeat until the vinegar odor is eradicated.
- Replace the water tank cap.
Storage:
- Unplug the power cord from the mains power supply.
- Allow the unit to cool thoroughly (at least 60 minutes).
- Remove all attachments.
- Drain the remaining water from the water tank to minimize potential mineral build-up.
- Loosely replace the water tank cap; do not tighten it as it may be difficult to unscrew for future use.
- Store all accessories with the unit in a dry, cool location.