44
AURORA
EN
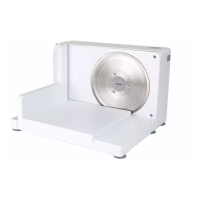
APPLIANCE DESCRIPTION (Fig.A)
1) Feet
2) Motor body
3) Blade
4) Blade hooking/releasing screw
5) Releasable surface
6) Sliding carriage
7) Food presser
8) Finger protection
9) Cut thickness adjustment plate
Commands
10) Switching on/o button
11) Switching on unlocking button
12) Cutting thickness control knob
- - - - - - - - - - - - - - - -
13) Rating label
REMOVAL/INSTALLATION OF COMPONENTS
The blade is very sharp, manipulate it carefully.
Before installing or removing the blade from the apparatus,
disconnect the plug from the socket.
• Positionthesliceronaworksurface.
• Completelyopenthereleasablesurface(5)fromthemotorbody(2)makingsureall
the feet (1) lean on the work surface correctly. (Fig. B)
Make sure the work surface is levelled and stable.
• Assemblethengerguard(8)ontheslidingcarriage(6).(Fig. C)
• Pushthengerguard(8)downwardsuntilyouhearthehooking“click”.(Fig. C)
• Positiontheslidingcarriage(6)onthereleasablesurface(5).(Fig. D)
• Positionthefoodpusher(7)onthengerguard(8).(Fig. E)
• Theslicerisreadyforuse.
With the included blade can slice foods such as bread, meats, cheese, hams,
vegetables, etc.
Do not cut frozen food.
• Adjustthecuttingthickness,turningtheknob(12).(Fig. F)
• Thecuttingthicknessisadjustablefrom0to20mm.