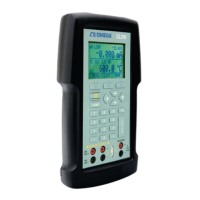
Note: The calibrator simulates a 2-wire RTD. To connect 3- or 4-wire
transmitter, use stacking cables, as shown in Figure 15.
4.9-1 Custom RTD
A custom curve-fit PRT may be entered into the calibrator for
sourcing and measuring. To do so follow these steps:
1. Switch to lower display. Select RTD and set sensor type to
CUSTOM.
2. Enter the RTD custom setup main menu, and select [SET
CUSTOM].
3. Using the keypad, enter the values that the calibrator
prompts for: minimum temperature, maximum
temperature, R0, and the values for each of the
temperature coefficients.
The custom function uses the Calendar-Van Dusen equation for
outputting and measuring custom RTDs. The coefficient C is only
used for temperatures below 0°C. Only A and B coefficients are
needed for the range above 0°C, so coefficient C should be set
to 0. The R0 is the resistance of the probe at 0°C. The
coefficients for PT385, PT3926, and PT3616 are shown in Table 4
below.
Table 4. RTD Coefficients
RTD Range(°C) R0 Coefficient A Coefficient B Coefficient C
PT385 -260 - 0 100 3.9083x10⁻³ -5.775x10⁻⁷ -4.183x10⁻¹²
PT385 0 - 630 100 3.9083x10⁻³ -5.775x10⁻⁷ ---
PT3926 Below 0 100 3.9848x10⁻³ -5.87x10⁻⁷ -4x10-12
PT3926 Above 0 100 3.9848x10⁻³ -5.87x10⁻⁷ ---
PT3916 Below 0 100 3.9692x10⁻³ -5.8495x10⁻⁷ -4.2325x10⁻¹²
PT3916 Above 0 100 3.9692x10⁻³ -5.8495x10⁻⁷ ---
23