10007125.DOC
17/20
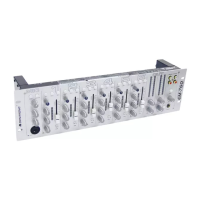
Rearpanel
3
R
21
3
L
2
1
2
MASTER OUTPUT
1
NO MIC MONO
REC
BOOTH
BOOTH
REC
WITH MIC
STEREO
3
R
R
R
1
2
3
L
L
L
1
LINE 5
LINE 5
MIC 4
LINE 7
LINE 7
LINE 9
LINE 9
MASTER 2 OUTPUT
MASTER 2 OUTPUT
MASTER 2 OUTPUT
CH-4
CH-4
CH-5
CH-5
CH-6
CH-6
PHONO 1
AUX
PHONO 2
AUX
PHONO 2
AUX
PHONO 1
AUX
PHONO 3
AUX
PHONO 3
AUX
LINE 3LINE 4
LINE 4
MIC 3
LINE 3
MIC 2
LINE 6
LINE 6
LINE 8
LINE 8
LINE 2
LINE 2
MIC 1
LINE 1
LINE 1
CH-3
CH-3CH-2
CH-2
CH-1
CH-1
OMNITRONIC SHOWEQUIPMENT GmbH, GERMANY
Type: OMNITRONIC EM-760
Power supply: 15x2 V AC, 50 Hz
Power consumption: 35 W
Fuse: F 1.5 A, 230 V
~
AUXAUXAUX
PHONO
PHONO
PHONO
GNDGNDGND
MIC LEVELMIC LEVELMIC LEVELMIC LEVEL
MIC LEVEL
LINE LEVELLINE LEVELLINE LEVELLINE LEVELLINE LEVEL
MIC LEV
LINE LEVEL
MIC 1
MIC 2
MIC 3MIC 4
MIC 5
MIC 6
CAUTION
CAUTION
!
!
Vor Gebrauch Anleitung lesen. Gerät vorFeuchtigkeit schützen! Vor Sicherungswechsel
vom Netz trennen! Nur Sicherungen mit gleichen Leistungswerten einsetzen.
Niemals das Gerät öffnen! Im Geräteinnern befinden sich keine zu wartenden Teile.
Wartungs- und Servicearbeiten nur durch autorisierten Fachhandel!
Read user manual before use. Keep away from moisture! Disconnect from mains
before changing fuse. Replace the fuse only with the same type and rating.
Never open the housing! There are no serviceable parts inside the device.
Maintenance and service operations only by authorized dealers.
Lire le mode d'emploi avant l'utilisation. Ne pas exposer à l'humidité. Débrancheravant
de remplacer le fusible. Utiliser un fusible de rechange de même type. Ne jamais ouvrir
le boîtier! L'intérieurde l'appareil ne contient pas de par ties nécessitant
un entretien. L'entretien et les réparations seulement par un revendeur autorisé!
AC INPUT
~15Vx2/1.5A
11036466
1112
1 2 3 4 5 6 7
8910
13
14
1. POWER SWITCH
Press this button to start operating.
2. AC CONNECTION
Plug the power supply cable in here.
3. REC OUT
To connect your recording unit.
4. BOOTH-CONTROL
The EM-760 features a DJ BOOTH monitor system. Connect your monitor system with the BOOTH-sockets
on the rearpanel.
5. BALANCED MASTER OUT
Balanced output for the master signal.
6. LINE/PHONO INPUT-SOCKETS
Connect CD-players or Tape Decks connected with LINE input-sockets. Line level musical instruments with
stereo outputs such as Rhythm Machines or Samplers should also be connected with the LINE input-
sockets.
Connect your turntable with the PHONO input-sockets.
7. GND (GROUND TERMINAL)
Connect the ground lead of the turntable with this terminal. This helps to reduce humming and pop noises.
8. MIC / LINE LEVEL
9. MIC-SOCKET
You can connect microphones with XLR-plug or jack.
10. PHONO / LINE-SELECTOR
Used to switch the input sockets of CH-1 and CH-2 to Phono or Line.
11. AC VOLTAGE-SELECTOR
Make sure that the selector is properly set.
12. MASTER OUT
Output sockets for connecting your power amplifier.
13. STEREO/MONO-SWITCH
Used to set the master output to mono or stereo. If you connected a mono-signal via 1 RCA-socket, you can
switch the output signal to STEREO in order to have a stereo output signal.
14. REC WITH MIC/NO MIC