Adjustment, Without Load:
1.
Start engine and allow it to warm up. Push
in
on
governor mechanism to slow engine down to
about 400 to
500
rpm.
2.
Set idle adjustment screw for even operation
(SO
engine is firing on
all cylinders and running
smoothly).
3. Release governor mechanism to allow engine to
accelerate. Engine should accelerate evenly and
without a lag. If not, adjust needle outward about
1/2 turn and again slow down engine and release
governor mechanism. Continue until engine.
accelerates evenly and without a lag after releas-
ing governor.
With the carburetor and governor adjusted, and the
engine running with no load (Figure 23), allow 1/32-
inch clearance at stop pin to prevent excessive
hunting when a large load is suddenly removed.
Removal and
Disassembly:
..
1.
2.
3.
4.
5.
6.
7.
8.
Remove air housing door and top panel, fuel line,
governor linkage and electric choke wire.
Remove two carburetor mounting nuts and pull
off carburetor.
Remove air cleaner adapter and choke from
carburetor.
Remove main fuel adjustment needle (begin Spec
R)
,and float bowl nut and pull off the bowl.
Remove float pin and float.
Lift out float valve and unscrew its seat.
Remove no-load adjusting needle, load adjusting
needle (prior to Spec
R)
and spring.
Remove throttle plate screws and plate, and pull
out throttle shaft.
Remove choke plate screws and plate and pull out
choke shaft.
Cleaning and Repair:
Soak all components thorough-
ly in a carburetor cleaner, following the cleaner
manufacturer’s instructions. Clean all carbon from
the carburetor bore, especially in the area of the
throttle. Blow out the passages with compressed air.
If possible, avoid using wire to clean out the passages.
Check the adjusting needles and nozzle for damage.
If
the float is loaded with fuel or damaged, replace it.
The float should fit freely on its pin without binding.
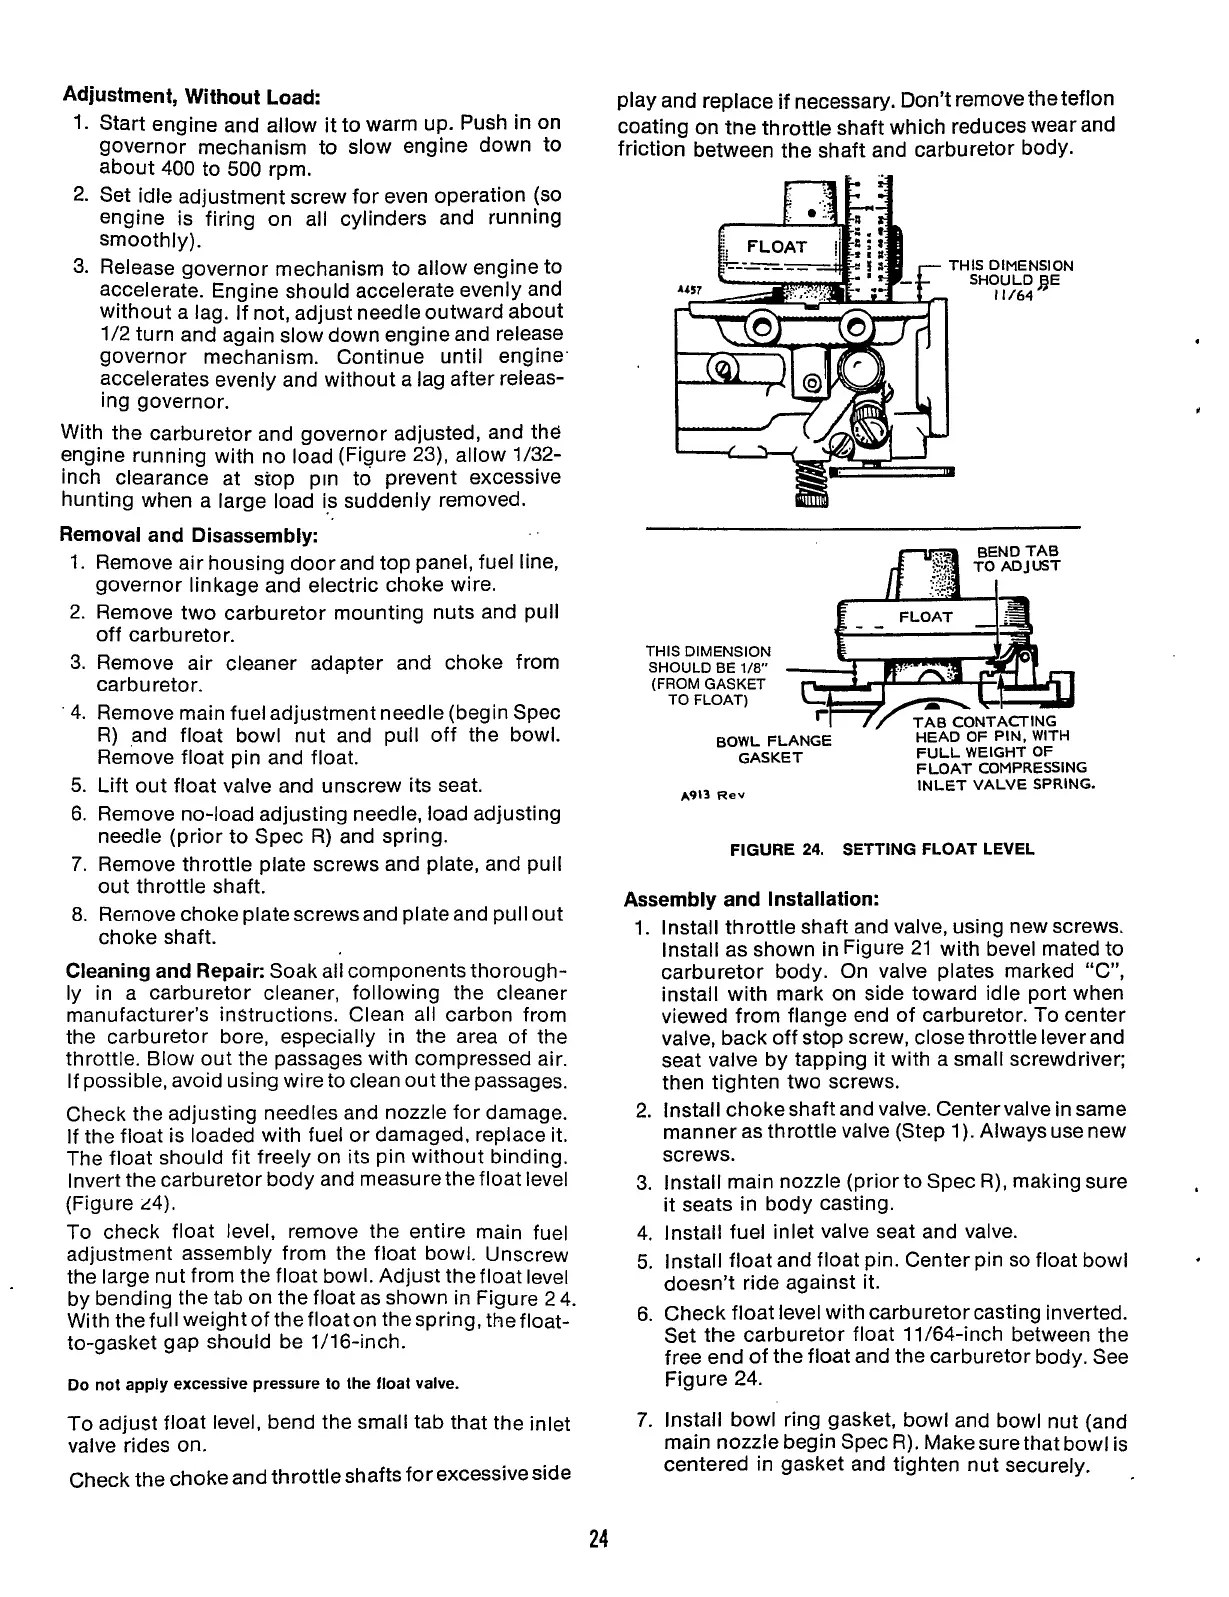
Invert the carburetor body and measure the float level
(Figure 14).
To
check float level, remove the entire main fuel
adjustment assembly from the float bowl. Unscrew
the large nut from the float bowl. Adjust thefloat level
by bending the tab on the float as shown
in
Figure 2 4.
With the full weight of the floaton thespring, thefloat-
to-gasket gap should be 1/16-inch.
Do
not apply excessive pressure
to
the float valve.
To
adjust float level, bend the small tab that the inlet
valve rides
on.
Check the choke and throttle shafts for excessive side
play and replace
if
necessary. Don’t remove the teflon
coating on tne throttle shaft which reduces wear and
friction between the shaft and carburetor body.
THIS OIMENSION
SHOULD
BE
11/64
THIS
DIMENSION
SHOULD
BE
1/8”
(FROM
GASKET
TO FLOAT)
HEAD
OF
PIN, WITH
FULL WEIGHT OF
FLOAT COMPRESSING
INLET VALVE SPRING.
BOWLFLANGE
GASKET
~91913
Rev
FIGURE
24.
SETTING FLOAT LEVEL
Assembly and Installation:
1.
2.
3.
4.
5.
6.
7.
Install throttle shaft and valve, using new screws.
Install as shown
in
Figure 21 with bevel mated to
carburetor body. On valve plates marked “C”,
install with mark on side toward idle port when
viewed from flange end of carburetor.
To
center
valve, back off stop screw, close throttle lever and
seat valve by tapping it with a small screwdriver;
then tighten two screws.
Install choke shaft and valve. Center valve
in
same
manner as throttle valve (Step 1). Always use new
screws.
Install main nozzle (prior to Spec
R),
making sure
it
seats in body casting.
Install fuel inlet valve seat and valve.
Install float and float pin. Center pin
so
float bowl
doesn’t ride against it.
Check float level with carburetor casting inverted.
Set the carburetor float 11164-inch between the
free end of the float and the carburetor body. See
Figure 24.
Install bowl ring gasket, bowl and bowl nut (and
main nozzle begin Spec
R).
Makesure that bowl is
centered
in
gasket and tighten nut securely.
24
Redistribution or publication of this document,
by any means, is strictly prohibited.