Do you have a question about the Onkyo P-304 and is the answer not in the manual?
Read, retain, heed, and follow all operating and safety instructions for safe use.
Proper placement regarding water, heat, ventilation, and power sources for safe operation.
Instructions on grounding, cord protection, cleaning, and non-use periods.
Important warnings about risk of shock, fire, and servicing requirements.
Instructions for cleaning the appliance's exterior panels with appropriate materials.
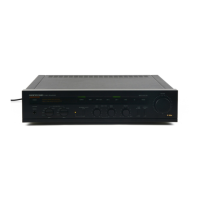
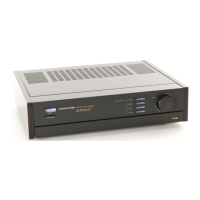
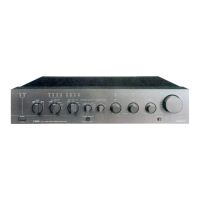
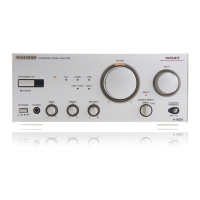
Turns the unit on/off; orange band lights when powered on.
Lights when the recording output switch is pressed for record/dubbing mode.
Turns output off (green band lights when ON); use for headphones or muting.
Selects desired program source; previously depressed switch comes up.
Adjusts volume level clockwise; marked in decibels for output/headphone.
Insert stereo headphone plug here and adjust volume.
Press to ON for recording/dubbing; indicator lights for signal to REC terminals.
Selects program sources for recording/dubbing from tape decks 1 and 2.
Emphasizes or attenuates bass by turning left or right of DEFEAT mark.
Emphasizes or attenuates treble; acts as high cut filter when fully left.
Adjusts relative volume levels of the left and right channels.
Changes output signal from stereo to mono.
Selects between MC and MM cartridges for turntables.
Read component manuals, confirm cable connections, secure plugs, handle cables carefully.
Turntable ground lead connection to amplifier GND terminal.
Keep pin-type cables away from power cords to prevent hum.
Rear AC outlets for audio components, not for high-heat appliances.
Outlet with 200W max capacity, not switched by front panel power.
Outlets with 700W max capacity, switched by front panel power.
Diagram illustrating connections for CD player, turntable, tuner, and tape decks.
Shows connection from P-304 to a power amplifier.
Shows connection of Left (L) and Right (R) speakers.
Connects the unit to AC power supply cord.
Note on setting voltage selector and output from AC outlets.
Do not plug in power cord until all connections are completed and checked.
Initial settings for front panel controls before operating.
How to select and listen to tape decks connected to TAPE-1 and TAPE-2.
Steps for setting recording source, output, and level.
Procedure for dubbing tapes from one deck to another.
Connecting external devices to TAPE terminals for signal routing.
Connecting decks and equalizers to TAPE terminals for signal processing.
Connecting tape deck and equalizer to TAPE terminals for recording.
Note on dubbing between decks via equalizer using LINE terminals.
How tone control effects gradually reduce with volume increase.
Diagram showing input, tape, and recording selector connections.
Check power cord connection to the wall socket.
Check power amplifier, speakers, and input/output cable connections.
Check ground lines, cables, speaker placement, and power transmitter proximity.
Verify cartridge selector setting (MC vs. MM) matches the cartridge type.
Details input sensitivity and impedance for various input types.
Specifies rated output levels and impedance for TAPE REC and OUTPUT.
Frequency response characteristics for CD, TUNER, LINE, and TAPE inputs.
Maximum overload levels for PHONO MM and MC inputs.
THD specifications for PHONO MM, PHONO MC, and other inputs.
IM distortion levels for CD, TUNER, LINE, and TAPE inputs.
SNR specifications for PHONO MC, PHONO MM, and CD inputs.
Specifications for Bass and Treble control ranges.
Details for HIGH CUT filter specifications.
Lists available input and output terminals.
Power supply voltage and frequency details for USA and worldwide models.
Physical dimensions and weight of the unit.
| Type | Stereo Preamplifier |
|---|---|
| Signal-to-Noise Ratio | 110dB (IHF-A) |
| Dimensions | 435 x 85 x 309 mm |
| Input Sensitivity | 150mV |
| Input Impedance | 50kΩ |