20
Each Air Beam is connected to the beams next to it by an AIR transfer hose which has an isolation valve on each end where
it connects to the AIR beam. Each AIR transfer hose has a spring inside it to protect it from kinks and bends that could
damage the hose or prevent air passing between the beams. We recommend regular inspection of the AIR transfer hoses
and isolation valves to ensure they are in good condition. You can find the AIR Transfer hoses by zipping open the semi-circle
zippers in the roof of your tent. Should you need to close off the valve, the back section is turnable. There are markings on the
valve to show which direction to turn for open and close. IMPORTANT! If you close off a valve, please remember to re-open it
before trying to re-inflate your tent to ensure air can reach each AIR beam.
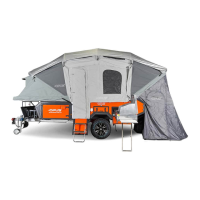
The AIR Beams are housed inside
two protective layers; an inner thick
protective layer and an outer layer
built into the main tent. You should
aim to keep the AIR beams enclosed
inside the layers unless you suspect
an issue with the air beam. Should you
need to access the AIR beam, ensure
that no part of the AIR beam is caught
in the zip when you close it back up.
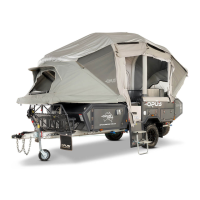
Your OP2 AIR tent is made of 9 connected AIR beams in the main tent (and 9 beams in the annex if you choose that
addition). The tent is inflated by the compressor that is mounted in the cabinet to the right of the door. The hose from
the AIR compressor is threaded up through the cabinetry to the main AIR tent inlet valve. The compressor is activated
by the button on the control panel, which also has a breaker switch should this be required. The air compressor is
preset to the optimum pressure of 6.5psi and will automatically shut off when the pressure in the AIR tent reaches this
pressure. Occasionally you may wish to adjust the psi to account for variations in outside air pressure (caused by altitude,
temperature and extreme wind).
Our recommendation is to first check the suitability of the air poles at the preset pressure. If you then decide you require
more or less pressure in the tubes the psi may be adjusted using the dial located on top of your compressor. Turn the dial
to increase or decrease the pressure as desired, however you must not increase the pressure over 9psi and we recommend
returning the pump back to 6.5 psi for normal camping.
Once your AIR tent is fully inflated and the compressor shuts off, please remove the hose from the valve and cap the valve.
This will stop any air leaking out around the compressor hose. Failure to remove the hose and cap the valve may result in
tent deflation.
AIR TENT
AIR TENT DESIGN