1
GB
CABLE FREE WEATHER
STATION
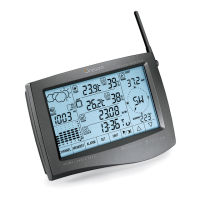
MODEL: WMR112 / WMR112U (UK VERSION)
USER’S MANUAL
SECTION 1 INTRODUCTION
Congratulations on your purchasing the WMR112/112U Cable
Free Weather Station. An all-purpose easy-to-use system, the
WMR112/112U lets you monitor the following weather elements:
- Air temperature
- Relative humidity
- Barometric pressure
- Wind speed and direction
- Rainfall
The WMR112/112U is also equipped with:
- RF calendar clock with daily alarm
- Weather forecast within 32 to 48 km (20- to 30-mile) radius
- Weather alarms
- Memory for maximum and minimum readings
- Touch-screen plus key button operation
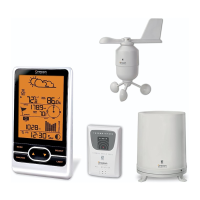
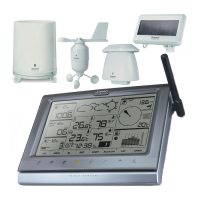
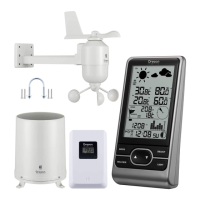
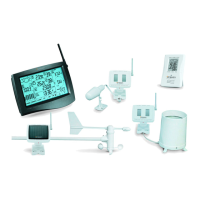
STANDARD PACKAGE
The original WMR112/112U comes complete with the following:
- Main unit (WMR112/112U)
- Anemometer (WGR918N)
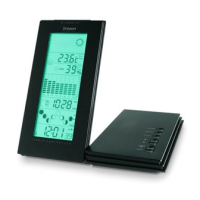
- Thermo-hygrometer (THGN228NX)
- Rain gauge (PCR918N)
- Baro-thermo-hygrometer (BTHR918N)
- 12V AC adapter
The rain gauge is powered by solar transmitter STR928 while the
anemometer is powered by solar transmitter STR938.
The WMR112/112U can support up to seven different remote
instruments. You can connect up to three optional thermo or
thermo-hygro sensors to the system.
Optional items include:
- Thermo-hygro sensor (THGR228N/THGR238N)
- Thermo sensor (THR228N/THR238N)
Contact an authorized dealer for optional items.
SECTION 2 INSTALLATION
The WMR112/112U operates at 433MHz. No wire installation is
required among units.
The WMR112/112U has an effective range of 100 meters in an open
area. Position the units within the range and be sure the transmission
path is clear of interference and obstacles.
Note: The anemometer, thermo-hygrometer and rain gauge should
be installed outdoors and in locations that best measure the weather
elements which the instruments are designed for. As for the baro-
thermo-hygrometer, it must be installed indoors. If you have any
optional thermo or thermo-hygro sensors, they can be installed
outdoors or indoors.
THE ANEMOMETER
The anemometer measures wind speed and direction.
To install it,
1. Unscrew the solar transmitter STR938.
2. Plug in the connector of WGR918N into the solar transmitter as
shown.
3. Secure the screws again.