EasyManua.ls Logo

Oregon Scientific WMR112A User Manual

Oregon Scientific WMR112A
7 pages
To Next Page IconTo Next Page
Page #1 background imageLoading...
Page #1 background image
1
GB
CABLE FREE WEATHER
STATION
MODEL: WMR112A
USER’S MANUAL
SECTION 1 INTRODUCTION
Congratulations on your purchasing the WMR112A Cable Free
Weather Station. An all-purpose easy-to-use system, the WMR112A
lets you monitor the following weather elements:
- Air temperature
- Relative humidity
- Barometric pressure
The WMR112A is also equipped with:
- RF calendar clock with daily alarm
- Weather forecast within 32 to 48 km (20- to 30-mile) radius
- Weather alarms
- Memory for maximum and minimum readings
- Touch-screen plus key button operation
PACKAGE
The original WMR112A includes the following:
- Main unit (WMR112A)
- Baro-thermo-hygrometer (BTHR968)
- Thermo-hygrometer (THGR268)
- 12V AC adapter
The WMR112A can support up to seven different remote instruments.
You can connect up to three optional thermo or thermo-hygro
sensors to the system.
Optional items include:
- Anemometer (WGR968)
- Rain gauge (RGR968)
- Thermo sensor (THR238/THC268)
- Outdoor Thermo-hygrometer(THGR968)
Contact an authorized dealer for optional items.
SECTION 2 INSTALLATION
The WMR112A operates at 433MHz. No wire installation is required
among units.
The WMR112A has an effective range of 300 feet in an open area.
Position the units within the range and be sure the transmission
path is clear of interference and obstacles.
Note: The thermo-hygrometer should be installed outdoors and in
locations that best measure the weather elements which the
instruments are designed for. As for the baro-thermo-hygrometer,
it must be installed indoors. If you have any optional thermo or
thermo-hygro sensors, they can be installed outdoors or indoors.
THE THERMO-HYGROMETER
The thermo-hygrometer measures outdoor temperature and
humidity. It uses two (2) UM-3 or “AA” size batteries.
Follow these steps to install / replace batteries:
1. Remove the screws on the battery compartment.
2. Assign a channel to the sensor by changing the channel switch
in the battery compartment of the remote sensor.
3. Select the unit of measurement for the temperature display on
the degrees C and degrees F slide switch
4. Insert the batteries strictly according to the polarities shown
therein.
5. Press the [RESET] button.
6. Replace the battery compartment door and secure its screws.
THE BARO-THERMO-HYGROMETER
The baro-thermo-hygrometer measures the atmospheric pressure,
temperature and humidity.
The sensor uses four UM4 or “AAA”-sized batteries.
To install it,
1. Insert alkaline batteries accordingly.
2. Mount the unit where you want to monitor the readings. Or you
can make use of its table stand to place it on a flat surface.
THE MAIN UNIT
The main unit gives you all the readings and controls. It should be
placed indoors.
The main unit is powered up by the 12V AC adapter.
To install it,
1. Position the main unit and other units within effective range
(300 feet).
2. Insert four UM4 or “AAA”-sized alkaline batteries for backup
purpose.
RESET
Question and Answer IconNeed help?

Do you have a question about the Oregon Scientific WMR112A and is the answer not in the manual?

Oregon Scientific WMR112A Specifications

General IconGeneral
BrandOregon Scientific
ModelWMR112A
CategoryWeather Station
TypeWireless
Wireless TransmissionYes
Wireless Range100 m
Rainfall MeasurementYes
Display TypeLCD
Power SourceBatteries
Power (Base Station)3 x AA batteries
Power (Remote Sensor)2 x AA batteries
Dimensions (Base Station)150 x 100 x 30 mm
Transmission Frequency433 MHz
Outdoor Temperature Range-40 to 60 °C
Indoor Temperature Range0 to 50 °C
Humidity Range20% to 95%

Summary

SECTION 1 INTRODUCTION

PACKAGE CONTENTS

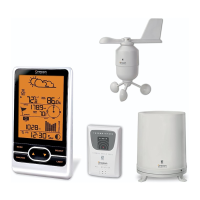
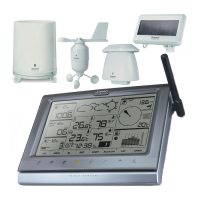
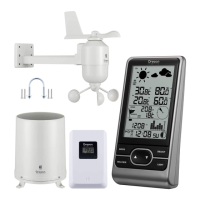
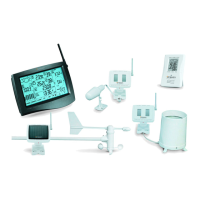
Lists the items included in the original WMR112A package and optional accessories.

THERMO-HYGROMETER SETUP

THERMO-HYGROMETER BATTERY INSTALLATION

Step-by-step guide for installing or replacing batteries in the thermo-hygrometer.

BARO-THERMO-HYGROMETER SETUP

BARO-THERMO-HYGROMETER INSTALLATION

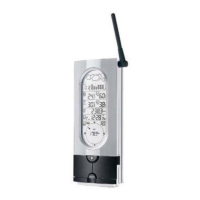
Instructions for installing batteries and mounting the baro-thermo-hygrometer.

SECTION 2 INSTALLATION

MAIN UNIT INSTALLATION

Guide for setting up the main unit, including power connection and battery backup.

MAIN UNIT OPERATION

MAIN UNIT BUTTON FUNCTIONS

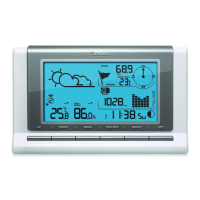
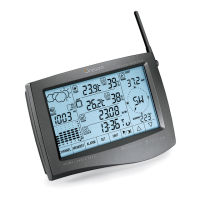
Description of the buttons and display windows on the main unit.

INITIATING OPERATION

Steps to initiate the main unit's operation and signal reception.

LOW-BATTERY WARNING INDICATORS

Explanation of low-battery indicators for the main unit and remote sensors.

RF CALENDAR CLOCK FUNCTIONS

MANUAL CLOCK SETTING

Procedure for manually setting the calendar clock and display preferences.

RADIO CONTROLLED CLOCK RECEPTION

Information on automatic synchronization with the U.S. Atomic Clock signal.

WEATHER FORECAST DISPLAY

Explanation of the weather forecast icons and their meanings.

DAILY ALARM SETTINGS

SETTING THE DAILY ALARM

Steps to set a daily alarm, including time and activation.

DEACTIVATING THE ALARM

Procedure to turn off the daily alarm function.

INDOOR BAROMETRIC READING

SELECTING BAROMETRIC DISPLAY UNITS

How to choose between different units for displaying barometric pressure.

VIEWING PRESSURE HISTORY

How to view the barometric pressure history for the past 24 hours.

SETTING SEA-LEVEL PRESSURE

Procedure for setting the sea-level pressure value.

TEMPERATURE AND DEW POINT READINGS

INDOOR TEMPERATURE UNIT SELECTION

How to select display units for indoor temperature and dew point.

VIEWING TEMPERATURE MEMORIES

How to display maximum, minimum, and current indoor temperatures.

CLEARING TEMPERATURE MEMORIES

Steps to clear the stored maximum and minimum temperature data.

INDOOR HUMIDITY MONITORING

VIEWING HUMIDITY RECORDS

How to display maximum, minimum, and current indoor humidity readings.

CLEARING HUMIDITY MEMORY

Procedure to clear the stored maximum and minimum humidity data.

OUTDOOR AND CHANNEL TEMPERATURES

SELECTING OUTDOOR TEMPERATURE SOURCES

How to select readings from the outdoor sensor or specific channels.

SELECTING TEMPERATURE DISPLAY UNITS

How to choose between Celsius and Fahrenheit for temperature display.

VIEWING OUTDOOR TEMPERATURE RECORDS

How to display maximum, minimum, and current outdoor temperatures.

CLEARING OUTDOOR TEMPERATURE MEMORY

Steps to clear the stored maximum and minimum outdoor temperature data.

OUTDOOR AND CHANNEL HUMIDITY

SELECTING HUMIDITY SOURCES

How to select humidity readings from the outdoor sensor or specific channels.

VIEWING HUMIDITY RECORDS

How to display maximum, minimum, and current outdoor humidity readings.

CLEARING HUMIDITY MEMORY

Steps to clear the stored maximum and minimum outdoor humidity data.

AUTO SCANNING FUNCTION

USING AUTO SCANNING

Instructions for enabling and using the auto scanning feature for sensors.

WEATHER ALARMS

SETTING WEATHER ALARMS

Guide for setting various weather alarms like temperature, humidity, and pressure.

STOPPING ACTIVE ALARMS

How to stop an active alarm and deactivate the alarm function.

DISCONNECTED SIGNALS

TROUBLESHOOTING SIGNAL LOSS

Steps to take if the main unit loses connection with sensors.

THE RESET BUTTON

RESETTING THE SYSTEM

Procedure for resetting the main unit and weather instruments to default settings.

MAINTENANCE AND CARE

PRODUCT CARE INSTRUCTIONS

Guidelines for cleaning and maintaining the weather station unit.

SPECIFICATIONS

OPERATING RANGES AND ACCURACY

Technical specifications for temperature, humidity, and pressure measurements.

DIMENSIONS AND POWER

Physical dimensions, weight, and power requirements for the units.

FCC COMPLIANCE

REGULATORY INFORMATION

Details on compliance with FCC rules and potential interference issues.

INTERFERENCE CORRECTION METHODS

Recommended steps to resolve radio or television reception interference.

CUSTOMER SUPPORT AND WARRANTY

ASSISTANCE AND CONTACT

Information on how to contact customer support for assistance.

PRODUCT WARRANTY DETAILS

Information regarding the product's warranty period and coverage.

Related product manuals