3
GB
THE RF CALENDAR CLOCK
The calendar clock is radio-controlled. It automatically
synchronizes its current time and date when it is brought within
range of the radio signal generated from U.S. Atomic Clock.
You can also set the calendar clock manually.
To do so,
1. Press the RF calendar clock and alarm window.
2. Press and hold [
] to disable the radio reception function.
3. Press and hold [SET] till the digit flash.
4. Use [ ] and [ ] to change to the desired setting.
5. Press [SET] for the next item setting.
6. Repeat from Step 4 to finish all the settings for:
- Clock display formats (12hr or 24hr)
- Display language of the day-of-the-week
- Clock
- Calendar display formats (Month-Day, Day-Month)
- Calendar
For the display language, you can choose:
- English (E)
- German (D)
- French (F)
- Italian (I)
- Spanish (S)
7. Press [SET] to confirm.
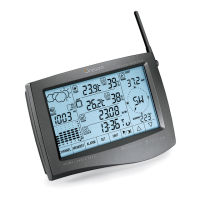
The calendar clock and alarm window has three displays: clock
with seconds, clock with day-of-the-week and calendar. To change
from one display to another, press the window once.
THE DAILY ALARM
To set the daily alarm,
1. Press the RF calendar clock and alarm window.
2. Press [ALARM] and the
indicator will be display to indicate
that you are in the alarm mode.
3. Press and hold [SET] till the hour digit flash.
4. Use [
] and [ ] to change to the desired setting.
5. Press [SET] for minutes setting.
6. Use [
] and [ ] to change to the desired setting.
7. Press [SET] to confirm.
Note: the window will show “
” if no alarm is armed.
Once set, the alarm clock will be activated automatically and the
alarm indicator will light up. When an alarm goes off indicator
will flash and a beep sound will be activated for 1 minute. Press any
button to stop it. The alarm is still active and will go off again the
next day.
To deactivate the function,
1. Press the RF calendar clock and alarm window.
2. Press [
]. The alarm indicator will disappear.
ABOUT RADIO CONTROLLED CLOCK RECEPTION
Whenever the WMR112A is brought within range of the radio
signal with its radio reception function activated, it will search for
the clock signal at a predefined time on each day while the manual
calendar clock settings will be overridden.
When the unit is new and just out of the box, synchronization with
the U.S.atomic clock can take upto 72 hours. The unit will receive
the mostdependable and interference free signal automatically
between Midnightand 4 AM.
While receiving the signal the radio reception indicator will blink.
A complete reception generally takes 2 to 10 minutes, depending
on the strength of the radio signal.
The indicator will stop blinking when the reception is complete.
The status of reception will be shown:
For best signal reception, place the unit away from other equipment
that emit RF or microwave signals such as TV's, radios, PC'sor
microwave ovens. Other causes for signal interference include
electrical power transmission towers, steel reinfoced concrete
construction, and/or metal siding.
After receiving the initial signal, updates are accomplished with
greaterease. Even though there are areas that may have more
difficulty in receiving a signal, the RF clock contains very accurate
quartz movement and will retain precise time even if a signal is
missed on a rare occasion.
To disable the radio reception function:
1. Press the RF calendar clock and alarm window.
2. Press and hold [
] to disable the function. The radio reception
indicator will disappear.
To enable the function again,
1. Press the RF calendar clock and alarm window.
2. Press and hold [
] to enable the function. The radio reception
indicator will blink.
The status of reception will be shown
WEATHER FORECAST
The weather forecast is displayed in the weather forecast and
barometric reading window.
There are four readings for the forecast: sunny, slightly cloudy,
cloudy and rainy.
-
Strong
-
Weak
-
No signal
-
Receiving
Forecast Sunny Slightly Cloudy Cloudy Rainy
Indicator
displays on
the unit
 Loading...