6
4. If the object is still at the center of the reticle, there is no need for
further adjustment.
5. If the object moved off center, adjust the three alignment screws
(Figure 4) with a 1.5mm Allen key to move the object HALFWAY back
to center. When making the adjustment, loosen one screw by 1/4 turn
each time, then tighten the other two screws.
6. Repeat the above procedure until the object remains at the center
when rotating the polar scope 180 degrees.
Step 2 - Align Vertical Line of the Reticle
1. Loosen the attachment knobs in Figure 1A and level the polar scope
horizontally using the bubble level on the polar scope. Then re-tighten
the atachment knobs.
2. Point the polar scope to a distant object that has a vertical reference
line.
3. Loosen the locking bolt in Figure 4, then rotate the polar scope so the
0–6 line in the reticle is parallel to the vertical reference of the object.
4. Re-tighten the polar scope locking bolt.
Step 3 - Align Polar Scope Optical Axis with Mount’s R.A. Axis
1. Put a distant landmark or object in the center of the reticle in the polar
scope’s FOV with the azimuth adjustment knobs and the elevation
adjustment handle (Figure 4).
2. Loosen the R.A. clutch wheel and rotate the R.A. axis 180 degrees.
3. If the object is still at the center of the reticle, there is no need for
further adjustment.
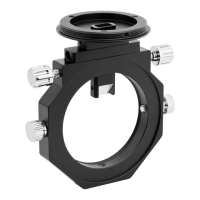
4. If the object moved off center, adjust the three alignment screws on the
front of the polar scope bracket (they have the raised heads) (Figure 5)
with a 2.5mm Allen key to move the object HALFWAY back to center.
NOTE: There are three pairs of screws. The three screws with the raised heads
are spring-loaded alignment screws. The three recessed screws are simply lock-
ing screws. Before making any adjustments, loosen all three locking screws (also
with a 2.5mm Allen key) by a couple of turns. When nished with the alignment,
you will lightly re-tighten the locking screws to secure the polar scope’s alignment
(Step 7).
5. When making the adjustment, loosen one alignment screw 1/4 turn
each time, and then tighten the other two alignment screws. (The
recessed locking screws should all still be loosened a couple of turns
at this point, per the NOTE above.)
6. Repeat the above procedure until the object stays at the center when
the polar scope is rotated 180 degrees.