Do you have a question about the Orion 7152 and is the answer not in the manual?
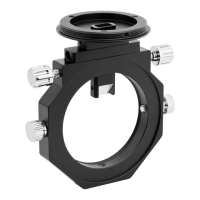
Prepare the mount by removing the bubble level and attaching the polar scope using existing knobs.
Install the polar scope illuminator onto the front of the polar scope for reticle illumination.
Strict warning against observing the sun without proper solar filters to prevent eye damage.
Point the mount to the celestial pole and power the illuminator using the battery cap and brightness dial.
Focus the polar scope eyepiece and verify the reticle pattern is visible and clear.
Use the reticle's graduated circle and Polaris to achieve polar alignment for Northern Hemisphere observing.
Use the reticle pattern and the star Octans to achieve polar alignment for Southern Hemisphere observing.
Methods to determine the correct position of Polaris relative to the Celestial Pole for accurate alignment.
Detailed steps to calibrate the polar scope's optical axis with the mount's R.A. axis.
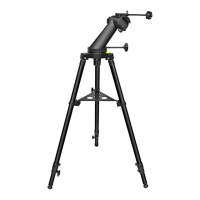
The Orion® Illuminated Polar Scope for Sirius™ Pro AZ/EQ-G Mount (#7152) is an external accessory designed to facilitate accurate polar alignment for astrophotography when using the Sirius Pro AZ/EQ-G mount in equatorial mode. While the SynScan hand controller offers a built-in polar alignment routine, this polar scope provides a convenient and often preferred alternative due to its ease of use and the speed at which polar alignment can be achieved.
The primary function of the polar scope is to provide a visual aid for aligning the mount's Right Ascension (R.A.) axis with the celestial pole. This alignment is crucial for long-exposure astrophotography, as it ensures that the telescope tracks celestial objects smoothly across the sky, preventing star trails. The polar scope features an illuminated reticle pattern that allows users to precisely position Polaris (for the Northern Hemisphere) or specific stars in Octans (for the Southern Hemisphere) relative to the celestial pole.
| Brand | Orion |
|---|---|
| Model | 7152 |
| Category | Camera Accessories |
| Language | English |