Do you have a question about the Orion 9829 and is the answer not in the manual?
Balance the telescope by adjusting counterweights on the shaft until it remains horizontal.
Balance the telescope by sliding it in the tube rings until it remains horizontal.
Align the equatorial mount's axis with Earth's rotational axis for tracking celestial objects.
Detailed steps for achieving precise polar alignment using a dedicated finder scope.
How to use R.A. and Dec. slow-motion controls for fine adjustment and tracking.
Learn how to use setting circles to locate celestial objects after calibration.
Guidance on how to point the telescope in various directions without spoiling alignment.
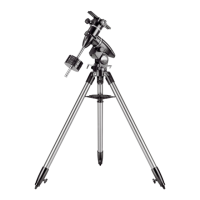
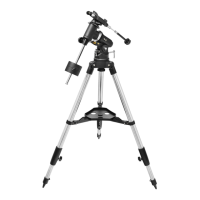
The Orion SkyView Pro EQ Mount is a precision-engineered equatorial mount designed to provide stable support and accurate tracking for various telescope optical tubes, particularly for astronomical observation. This mount is ideal for both novice and experienced stargazers who wish to observe celestial objects without them drifting out of view.
The primary function of the SkyView Pro EQ Mount is to compensate for the Earth's rotation, allowing celestial objects to remain stationary in the telescope's field of view. This "tracking" capability is achieved by slowly rotating the telescope on its Right Ascension (R.A.) axis, after the mount has been properly polar aligned. The mount is designed to hold telescope tubes weighing up to approximately 20 lbs, making it suitable for refractors, Newtonian reflectors, and catadioptric telescopes, provided appropriate tube rings are used to couple the optical tube to the mount.
The mount features both Right Ascension (R.A.) and Declination (Dec.) axes, each equipped with slow-motion control knobs. These knobs enable fine adjustments to the telescope's position, allowing users to precisely center objects within the eyepiece. Setting circles are integrated into the mount, providing a means to locate celestial objects by their cataloged coordinates (R.A. and Dec.). With accurate polar alignment and calibration, these setting circles can guide users to hundreds of fascinating celestial denizens, including galaxies, nebulae, and star clusters.
Assembly and Setup: The mount arrives in one box and requires careful unpacking. Assembly involves spreading the tripod legs, placing the equatorial mount onto the tripod head, and securing it with a central support shaft. The latitude adjustment L-bolt is threaded into the rear of the mount, and a tripod support tray is attached to the central support shaft, providing additional stability and holding accessories like eyepieces. The counterweight shaft is threaded into the declination axis, and counterweights are slid onto the shaft and secured with lock knobs. Slow-motion control knobs are then attached to the R.A. and Dec. gear shafts.
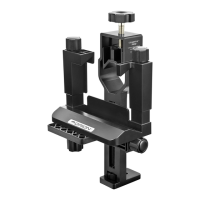
Telescope Attachment: To attach a telescope, tube mounting rings are first secured to a tube mounting plate. This plate, with the tube rings, is then placed into the dovetail slot on top of the equatorial mount and secured with a mounting plate securing knob and a safety screw. The telescope optical tube is then laid into the open tube rings, rotated for convenient viewing, and the rings are closed and tightened.
Balancing the Telescope: Proper balancing is crucial for smooth movement. The telescope is balanced on both the R.A. and Dec. axes. For R.A. balancing, the R.A. lock lever is loosened, and counterweights are slid along the shaft until they counterbalance the telescope, keeping the shaft horizontal. For Dec. balancing, the Dec. lock lever is loosened, and the telescope tube is slid within the tube rings until it remains horizontal when released.
Polar Alignment: For Northern Hemisphere observers, approximate polar alignment involves pointing the mount's R.A. axis at Polaris (the North Star). This is achieved by leveling the tripod, adjusting the mount's latitude to match the observing site's latitude, and then moving the tripod so the telescope tube and R.A. axis point roughly north towards Polaris. For more precise alignment, especially for astrophotography, an optional polar axis finder scope can be used. This finder scope, housed inside the R.A. axis, allows for accurate alignment by positioning Polaris within a specific reticle pattern, which includes constellations like Cassiopeia and the Big Dipper for orientation.
Tracking Celestial Objects: Once polar aligned, tracking celestial objects is simplified. As an object drifts across the field of view, users only need to turn the R.A. slow-motion control knob clockwise to keep it centered. The Dec. slow-motion control knob is generally not needed for tracking. An optional DC motor drive can be attached to the R.A. axis for hands-free automatic tracking.
Using Setting Circles: The setting circles, scaled in hours for R.A. and degrees for Dec., allow users to locate objects by their celestial coordinates. After accurate polar alignment, the Dec. setting circle is calibrated by positioning the telescope parallel to the R.A. axis and setting the pointer to 90°. The R.A. setting circle is calibrated by pointing the telescope at a known bright star near the celestial equator and setting the R.A. pointer to that star's coordinates. Once calibrated, users can look up an object's coordinates in a star atlas and then adjust the telescope's R.A. and Dec. axes to match those values, bringing the object into the finder scope's field of view.
Pointing the Telescope: The manual provides guidance on how to point the telescope in various cardinal directions (north, south, east, west, or overhead) while maintaining polar alignment. The key is to move the telescope only on its R.A. and Dec. axes, and to understand that the counterweight shaft's orientation will vary depending on the direction the telescope is pointed. For example, to point overhead, the counterweight shaft should be rotated to a horizontal position.
The manual emphasizes the importance of keeping the original packaging for potential shipping or warranty repair. It also advises users to immediately contact customer support if any parts are missing or broken upon unpacking. The polar axis finder scope, if installed, should have its plastic protective cover replaced when not in use to prevent it from getting bumped and knocked out of alignment. Regular tightening of thumbscrews and lock levers is implied through the setup and usage instructions to ensure stability and precise movement. The mount is designed for durability, and proper handling as described in the manual will contribute to its longevity. The one-year limited warranty covers defects in materials or workmanship, encouraging users to return defective instruments for repair or replacement.
| Rack Units | 42U |
|---|---|
| Material | Steel |
| Color | Black |
| Wheels | Yes |
| Height | 78.7 in (199.9 cm) |
| Type | Rack |