60 mm
H
G
E
F
F
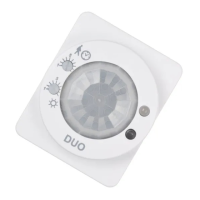
Description
Purpose and application
The OUTDOOR sensor detects the presence of persons and
measures the intensity of ambient light.
It is ideally suited for indoor and outdoor light applications that
require a high level of protection against outdoor weather condi-
tions (wetness, dirt).
The sensor is designed for wall and ceiling installation.
Installation
Safety instructions
The sensor must only be installed and put into operation by a
qualied electrician. The applicable safety regulations and ac-
cident prevention regulations must be observed.
WARNING!
Exposed, live cables.
Danger of electric shock!
• Only work on the sensor when it is de-energised.
CAUTION!
Destruction of the sensor and other devices through
incorrect mounting!
• Protect the supply line with a circuit breaker or
fuse (max. 10 A).
• Adhere to the connection diagram.
Function
The sensor works fully automatically and is used for contact-
free switching. The values detected by the sensor (motion,
light value) control the switching behaviour on the basis of the
settings created by the user.
The following settings can be made:
• Delay (if no motion is detected)
• Light switching threshold
• Operating mode
Design
The sensor is made up of the following components:
• Light and motion sensor with an integrated LED (A)
• Buttons S1 and S2 (B)
• Swivel arm (C)
• Connection box (D)
Installation notes
• The sensor can be mounted on a ush-mounted box with a
60 mm diameter.
• Install the connection box with the correct orientation so that
the sensor has the correct position when it is connected.
• Maintain a minimum distance of 0.5 m to luminaires or heat
sources (e.g. heater) to avoid undesired switching of the mo-
tion sensor due to light or false motion from heat.
Installation procedure
Route the connection lines through the knockouts (E) of the
connection box.
Knock out the condensation water opening (H) if necessary.
Attach the connection box to the wall or ceiling (G) using the
accessories included. Note the installation length.
Connect the connecting lines to the terminals (F); see „Con-
nection diagram“.
Attach the swivel arm with the sensor to the connection box
and x it with the screw integrated in the joint. This ensures
compliance with protection type IP 55.
Switch on the power supply.
The sensor is initialised (during initial startup, it also goes into
test mode) and is then switched to normal mode with the default
settings; see the operating instructions.