SM40149A
Step 1 / Étape 1 / Paso 1
Remove the silicone skin from the hard shell.
Enlevez le revêtement en silicone de sa coque.
Retire la cubierta de silicona del revestimiento duro.
Step 2 / Étape 2 / Paso 2
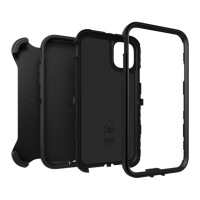
Separate the two halves of the case.
Séparez les deux moitiés du boîtier.
Separe las dos mitades de la funda
Step 3 / Étape 3 / Paso 3
Remove the clear membrane and insert.
Enlevez la membrane transparente, puis insérez l’appareil.
Retire la membrana transparente e inserte la unidad.
.
For additional help visit www.otterbox.com or call 888.695.8820
Pour obtenir une aide supplémentaire, rendez-vous sur www.otterbox.com ou appelez le 888.695.8820
Para obtener ayuda adicional visite www.otterbox.com o llame al 888.695.8820
Opening your OtterBox Case / Comment ouvrir votre boîtier OtterBox / Apertura de la funda OtterBox
Installing Your BlackBerry® Into The Case
Comment installer BlackBerry® dans le boîtier
Instalación del BlackBerry® en la funda
Step 1 (Optional)
Align the clear membrane with the front
of the device keypad, making sure every-
thing aligns. After everything is aligned,
turn the device over and wrap the tabs
of the membrane onto the device (1.2).
Start with the bottom tab, then the two
side tabs.
Étape 1 (Facultative)
Alignez la membrane transparente sur
l’avant du clavier de l’appareil, en vous
assurant que tout est aligné. Une fois tout
aligné, retournez l’appareil et enroulez les
pattes de la membrane sur l’appareil (1.2).
Commencez par celle du dessous, puis es
deux pattes latérales.
Paso 1 (Opcional)
Alinee la membrana transparente con la
parte delantera del teclado del dispositivo,
cerciorándose de que todo quede alineado.
Tras realizar este proceso, invierta el dis-
positivo y envuelva alrededor del mismo las
lengüetas de la membrana (1.2). Comience
con la inferior, entonces dos lengüetas
laterales.
Step 2/ Étape 2/ Paso 2
Step 1.2/ Étape 1.2/ Paso 1.2
Step 1.1/ Étape 1.1/ Paso 1.1
OtterBox Defender Series™ Instruction: BlackBerry® Curve™ 8350i
Instructions Pour La Série OtterBox Defender™: BlackBerry® Curve™ 8350i
Instrucciones de la Serie OtterBox Defender™: BlackBerry® Curve™ 8350i
Step 2
Place the phone into the plastic lid.
Étape 2
Placez le téléphone dans le couvercle e
plastique.
Paso 2
Ponga el teléfono en la tapa plástica.
Step 3
Snap together the plastic lid and the base.
Étape 3
Pressionez le couvercle en plastique et
la base.
Paso 3
Cierre uniendo la tapa plástica con la base.
Step 3/ Étape 3/ Paso 3