06INSTALLATION
3. Next you need to determine if the drive post should be
moved from its default location. For 2280 M.2 drives, the
post is pre-installed at the correct location; please skip
ahead to Step 4.
All other M.2 form factors – you will need to move the drive
post to the correct location. Note that the PCBA (3a) has
four additional M.2 post locations, highlighted in red. Make
note of the location applicable to your drive’s form factor
then proceed.
You first need to use your fingers, a 6mm socket wrench
(not included), or a pair of needle-nose pliers (not included)
to immobilize the fastener on the underside of the PCBA
(3b).
On the top side of the PCBA, use a 5mm socket wrench,
or fingers, to turn the drive post (3c) until it is loose, then
remove it (3d).
Last, move the fastener to the correct post location on
the underside of the board, again immobilize it with your
fingers, pliers, or a 6mm socket wrench, then insert the
drive post threads-down into the post cut-out and affix it to
the fastener, securing them both to the PCBA.
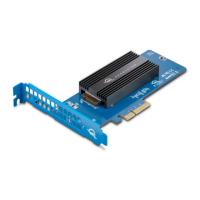
4. Align the connector on the M.2 drive with the connector on
the PCBA — a 2280 form factor is shown here — then insert
the drive until it is fully seated. Minimal force is required.
If the drive does not seat properly, do not increase the
amount of force. Remove the drive, re-align it, and try again.
Note that once seated, the drive will not lay flat. Note also
in this example the drive does not have its own heat sink,
requiring an additional step at the end of the process.
4
3a
3b
3c 3d