EasyManua.ls Logo

OWC U.2 SHUTTLE - User Manual

OWC U.2 SHUTTLE
10 pages
Print Icon
To Next Page IconTo Next Page
Loading...
U.2 SHUTTLE
3.5-inch U.2 NVMe SSD Carrier Shuttle
Ideal for Media Production Workows
Ooad day’s shoot and send drive to post
Fast and Easy Drive Swaps
Move between U.2 devices,
PCs, and servers
RAID Ready
Harness the power of RAID 0, 1, 4, 5, or 10
via your choice of RAID utilities
Question and Answer IconNeed help?

Do you have a question about the OWC U.2 SHUTTLE and is the answer not in the manual?

Summary

Introduction

System Requirements

Details required operating system, hardware, and supported NVMe M.2 drive types for the shuttle.

Package Contents

Lists the items included in the OWC U2 Shuttle package with accompanying images.

About This Manual

Provides context on manual accuracy, firmware changes, and warranty details.

Device Setup

Installation of M.2 Drive(s)

Step-by-step guide for installing M.2 NVMe SSDs into the OWC U2 Shuttle.

Host Installation: Helios 3 S

Instructions for installing the U2 Shuttle into the OWC Mercury Helios 3S.

Host Installation: ThunderBay Flex 8

Instructions for installing the U2 Shuttle into the OWC ThunderBay Flex 8.

Host Installation: Mercury Pro U.2 Dual

Instructions for installing the U2 Shuttle into the OWC Mercury Pro U.2 Dual.

Usage Notes

Provides specific performance notes when using the Shuttle with ThunderBay Flex 8.

Support Resources

Troubleshooting

Guides users on diagnosing and resolving common installation and connectivity issues.

Formatting

Provides information and links for formatting M.2 SSDs for Mac and Windows.

About Data Backup

Recommends data backup strategies and clarifies OWC's liability.

Contacting Technical Support

Lists phone, chat, and email contact methods for technical assistance.

Overview

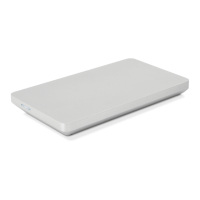
The OWC U.2 Shuttle is a 3.5-inch U.2 NVMe SSD Carrier Shuttle designed for fast and easy drive swaps between U.2 devices, PCs, and servers. It is ideal for media production workflows, allowing users to offload a day's shoot and send the drive to post-production. The device supports RAID configurations, enabling users to harness the power of RAID 0, 1, 4, 5, or 10 via their choice of RAID utilities.

Function Description

The U.2 Shuttle serves as a carrier for up to four NVMe M.2 drives with a 2280 form factor and M-key connector. It allows these M.2 drives to be used in systems that support a 3.5-inch drive form factor with an NVMe U.2 connection. This enables users to leverage the high performance of NVMe SSDs in compatible enclosures and host systems.

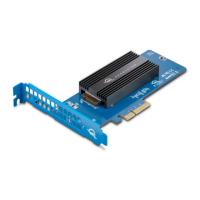
The installation process for M.2 drives involves removing the shuttle's cover, securing the M.2 drives onto the internal PCBA, and then re-affixing the cover. The design ensures that the "fins" on the cover sit flush with the top edges of the chassis when correctly installed, which is crucial for proper seating within host enclosures and to prevent installation issues with the U.2 NVMe Interchange System.

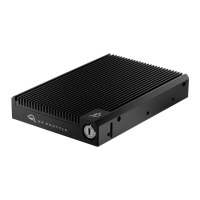
Once the M.2 drives are installed in the U.2 Shuttle, the shuttle can be inserted into various OWC host enclosures. For instance, when used with the OWC Mercury Helios 3S with U.2 NVMe Interchange System, the shuttle slides into the interchange chassis, connecting to the U.2 connector inside. A locking mechanism with included security keys allows users to secure the shuttle in place. It's important to note that this configuration is not hot-swappable, requiring the Helios 3S to be powered off and disconnected from the host computer before installing or removing the U.2 Shuttle.

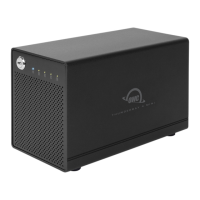
When installed in an OWC ThunderBay Flex 8, the U.2 Shuttle is first seated into a drive sled. The drive sled, with the shuttle attached, then slides into one of the ThunderBay's bays. The top-left bay is recommended for optimal performance due to its four lanes of PCIe bandwidth (x4), while other top bays offer single-lane (x1) bandwidth.

For the OWC Mercury Pro U.2 Dual, the installation involves removing the inner chassis from the enclosure, placing the U.2 Shuttle into the inner chassis, and then securing it with screws. The inner chassis is then slid back into the outer enclosure. This process allows for the installation of one or two U.2 Shuttles or other U.2 devices.

After installation into a host enclosure, the M.2 drives within the U.2 Shuttle can be formatted and/or configured for RAID using software like SoftRAID or Apple's Disk Utility RAID Assistant feature. This flexibility allows users to create independent volumes or various RAID configurations to suit their performance and data redundancy needs.

Usage Features

The U.2 Shuttle offers several features that enhance its usability and integration into various workflows:

  • Versatile Compatibility: Designed to work with specific OWC enclosures such as the ThunderBay Flex 8, Mercury Helios 3S with U.2 NVMe Interchange System, and Mercury Pro U.2 Dual, ensuring seamless integration into existing OWC ecosystems.
  • High-Performance NVMe Support: By carrying NVMe M.2 drives, the shuttle enables users to take advantage of the high-speed data transfer capabilities of NVMe technology, which is crucial for demanding applications like media production.
  • RAID Capabilities: The ability to configure M.2 drives in RAID 0, 1, 4, 5, or 10 provides options for increased performance (RAID 0), data redundancy (RAID 1, 4, 5), or a combination of both (RAID 10), depending on the user's requirements.
  • Easy Drive Swaps: The shuttle design facilitates quick and straightforward installation and removal of M.2 drives, making it convenient for users who need to frequently swap drives or transport data.
  • Security: The inclusion of security keys for locking the U.2 Shuttle into compatible host enclosures like the Helios 3S adds a layer of physical security, preventing unauthorized removal.
  • Optimized Performance in ThunderBay Flex 8: The recommendation to use the top-left bay in the ThunderBay Flex 8 highlights an optimized usage scenario, ensuring users can achieve the best possible PCIe bandwidth for their M.2 drives.
  • Flexible Volume Configuration: Users can choose to format individual M.2 drives as independent volumes or combine them into RAID volumes, offering flexibility in how storage is managed.

Maintenance Features

While the U.2 Shuttle itself is a passive carrier, its design and the accompanying instructions emphasize proper installation and troubleshooting to ensure reliable operation:

  • Clear Installation Instructions: The manual provides detailed, step-by-step instructions for installing M.2 drives into the shuttle and then installing the shuttle into various host enclosures. This clarity helps users perform correct installations and avoid common errors.
  • Troubleshooting Guidance: The troubleshooting section addresses common issues, primarily focusing on improperly installed M.2 drives or shuttles not fully connected to the host enclosure. It advises users to inspect connections and re-seat components, which are fundamental maintenance steps.
  • Emphasis on Correct Seating: The instructions repeatedly stress the importance of correctly seating the M.2 drives and the shuttle itself, noting that minimal force should be used and that components should sit flush. This attention to detail helps prevent physical damage and ensures proper electrical connection.
  • Data Backup Recommendations: The manual strongly advises users to maintain two copies of their data—one on the U.2 Shuttle and another on an internal drive or external storage unit. This is a critical data maintenance practice to prevent data loss, underscoring the importance of user responsibility in safeguarding their information.
  • Technical Support Resources: OWC provides comprehensive support resources, including phone, chat, and email, for users who encounter issues that cannot be resolved through the provided troubleshooting steps. This ensures that users have access to expert assistance when needed.
  • Warranty Information: The product comes with a 1-year OWC Limited Warranty for the shuttle without drives pre-installed, and a 3-year warranty for solutions with drives pre-installed. This warranty information is important for users to understand their coverage and rights regarding potential repairs or replacements.
  • Firmware and Product Updates: The manual notes that images and descriptions may vary slightly and that functions and features may change depending on the firmware version. It directs users to the product web page for the latest product details and warranty information, implying that keeping up-to-date with product information is a form of maintenance.

OWC U.2 SHUTTLE Specifications

General IconGeneral
InterfaceU.2
Enclosure MaterialAluminum
Drive Bays4
Supported Drive TypesU.2 NVMe SSD
CompatibilityMac and Windows
CapacityUp to 32TB
Power SupplyBus-powered
LED IndicatorActivity LED
Included AccessoriesU.2 cable, screws

Related product manuals