17
MiniMaster
MA60-16E
ENGLISH
5. Once the start sequence is complete, the mode set is conrmed using the following ashing indicators:
‒ LED no. 2, 4 and 5 ashing = alkali dosing activated.
Save the setting by keeping button E pressed for 2 seconds immediately after LED indication conrmation has completed
until LEDs 1 and 5 start to ash quickly.
6. To check the unit’s setting: shut off, wait around 3 seconds, turn power back on to the unit - LEDs 1-7 ash during the start
sequence, with the ashing indications as described in point 5.
7. In order to change dosing settings for acid, repeat the process from step 1. Once the start sequence is complete, the mode
set is conrmed using the following ashing indicators:
‒ LED no. 2, 4 and 6 ashing = acid dosing activated.
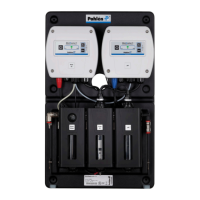
13. Maintenance
• When rinsing the pool sand lter – close the shut-off valves (L1 and L2) on the pre-lter running to and from the MiniMaster.
• Check the ow by pressing button (F) – adjust to the correct ow using set screw (H) on the start module.
• Reference measurement of chlorine and pH levels must be carried out once or twice a month using digital photometric
equipment and calibrating accordingly. Take measurement water from the measurement water outlet on the pre-lter.
In the event of a deviation from the calibrated value – clean the electrodes and re-calibrate.
• The threads and O-rings of the plugs should be lubricated at least once a year using silicon grease with PTFE (non-petroleum
based grease).
• Check hoses, connections and chemical levels on a regular basis.
Electrodes
Should be cleaned on a regular basis (see instruction MA60-06: Electrodes, use and maintenance), at least once a month in the
case of freshwater pools, and twice a week in the case of salt water pools.
1. Shut off dosing (on/off button E).
2. Shut off the water ow by closing the ball valves (L1 and L2).
3. Lift the locking brace (M) and fold the modules forward, see Figure 3.
4. Remove the electrode’s BNC contact (see Figure 5) from the control unit.
5. Unscrew the electrode and lift it up out of the unit.
6. Clean, rinse and ret it.
Filter
Check the lter on a regular basis and clean if necessary. Replace the lter cartridge as a when required.
1. Shut off dosing (on/off button E).
2. Shut off the water ow by closing the ball valves (L1 and L2).
3. Unscrew the lter housing in which the lter cartridge sits.
4. Replace or rinse the lter using normal tap water. A soft brush may be used if necessary.
Adjuster screws
Adjuster screw (H) and Measurement water tap (N) must be cleaned if necessary so that they do not seize due to scale build-up.
1. Shut off dosing (on/off button E).
2. Shut off the ow using the ball valves (L1 and L2).
3. Unscrew the adjuster screw, rinse and dry off.
4. Lubricate the O-ring and the thread of the plug using a little silicon grease.
Winter storage
• Where there is a risk of freezing, the modules and the pre-lter must be drained of water, bottom plugs and electrodes
removed and stored in a frost-free location (standing in water).