Do you have a question about the Panasonic ag-hpx600p and is the answer not in the manual?
Essential safety warnings and precautions before operating the camera.
Outlines FCC compliance for USA and Canada, including warnings.
Details on the extended warranty program for P2HD devices, including registration requirements.
Explains how to interpret illustrations, reference pages, and terminology used in the manual.
Initial checks and precautions before operating the camera for the first time, including laser safety and software info.
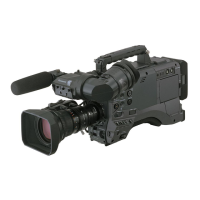
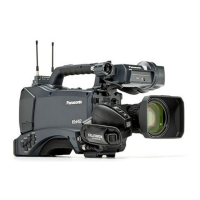
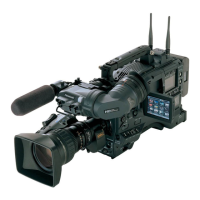
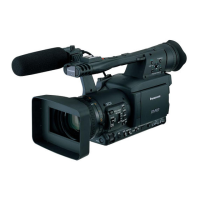
Key capabilities and advantages of the P2 memory card camera-recorder, including optional functions.
Overview of compatible accessories and optional components for the camera system, showing how they connect.
List of items included with the camera package, such as the CD-ROM and shoulder strap.
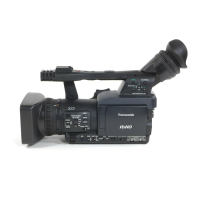
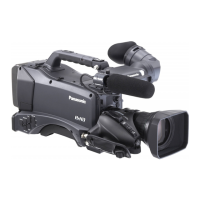
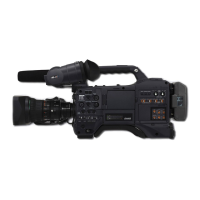
Identification of power-related terminals and accessory mounting points on the camera body.
Details on microphone and line input terminals and audio output sections of the camera.
Explanation of camera controls for shooting, recording, and playback functions like shutter and white balance.
Description of controls for navigating menus and managing clips via thumbnails.
Explanation of warning lamps and status indicators on the camera for operational feedback.
Breakdown of information displayed on the SmartUI [HOME] screen, including indicators and status.
Procedure for setting the camera's internal clock and time zone for accurate recording and playback order.
Instructions for inserting, removing, and managing P2 cards for recording and data access.
Steps for setting up power, inserting cards, and configuring basic shooting and recording switch settings.
Explanation of different recording methods, including pull-down and native frame rates for video.
Details on using the VFR function for time-lapse and high-speed shooting with various frame rates.
Features like pre-recording, interval recording, one-shot recording, and loop recording for advanced capture.
How to play back recorded clips at normal, variable, fast-forward, and fast-reverse speeds.
Configuration of various recording formats, signals, and playback times for different video standards.
Procedures for setting the camera's white and black balance for optimal image quality under various lighting.
How to configure shutter modes, speeds, synchro scan, and variable ranges for exposure control.
Function to reduce interference from strobe lights during shooting by compensating for banding.
Customizing buttons for quick access to frequently used functions like gain, zoom, and scene files.
Configuring audio input sources and adjusting recording levels for channels using SmartUI.
Managing time codes, user bits, and date/time settings for accurate metadata and clip organization.
Understanding various indicators and information shown on the viewfinder screen for monitoring status.
Managing scene files and user settings, including saving, loading, and formatting SD memory cards.
Information on using batteries and external DC power supplies for camera operation, including mounting procedures.
Procedures for attaching, adjusting, and compensating for lenses, including flange back and shading.
Connecting microphones, wireless receivers, and other audio devices to the camera's input terminals.
Instructions for attaching tripods, shoulder straps, and other external accessories to the camera body.
Introduction to clip management through thumbnail displays and available operations.
Methods for selecting individual or multiple clips, changing display, and managing clip properties.
Procedures for copying, deleting, restoring, and reconnecting clips, and using text memos for editing.
Reading and modifying metadata for clips, such as reporter names or shooting locations, from SD cards.
Customizing how P2 card capacity and status information is displayed on the screen.
How to access and navigate the camera's main setting menus via the viewfinder and basic operations.
Hierarchical overview of all available menu items and their dependencies based on installed options.
Detailed descriptions of each menu item, its settings, and specific remarks or conditions.
Fundamental operations for navigating and changing settings within the SmartUI interface using its buttons and screens.
Visual guide to operating the SmartUI interface and its main screens, showing menu flow.
How to connect the camera to a computer via USB 2.0 for data transfer and control using device or host modes.
Using the camera in USB host mode to connect and manage external hard disk drives for data viewing and transfer.
Instructions for connecting remote control and extension units for camera operation via the <REMOTE> terminal.
Pre-operation checks for the camera, memory cards, audio, and time code systems to ensure proper function.
Understanding error codes, warning messages, and recommended actions for troubleshooting camera or P2 card issues.
Procedures for checking and updating the camera's firmware using dedicated tools or SD cards for performance improvements.
Information on installing and using the video encoder board for high-resolution proxy recording and efficient clip management.
Details on installing and using the SDI input board for high-quality recording via digital input signals.
Technical details including physical dimensions, general specifications, and camera unit capabilities like shutter speed and sensitivity.
Pin assignments and signal descriptions for all camera terminals, aiding in external connections.
| Audio Channels | 4 |
|---|---|
| Media Slots | 2x P2 Card Slots |
| Sensor Size | 1/3" |
| Effective Pixels | 2.2 Megapixels |
| Recording Format | DVCPRO HD, DVCPRO50, DVCPRO, DV |
| Video Resolution | 1920 x 1080 |
| Frame Rate | 30p, 24p |
| Focus | Auto/Manual |
| Viewfinder | Color LCD |
| Outputs | HDMI |
| ND Filter | Yes (1/4, 1/16, 1/64) |
| Weight (body only) | 2.3 kg |
| Camera Type | Shoulder-mounted |
| Audio Recording | 48 kHz/16-bit, 4-channel |