12
• Keep both the inner blades inserted. If only one of the inner
blades is inserted, the shaver may be damaged.
• If you clean the shaver with water, do not use salt water or
hot water. Do not soak the shaver in water for a long period
of time.
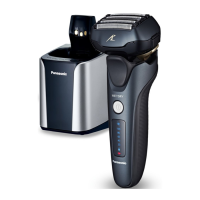
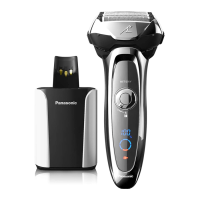
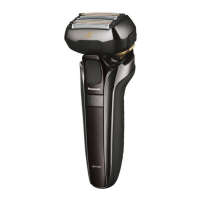
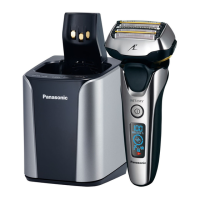
Parts identification
A Main body
1 Protective cap
2 System outer foil
3 Foil frame
4 Smooth rollers
• They help to glide over
the skin more easily.
5
Foil frame release buttons
6 Power switch
7 Lamp display
a. Used time lamp
b. Battery capacity lamp
c. Shaving sensor lamp
(
)
d. Clean lamp (
)
e. Switch lock lamp (
)
f. Foil/blade check lamp
(
)
g. Charge status lamp
(
)
8 Appliance socket
9 Outer foil section
: System outer foil release
buttons
; Inner blades
< Trimmer
= Trimmer handle
>
Main body rear terminals
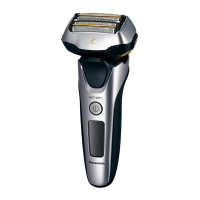
B Self-cleaning recharger
? Charging terminals
@ Cleaning liquid unit
removal button
A Intake port
B Self‑cleaning recharger
socket
C Lock release lever
D Cleaning liquid filter
Cleaning liquid unit
STATUS lamp
LOW lamp
CLEAN lamp
DRY lamp
SELECT button
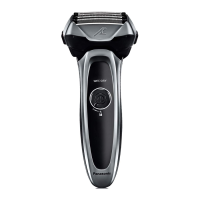
C AC adaptor (RE7-87)
Adaptor
Power plug
Cord
Appliance plug
Accessories
D Travel case
E Cleaning brush
F Oil
G Special detergent
(Detergent)
H Operating Instructions
I Guarantee Card
There may be water droplets
inside the self‑cleaning
recharger at the time of
purchase, but there is no
problem regarding the hygiene
or the performance. (It is a
residue of the distilled water
used for performance test.)
Preparation
Charging the shaver
• Turn the shaver off.
• Wipe off any water droplets on the main body rear terminals.
1
Insert the appliance plug
[C] into the self-cleaning
recharger [B].
2
Remove the protective cap
[A1] while pressing the side
of the cap and insert the
shaver into the self-cleaning
recharger.
• Slowly insert the shaver into the
self‑cleaning recharger taking care
not to damage the system outer
foil.
1
2
3
3
Plug the adaptor [C] into a household outlet.
• Check that the charge status lamp ( ) is glowing.
• Charging is completed after approx. 1 hour.
ES-LV9N_EU.indb 12 2015/12/11 13:05:49
 Loading...