Installation
(Between joist mounting installation) continued
III
12
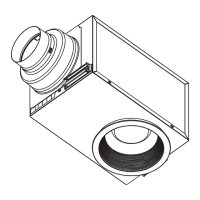
7. Secure installation bracket I and IV to the fan body using
short screw I (M4X12) and short screw II (M4X10).
10. Finish ceiling work. Ceiling hole should be cut at the edge
of the frame.
(Fig. 22)
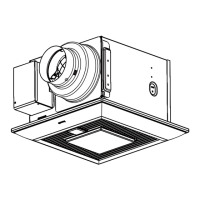
Fig. 24
8. Slide the circular duct onto the adapter and secure with
tape.Remove the junction box cover and secure conduit
to junction box knockout hole.(7/8 inch)
Refer to wiring diagram on page 6.
Using wire nuts, connect house power wires to ventilating
fan wires:
Black to blacks; white to whites; green to greens.
Replace junction box cover.
9.
Mount junction box cover carefully so that lead wires
are not caught.
CAUTION:
(Fig. 3)
(Fig. 24)
Adapter
Junction box cover
Circular duct
(Fig. 23)
Fig. 23
Short screw
II
Installation bracket
I
Installation bracket
IV
Ceiling joist
Short screw
I
Fig. 22
Conduit
Flange
Ceiling
235
235
(9.25)
(9.25)