Do you have a question about the Panasonic NV-VS70EN and is the answer not in the manual?
General safety warnings to reduce fire/shock hazard and interference.
Location of the rating plate on the camera.
Location of the rating plate on the adaptor.
Advice on ventilation and reading instructions.
Disclaimers on liability and copyright observance.
Power supply components for the camera.
Primary power source for operating the camera.
Accessories for playback and carrying the device.
Cables for connecting to external devices.
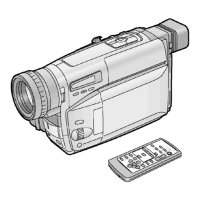
For remote operation and backup power.
Lens protection and computer interface.
Lights indicating camera status and functions.
Switches for 0-Lux, WB sensor, IR emitters.
Buttons for fade, focus, item set, tracking.
Controls for menu navigation and selection.
Buttons for auto exposure, digital effects.
Component for viewfinder viewing.
Buttons for search, stop, fast forward operations.
Buttons for playback, WB, TBC, and backlight.
LCD screen, compartment covers, and input ports.
Viewfinder assembly and battery housing.
Sockets for connecting to external devices.
Buttons for starting recording and selecting operating modes.
Camera holding strap and audio output component.
Port for transferring digital images to a computer.
Controls for cassette handling and title overlay.
Buttons for recording and special modes.
Controls for zoom magnification and audio volume.
Mechanism for adjusting viewfinder focus.
Attachments for carrying strap and tripod mounting.
Connecting the camera to wall power.
Using the internal battery for camera operation.
Steps for battery installation and charging procedure.
Procedure for safely removing the battery.
Explanation of status lights during charging.
Understanding the battery time indicator display.
Conditions that impact battery duration.
How to operate the camera's LCD screen.
Positioning the screen for optimal viewing.
Steps to enter and navigate through menu settings.
Procedure for closing the menu interface.
Top-level settings menu for camera functions.
Specific settings within the camera setup menu.
Options for applying digital picture effects.
Options for adding text overlays to footage.
Setting date, time, and display preferences.
Adjusting monitor and viewfinder settings.
Accessing miscellaneous camera features.
Top-level settings menu for VCR functions.
Settings for various playback modes.
Options for effects and titles during playback.
Settings for VCR playback display and configuration.
Settings for the main screen's brightness and colour.
Settings for the camera's viewfinder brightness.
Steps for menu access and screen positioning.
Steps for operating the video cassette compartment.
Methods to protect recorded content from accidental deletion.
Setting tape length for accurate time display.
Checking the amount of recorded time remaining on the tape.
Explanation of VHS, S-VHS, and S-VHS ET recording formats.
Deciding the recording format before starting.
Steps for adjusting viewfinder clarity and focus.
Customizing the length of the grip belt for better handling.
Procedure for securing the lens cap.
Steps for inserting the backup battery.
Procedure for battery replacement when depleted.
Safety warnings and guidelines for battery use.
Step-by-step guide for setting the camera's clock.
Information on clock accuracy and function.
Procedure for inserting date, time, or custom titles.
How to remove existing text overlays.
Basic steps for recording using automatic settings.
Managing the recording indicator light.
Alternative use of the record button for starting/stopping.
Digital Noise Reduction application in low-light conditions.
Reviewing the end of a recorded scene.
Searching recorded scenes during pause mode.
Adjusting settings for backlit subjects.
Controlling the zoom magnification level.
Enhancing distant voices based on zoom position.
Recording small subjects at very close range.
Basic steps for viewing recorded footage on the camera.
How to halt the playback process.
Controlling the audio output level.
Time Base Correction for playback stability.
Digital Noise Reduction for improving playback clarity.
Steps for connecting the camera for TV viewing.
Steps to perform after viewing content on TV.
Instructions for cleaning the finder, monitor, body, and lens.
Fast searching for specific playback points.
Reviewing recorded segments of footage.
Locking search function for continuous sequences.
Freezing the playback image at a specific frame.
Returning from search modes to standard playback.
Detailed steps for performing cue playback.
Detailed steps for performing review playback.
Further explanation of the search lock feature.
Detailed steps for performing still playback.
Detailed steps for returning to normal playback.
Steps for connecting the camera to a TV for playback.
Steps to perform after viewing content on TV.
Instructions for cleaning the finder, monitor, body, and lens.
Gradually making the picture and sound appear.
Gradually making the picture and sound disappear.
Capturing a still image with sound for a short duration.
Simulating an SLR camera shutter blink effect.
Steps to choose and activate digital effects.
Steps to turn off active digital effects.
Reduces picture shake during recording.
Magnifies distant subjects beyond optical zoom.
Provides stabilized and magnified view.
Image distortion effects for creative recording.
Electronically brightens the picture.
Displays nine small still images simultaneously.
Displays a small image within the main picture.
Transition effects between scenes.
Image colour and tone effects.
Converts the image to monochrome.
Gradual fading effects for scene transitions.
Steps to enable the picture stabilization feature.
Steps to disable the picture stabilization feature.
Conditions that may affect stabilizer effectiveness.
Steps to enable and use the digital zoom feature.
Steps to disable the digital zoom feature.
Recording a sequence of 9 still pictures for analysis.
Removing or disabling the multi-image display.
Recording a sequence of 9 stills for playback.
Removing or disabling the multi-image display.
Displaying a small still image within the main picture.
Removing or disabling the Picture-in-Picture display.
Using scene transition effects between recordings.
Disabling the transition effects.
Available types of digital fade effects.
Gradually making the picture fade in.
Gradually making the picture fade out.
Disabling the digital fade effects.
Steps to enable automatic recording based on motion detection.
Steps to disable the motion sensor during stand-by or recording.
Conditions that may impair the motion sensor's performance.
Recording in complete darkness using infrared illumination.
Disabling the night vision recording mode.
Steps for manually setting the white balance.
Steps to disable manual white balance adjustment.
Scenarios where manual WB is preferred over auto.
Understanding how white balance affects colour.
Light sources compatible with auto white balance.
Steps for manually setting focus on a subject.
Steps to disable manual focus adjustment.
Scenarios where manual focus is preferred over auto.
Selection of AE modes for specific recording conditions.
Steps to disable the Programme AE modes.
Descriptions of specific automatic exposure modes.
Descriptions of specific automatic exposure modes.
Identification and function of remote control buttons.
Remote buttons for playback operations.
Remote buttons for applying playback digital effects.
Remote buttons for recording, zoom, and volume.
Remote buttons for menu navigation and playback zoom.
Factors affecting the correct operation of the remote.
Steps to install the battery into the remote controller.
Procedure for replacing the remote's battery.
Safety warnings for the remote control battery.
Steps to face the LCD monitor forward for self-recording.
How to halt the recording process.
How the mirror effect works for self-recording.
Indicators displayed and limitations of the mode.
Steps to insert pre-set titles into recordings.
Choosing the language for pre-programmed titles.
Choosing the specific pre-set title text.
Choosing the colour for the title overlay.
Adjusting the dimensions of the title overlay.
Information on how titles are displayed with certain modes.
Removing inserted pre-programmed titles.
Steps to capture and save custom titles for overlay.
Adding custom titles at the start of a recording.
Adding custom titles during the recording process.
Important information on custom title storage and effects.
Adding titles to footage during playback.
Applying digital effects to footage during playback.
Overlaying stored images during playback.
Choosing desired digital effects for playback.
Managing active digital effects during playback.
Recording a sequence of 9 stills for playback analysis.
Erasing or re-displaying multi-image sequences.
Recording a sequence of 9 stills for playback.
Erasing or re-displaying multi-image sequences.
Displaying a small still image within the main playback picture.
Removing or disabling the Picture-in-Picture display.
Using scene transition effects during playback.
Disabling the transition effects.
Available types of digital fade effects for playback.
Gradually fading the picture in during playback.
Gradually fading the picture out during playback.
Disabling the selected digital fade effect.
Saving a custom title to digital memory for playback.
Changing the colour of a stored title during playback.
Disabling the digital superimposer function.
Using the zoom function during playback.
Adjusting the zoom level for playback.
Moving the zoomed section of the playback image.
Disabling the playback zoom feature.
Viewing the recorded time elapsed on the tape.
Adjusting tape counter display options in camera mode.
Adjusting tape counter display options in VCR mode.
Marking and recalling specific tape positions.
Steps for copying recorded tapes to a VCR.
Tips for ensuring optimal dubbing quality.
Specifications for the PC and software.
Details on system compatibility for connection.
General safety and handling guidelines for the camera.
Guidelines for storing the camera safely.
Safety guidelines for the power adapter.
Important warnings and guidelines for battery use.
Guidelines for storing batteries to maintain performance.
Proper care and storage for video cassettes.
Addressing moisture buildup inside the camera.
Methods to avoid moisture formation.
Maintaining video heads for optimal playback quality.
Explanation of white balance concepts and camera operation.
Explanation of camera focus mechanisms.
Symbols indicating critical alerts and errors.
Symbols indicating camera operational modes.
Symbols for various playback states.
Symbols for selected modes and settings.
Symbols indicating active digital effects.
How to control the camera's demonstration feature.
List of power supplies, lenses, and filters.
List of accessories for playback and computer connection.
List of accessories for illumination and stability.
Detailed technical specifications for the camera model.
Technical specifications for the power adapters.
Issues related to camera power or automatic shutdown.
Issues with tape time display, distortion, or storage.
Issues related to no picture or unclear image during recording.
Problems starting recording or displaying titles.
Problems with picture quality during playback.
Problems related to the remote controller not functioning.
Problems or unexpected behavior with the demo feature.