27
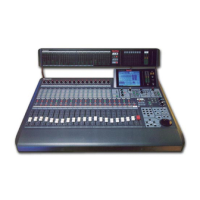
3.5 Example of systems for WR-DA7 tandem connections with DA-98 (1 unit)
and DA-38 (3 units)
This is a 32-track digital recording configuration using two WR-DA7 mixers configured in tandem
with three DA-38’s being synchronized using the DA-98 as the master unit. Synchronization with
timecode (MTC or SMPTE) generated from the DA-98 and remote control operations function
using MMC generated from the WR-DA7.
Method of connection
With the mixers powered OFF, insert the WR-TDIF option cards in Slots 1and 2 and install the WR-
TNDM card in SLOT 3 of the two WR-DA7 units. For proper grounding fasten them to the console
using the supplied screws.
Set the dip switches on the WR-TDIF card of the DA-98 and 38 (both SW1, 2 at ON, OFF).
Set the rear switch of the WR-TNDM card to MASTER for the WR-DA7 that is to be used as a master
unit and set the slave WR-DA7 to SLAVE.
Make the tandem connection between the WR-TNDM cards of the two WR-DA7 units using the pro-
prietary D-sub 25-pin Tandem Cable (Part # DA/DB-DB: Available in the USA).
For communication between the two WR-DA7 units, connect the master unit of the WR-DA7 with
the TO PC port of the slave unit using the recommended serial cable (Macintosh Printer cable).
For wordclock connections, connect the WORD SYNC OUT of the DA-98 to the WORD CLOCK IN
of the WR-DA7’s master unit (or select the SLOT that has the DA-98 connected to it as the Master
Wordclock source), and connect between the WCK OUT of the master unit for the WR-DA7 to the
WCK IN of the slave unit using the BNC-BNC cables. (Part # DA/BNC: Available in the USA)
For terminating the wordclock signals, the master unit is selected to 75ohm=OFF (*75 ‘=ON to
obtain synchronization from the slot) and the slave unit is selected to 75 Ohm=ON.
Connect the WR-TDIF card with DIGITAL I/O (TDIF-1) of the DA-98, 38 using the recommended
cables (Part # WR-TDIF: Available in the USA) and press the DIGITAL IN switch on the front panel
of each DA-98, 38 to select the digital-input mode.
Make the connections to the DA-98, 38 using the PW-88S SYNC cables, from SYNC OUT to SYNC
IN. Connect a terminator to the SYNC OUT of the last DA-38.
To make MIDI connections, establish a loop of the two WR-DA7 units and the DA-98, and make
MIDI cable connections from MIDI OUT to MIDI IN. This makes MMC and MTC functions avail-
able.
(It is possible to receive the SMPTE timecode by using the option card WR-SMPT. Make the connec-
tion from TIME CODE OUT (XLR) of the DA-98 to SMPTE IN (XLR) of the WR-DA7.)

 Loading...