18
TQBJ2179
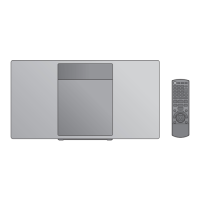
1 Unscrew the fixing screw at the rear of the unit.
2 Detach the stand from the unit while pressing the
catches upward.
≥ While lifting the catches upwards, gently pull the stand
forward.
3 Attach the fall prevention cord (not supplied) to this
unit.
A Fall prevention cord (not supplied)
≥ Bend the cord twice from the tip, each at 45o and 5 mm
(
3
/
16
q
)
apart for it to go through the holes.
B 5 mm
(
3
/
16
q
)
4 Put up the wall mounting sheet on the wall where
the unit is to be mounted.
≥ Spread out the wall mounting sheet when tapping it to
the wall.
5 Make holes on the wall at the center of each cross
mark on the sheet.
≥ Take the sheet away from the wall after its use.
6 Attach each wall mount bracket to the wall with two
screws (not supplied).
≥ Use a level to ensure both wall mount brackets are
level.
7 Attach the safety holder with two screws (not
supplied) to the wall.
Wall mount instructions
Before installation, turn the unit off and disconnect the
AC power supply cord from the AC outlet.
Keep the removed screw and stand for future use.
≥ When using the unit in a non-wall-mounted position again,
be sure to reattach the stand to the unit and secure it with
its screw.
Stand
Fixing screw
Soft blanket or cloth
Wall mounting sheet
Adhesive tape (not supplied)
Wall
420 mm
(16
17
/
32
q
)
102.5 mm
(4
1
/
16
q
)
130.5 mm
(5
1
/
8
q
)
141 mm
(5
9
/
16
q
)
100 mm
(3
15
/
16
q
)
118.5 mm
(4
11
/
16
q
)
300 mm
(11
13
/
16
q
)
100 mm
(3
15
/
16
q
)
39 mm
(1
17
/
32
q
)
73 mm
(2
7
/
8
q
)
Space required
At least
30 mm
(1
3
/
16
q
)
‰7.5 mm
(
19
/
64
q
)
to
‰9.4 mm
(
3
/
8
q
)
‰
4.0 mm (
5
/
32
q
)
Wall mount bracket
At least
30 mm
(1
3
/
16
q
)
‰7.5 mm
(
19
/
64
q
)
to
‰9.4 mm
(
3
/
8
q
)
‰
4.0 mm (
5
/
32
q
)
Safety holder
SC-HC410PC-TQBJ2179_Eng.book 18 ページ 2019年2月15日 金曜日 午前10時59分
 Loading...