26
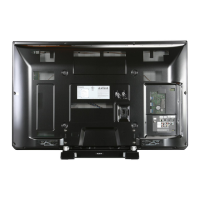
8.19. Remove the K-Board
1. Remove the Contact metal bottom B. (See section 8.16.)
2. Remove the screws (×2 ).
3. Remove the claw (×1 ).
4. Disconnect the connector (K1) and remove the K-Board
from the LED Panel.
8.20. Remove the V-Board
1. Remove the Contact metal bottom B. (See section 8.16.)
2. Remove the Claw (×1 ).
3. Disconnect the connector (V14) and remove the V-Board
from the 3D LED panel.
8.21. Replace the Plasma panel
Caution:
Place the Plasma panel on a flat surface of a table (cov-
ered by a soft cloth) and a cushion.
A new Plasma panel itself without Contact metals is fragile.
To avoid the damage to new Plasma panel, carry a new
Plasma panel taking hold of the Contact metals.
1. Place a carton box packed a new Plasma panel on the
flat surface of the work bench.
2. Open a box and without taking a new Plasma panel.
3. Attach the Cabinet assy and each P.C.Board and so on,
to the new Plasma panel.
 Loading...