Do you have a question about the ParaBody 827 LAT MACHINE and is the answer not in the manual?
Read all warnings and instructions before use. Use only for intended exercise. Do not modify.
Obtain a medical examination before commencing any exercise program.
Ensure body and clothing are clear of all moving machine parts.
Inspect machine before use. Do not use if damaged. Do not attempt repairs; contact dealer.
Ensure weight pin is fully inserted and do not prop plates in elevated positions.
Inspect cables and connections, especially cable ends. Do not attempt repairs; contact dealer.
Verify all spring-loaded pull pins are fully engaged and tighten thumbscrews before use.
Keep children away from the machine; supervise teenagers.
Assemble on a flat, level surface. Do not fully tighten frame connections until assembly is complete.
Lists the necessary tools for assembling the ParaBody 827 Lat Machine.
Specifies the minimum length, width, and height required for machine operation.
Details the dimensions of the machine when the optional leg press is attached.
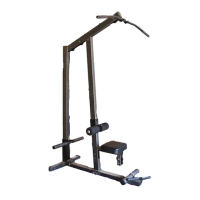
Attaches caps, end caps, round end caps, and loosely assembles rear upright to base.
Attaches glides and rubber bumper to the carriage.
Installs guides, roller pads, and spring pin assembly onto the roller pad support.
Installs end caps and loosely assembles front upright to the base.
Slides roller pad support onto front upright and carriage onto rear upright.
Loosely assembles top boom to uprights and securely attaches seat pad. Tighten all connections.
Routes cable through top boom, secures pulleys, and installs vinyl caps.
Attaches cable to carriage, places pulley in cable loop, and secures plates.
Secures cable ball end and pulleys to the front upright using specified hardware.
Loops cable over pulley, secures pulley to plates, and attaches cable to base.
Attaches lat bar and low row bar to cable ends and installs grips.
| Brand | ParaBody |
|---|---|
| Model | 827 LAT MACHINE |
| Category | Fitness Equipment |
| Language | English |