Do you have a question about the Parajet MAVERICK and is the answer not in the manual?
Covers warnings, disclaimer, warranty, and flight recommendations for safe operation.
Lists and illustrates the components included in the Maverick Lite Trike travel bag.
Step-by-step instructions for assembling the trike chassis, including wheels and brace arms.
Instructions for attaching the paramotor to the trike chassis using the quick-release clamp system.
Attaching paracord for weight shift and assembling the outer ring guard.
Guidance on adjusting offset blocks for optimal weight setting and flying characteristics.
Reference for setting offset blocks based on pilot and paramotor weight for takeoff.
Guide on adjusting paracord suspension for optimal weight shift, comfort, and safety.
Instructions for installing the reserve parachute container and connecting the strop.
Procedure for securely mounting the reserve parachute container to the paramotor harness.
Steps for priming and starting the Vittorazi paramotor engine safely.
Procedure for warming up the engine to ensure reliability and performance.
Detailed steps for preparing the glider for launch, including line checks and riser setup.
Step-by-step guide for launching the trike, controlling throttle, and lifting off.
Information on taxiing, in-flight behaviour, and limitations of the Lite Trike.
Guidance on approach, execution, and post-landing handling for safe landings.
Covers essential pre and post-flight checks for harness, airframe, engine, and glider.
Template for recording maintenance and service history of the Maverick Lite Trike.
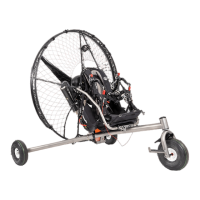
The Maverick Lite Trike is a lightweight and versatile paramotor trike designed to extend the precision engineering and design of Parajet's Maverick paramotor. It's intended for both daily use and long airborne adventures, offering a convenient and space-saving solution for pilots.
The core function of the Maverick Lite Trike is to provide a wheeled platform for a paramotor, allowing for easier take-offs and landings compared to foot-launching. It transforms a standard paramotor into a trike, offering a seated flying experience. The trike chassis is designed to be easily assembled and disassembled, making it highly portable. It integrates with the paramotor's harness and airframe, providing a stable and controlled flying platform. The trike's design emphasizes safety, ease of use, and adaptability to different pilot needs and flying conditions.
Assembly and Portability: The Lite Trike is shipped eighty percent factory-assembled, requiring minimal setup. Pilots need only to assemble the rear wheels and attach the brace arms. Once assembled, it can be folded into a space-saving package for easy storage and transport. This quick assembly and disassembly feature makes it ideal for pilots who need to transport their equipment frequently.
Paramotor Integration: The trike uses a two-part connector system (or a quick-release clamp system in newer models) to attach the paramotor airframe to the trike chassis. This system ensures a secure and central positioning of the paramotor on the trike. The harness arms are orientated towards the front of the trike chassis, and the fuel tank crossbar firmly locates onto a support plate at the rear.
Offset Blocks for Weight Adjustment: The trike features an offset block system to adjust the hangpoint, which is crucial for achieving optimal flying characteristics. These blocks can be moved to different positions on the pivot arm based on the pilot's take-off weight range. This adjustment system allows for fine-tuning to suit individual physique and flying style, ensuring comfort and control. Parajet provides a detailed guide for offset block fitment based on take-off weight, recommending testing in a simulator with an instructor.
Paracord Suspension System: A paracord suspension system stabilizes the trike chassis when the pilot is in a seated position during flight. Correct fitment of this system significantly impacts weight shift maneuverability, comfort, and safety. The paracord system has three variable adjustment settings (Standard, Short, and Tall) based on the pilot's inside leg length, ensuring a customized fit. The paracord runs freely through brace arm pulleys and underneath the main chassis tube, attaching to O-rings on the front of the harness.
Reserve Chute Integration: The trike is designed to accommodate a reserve parachute, which can be mounted on either side of the Maverick paramotor harness, replacing one of the harness pockets, or a front-mounted container can be used. Instructions are provided for attaching the reserve strop to a V-bridle and installing the reserve into its outer container, ensuring the deployment handle and V-bridle are correctly orientated and secured. The V-bridle is then routed to the shoulder straps and secured to maillons, with excess slack stowed in the reserve container.
Ring Guard Assembly: The outer ring guard sections are assembled by orientating mounts upwards, inserting nylon connectors, and pushing them together until button clips engage. Ring straps are then looped around the mounts and cage ring, ensuring a taut and secure fit.
Anchor Straps: Velcro anchor straps are looped around the rear axle, threaded through plastic buckles, and pulled tight. The tail end of the strap is routed around the foot brace of the Maverick airframe and then looped back around the rear axle, ensuring secure fastening with full contact.
Engine Starting and Warm-up (Vittorazi Motors): For starting, the fuel system needs to be primed by pushing the priming spring button and squeezing the priming bulb until fuel reaches the carburetor inlet. The hand control is attached to the pilot's hand with a velcro strap. The pull-start handle is used with a "Clear Prop" warning, pulling the cord quickly and firmly. For warm-up, the engine is run on idle for a couple of minutes, then the throttle is progressively squeezed and released for approximately five minutes until the engine reaches optimum operating temperature. The front wheel should be adequately braced to restrict travel during these procedures.
Glider Preparation and Launching: Before launch, the glider is unfurled downwind from the trike in a pronounced arc, with cell openings facing upward and the trailing edge into the wind. Lines are systematically pulled clear, risers are attached to the paramotor harness karabiners, and trimmers are set to a neutral or manufacturer-recommended position. Lines are slid into clips on the outer ring to remove slack. For launching, the pilot sits comfortably in the seat with the helmet on, checks the 6 connection points (leg straps, waist strap, karabiners, helmet strap), and ensures the area is clear. The engine is started, and power is applied progressively while controlling the trike via the foot-steerable front wheel and glider controls. Active glider control is maintained as it rises, preventing overshooting. Once the glider is overhead and stable, power is increased to maximum for take-off.
Taxiing and Landing: Ground control is achieved via the foot-steerable front wheel. Pilots are advised to practice taxiing at walking pace to familiarize themselves with the trike's handling, as it lacks brakes and higher speeds increase rollover potential. For landing, an early approach into the wind is recommended, with engine-off landings highly suggested for low airtime pilots. Upon landing, control of the glider is maintained to prevent damage to the trike and propeller, typically by stalling the glider behind the trike or to one side in windy conditions. When landing on an incline, the trike should come to a stop perpendicular to the gradient.
In-Flight Characteristics: The Maverick Lite Trike is designed for flight within the pilot's skill level and known limits, compatible with regular gliders as long as the maximum recommended weight range is respected. It is explicitly stated that the Lite Trike is not suitable for aerobatic or extreme maneuvers due to the increased risk of spiral neutrality/instability and abnormal stresses on the equipment.
Pre & Post Flight Safety Checklist: A comprehensive checklist is provided for pilots to perform before and after every flight. This fifteen-minute check helps pilots familiarize themselves with their equipment and identify any wear, tear, or mechanical problems. If any issues are found, the engine should not be started, and repairs must be carried out before flying. The checklist covers:
Service Log Book: The manual includes a dedicated "Service Log Book" section, providing blank pages for pilots to record maintenance activities, inspections, and any repairs carried out on their Maverick Lite Trike. This log book serves as a crucial record for tracking the device's history and ensuring ongoing airworthiness.
General Care and Lifespan: The lifespan of the Lite Trike is influenced by flying conditions, impacts, improper use, or harsh use. Regular inspection for signs of fatigue or wear before and after every flight is strongly recommended. Any problem, no matter how small, requires immediate repair with genuine Parajet parts before flying again. The manual emphasizes that treating the trike with care will extend its years of fun and use.
| Propeller Diameter | 125 cm |
|---|---|
| Thrust | 75 kg |
| Engine | Vittorazi Moster 185 Plus |
| Power Output | 25 hp |
| Weight | 24.7 kg (with Corsair Black Devil engine) |