EasyManua.ls Logo

Parkside PRP 400 A1 - User Manual

Parkside PRP 400 A1
128 pages
Go to English
Print Icon
To Next Page IconTo Next Page
Loading...
Regenfasspumpe / Water Barrel Pump / Pompe pour
collecteur deau de pluie PRP 400 A1
IAN 361098_2007
Regenton pomp
Vertaling van de originele gebruiksaanwijzing
Čerpadlo do sudu na
dťovou vodu
Překlad originálního provozního návodu
Water Barrel Pump
Translation of the original instructions
Regnvandspumpe
Oversættelse af den originale driftsvejledning
Regenfasspumpe
Originalbetriebsanleitung
Pompe pour collecteur d’eau de pluie
Traduction des instructions d‘origine
Pompa do deszczówki
Tłumaczenie oryginalnej instrukcji obsługi
Čerpadlo na dažďovú vodu
Preklad originálneho návodu na obsluhu
Bomba para depósitos de aguas
pluviales
Traducción del manual de instrucciones original

Table of Contents

Question and Answer IconNeed help?

Do you have a question about the Parkside PRP 400 A1 and is the answer not in the manual?

Overview

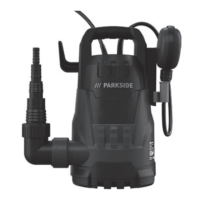
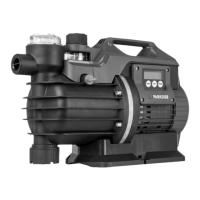
This document describes the Parkside PRP 400 A1 Water Barrel Pump, a high-quality product designed for pumping water from rain barrels or collection tanks, particularly suitable for garden irrigation. The device is intended exclusively for pumping clear water and rainwater up to a maximum temperature of 35°C. Commercial use is not recommended and will void the warranty.

Function Description:

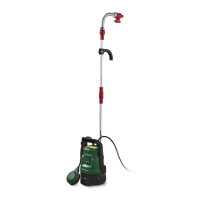
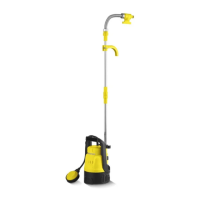
The pump is equipped with a float switch that automatically turns the pump on or off based on the water level. In case of overload, an integrated thermal protection switch will shut off the pump. The motor will restart automatically once it has cooled down. A height-adjustable plastic hook on the aluminum pipe allows the pump to be hung in a rain barrel, facilitating convenient water extraction via a hose. The shut-off valve functions as a water tap, regulating the flow.

Important Technical Specifications:

  • Model: PRP 400 A1
  • Input Voltage (U): 230 V~; 50 Hz
  • Power Consumption (P): 400 W
  • Safety Class: I
  • Degree of Protection: IPX8
  • Max. Discharge Rate (Qmax): approx. 4000 l/h
  • Max. Discharge Head (Hmax): 13 m
  • Max. Immersion Depth: 7 m
  • Max. Foreign Body Size (absorbable suspended solids): 3 mm
  • Max. Water Temperature (Tmax): 35°C
  • Mains Cable Length: 10 m

Usage Features:

The pump's assembly involves several steps:

  1. Lower Aluminum Pipe Assembly: Insert the large sealing ring (15) into the adapter (11) of the pressure connection, then screw the adapter (11) to the pump's pressure connection (21). Clip the pipe holder (12) with its middle holder to the aluminum pipe, ensuring the mounting rail points downwards. Insert a medium-sized sealing ring (14) into a screw sleeve (20). Place an aluminum pipe (19) onto the adapter (11) and secure it with the screw sleeve (20). Finally, push the pipe holder (12) down the aluminum pipe until it engages in the device's recess.
  2. Upper Aluminum Pipe Assembly: Connect the lower and upper aluminum pipes (19) using the connector (10). Place a small sealing ring (13) between the connector (10) and each of the two screw sleeves (18).
  3. Plastic Hook Assembly: Loosen the wing nut (8) on the plastic hook (7), remove the screw (9), clip the plastic hook (7) onto the upper aluminum pipe (19), and then fix it with the screw (9) and wing nut (8).
  4. Flexible Pipe Assembly: Insert a medium-sized sealing ring (14) into a screw sleeve (20). Push the flexible pipe (17) onto the upper aluminum pipe (19) and secure it with the screw sleeve (20).

Immersing the Pump:

Always use the plastic hook (7) or attach a rope to the carrying handle (2) to immerse or raise the pump. Never hold or hang the unit by the mains connection cable or the bent pipe/water hose, as this poses a risk of electric shock due to damaged cables. When immersing, ensure the shut-off valve (16) is open to vent the pump. The height of the plastic hook can be adjusted by loosening the wing nut (8), allowing the pump to hang in a rain barrel without touching the bottom and drawing in sediment. If the water level is low, the pump can be placed on the bottom, but the shut-off valve must protrude over the edge of the container. It is recommended to place the pump on a brick to avoid drawing in dirt and sand that may accumulate at the bottom of the barrel.

Mains Connection:

The pump comes with a safety plug and is designed for connection to an earthed socket with a residual current circuit breaker (RCCB) of 230 V ~ 50 Hz.

Operation:

The float switch (1) allows for continuous adjustment of the on/off switching points. To adjust, release the cable (5) from the fastening (6) and press it into the desired position. Ensure the float switch (1) can move freely, and the "On" and "Off" switching points are easily accessible. Choosing too long a cable for the float switch, especially if not hooked into the fastening, risks dry running. For manual operation, position the float switch (1) vertically in the fastening (6) for continuous running. To switch on, open the shut-off valve (16) (turn in + direction) to regulate water flow. Fully immerse the pump and insert the mains plug into the socket. The pump starts immediately. To switch off, pull the plug from the socket. If the water level is too low, the float switch will automatically turn off the pump. Supervise the appliance during operation to detect automatic cut-outs or dry running promptly.

Maintenance Features:

Regular cleaning and maintenance ensure performance and longevity.

  • General Cleaning: Clean the pump with clean water after each use. Remove any fluff or fibrous particles from the pump housing (3) with a water jet. Clean the float switch (1) and suction foot (4) from deposits with clear water.
  • Filter Cleaning: The suction foot contains a removable filter (23) to protect against contamination. Check and clean it occasionally. To clean, unplug the pump, turn the filter cover (22) a ¼ turn clockwise, remove it, clean the filter (23) under running water, and reassemble in reverse order. The pump must not be operated without the filter (23).
  • Flushing the Pump: After pumping heavily polluted water, flush the pump with lukewarm water (max. 35°C) until the pumped water is clear to prevent deposits.
  • Storage: Clean the pump before storage. Store it in a dry, frost-free place, out of reach of children. For longer periods of non-use, thoroughly clean and flush the pump before and after storage to prevent starting problems due to deposits.
  • Space-Saving Storage: Dismantle the flexible pipe (17) and the upper aluminum pipe (19). Clip them into the right and left sides of the pipe holder (12). Keep the sealing rings (13/14) in a safe place.

All other maintenance or repair work, especially opening the pump, must be carried out by a qualified electrician. Always contact the service center for repairs.

Parkside PRP 400 A1 Specifications

General IconGeneral
BrandParkside
ModelPRP 400 A1
CategoryWater Pump
LanguageEnglish

Related product manuals