EasyManua.ls Logo

Partex ProMark T-1000 - User Manual

Partex ProMark T-1000
4 pages
Print Icon
To Next Page IconTo Next Page
Loading...
CABLE I.D. PRINTER
Thank you for purchasing your new PROMARK T-1000 printer. The T-1000 is a professional, por-
table, thermal-transfer printer for Partex profiles, with which you can easily make your own mar-
kers for wires, cables and electrical components. The printer is compatible with Partex software
that enables you to import files directly from Excel. The PROMARK T-1000 is the perfect solution
for contractors, electricians and manufacturers of control cabinets.
Question and Answer IconNeed help?

Do you have a question about the Partex ProMark T-1000 and is the answer not in the manual?

Overview

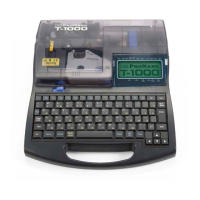
The PROMARK T-1000 is a professional, portable, thermal-transfer printer designed for creating markers for wires, cables, and electrical components. It is compatible with Partex profiles and software, allowing users to import files directly from Excel for efficient marker production. This device is particularly suited for contractors, electricians, and manufacturers of control cabinets.

Function Description:

The primary function of the T-1000 is to print identification markers using thermal-transfer technology. It supports various Partex profiles, ensuring compatibility with a range of marking needs. The printer's integration with Partex software streamlines the marker creation process, enabling users to design and print custom markers with ease. The thermal-transfer method ensures durable and legible prints suitable for industrial applications.

Usage Features:

Installation and Setup:

  1. Power Connection: Before connecting the power, ensure the power switch is turned off. The device uses an AC adapter (N14584) which connects to a household power outlet. The shape of the power plug may vary by country.
  2. Cover Operation: The printer features a cover that needs to be opened for ribbon and tube installation and closed before operation.
  3. Ribbon Cassette Installation:
    • Remove the stopper from the ribbon cassette.
    • Take up any slack in the ribbon to ensure smooth feeding.
    • Push the cassette into its designated slot until it clicks into place, indicating proper installation.
    • Caution: Avoid touching the metal connector part of the cassette or the connection terminal, as this can lead to improper recognition of the cassette.
  4. Tube Attachment Installation:
    • Align the hooks on the tube attachment with the corresponding holes on the printer.
    • Push the tube attachment in until it clicks into place securely.
  5. Tube Insertion:
    • Push the tube into the printer until its tip touches transport roller 2.
    • It is crucial to insert the tube with the correct curve orientation as shown in the figures. Incorrect orientation can cause the tube to jam and result in a feed error.
  6. Power On: After all accessories are installed and the cover is closed, turn on the power switch.

Inputting Characters (Example: Printing "C-2" on PO-05 profile):

  1. Character Input:
    • To input "C", hold down the [Shift] key and press [C].
    • To input "-", press the [-] key.
    • To input "2", press the [2] key.
  2. Correcting Errors:
    • If an incorrect character is accidentally input (e.g., "C=2" instead of "C-2"), use the left [◄] and right [►] arrow keys to move the cursor box to the position of the incorrect character (e.g., "2").
    • Press [Back Space] to delete the incorrect character (e.g., "=").
    • Then, input the correct character (e.g., "-").

Printing Process:

  1. Initiate Print: Press the [Print] button. Ensure that "PO" (Partex Profile) is selected as the print media.
  2. Ribbon Cassette Check: The printer will display messages if there are issues with the ribbon cassette:
    • "No ribbon cassette": Indicates the ribbon cassette is not installed. Install it as described.
    • "No ribbon information" / "No ribbon amount displayed" / "Press enter": Indicates that information cannot be read due to a ribbon cassette failure or other issues. Follow on-screen instructions if this message appears.
  3. Select Profile Size: Press [Enter]. Make sure that the desired profile size (e.g., PO-05) is selected.
  4. Set Print Quantity: Press [Enter]. Ensure that "Sets to print" is set to the desired quantity (e.g., "1"). The range for sets to print is typically 1 to 10, with an option for "All".
  5. Start Printing: Press [Enter]. The tube will automatically feed into the printer, and printing will begin.
  6. Automatic Cutting: Once printing is completed, the tube is automatically cut.
  7. Retrieve Tube: Take out the cut tube.

Maintenance Features:

  • Ribbon Cassette Management: The printer provides feedback regarding the ribbon cassette status, including warnings for uninstalled or faulty cassettes. This helps users ensure continuous operation by prompting them to install or replace ribbons as needed.
  • Error Handling: The device is designed to detect and alert users to common errors, such as incorrect tube orientation or ribbon cassette issues, guiding them through corrective actions to prevent damage or printing failures.
  • Software Compatibility: The T-1000's compatibility with Partex software, including direct file import from Excel, simplifies the management of print jobs and marker designs, contributing to overall system maintenance and efficiency.

Important Technical Specifications (Inferred from manual):

  • Printing Technology: Thermal-transfer.
  • Media Type: Partex profiles (e.g., PO-04, PO-05, PO-06).
  • Power Source: AC adapter (N14584) connected to household power outlet.
  • Portability: Designed as a portable device.
  • Input Method: Integrated keyboard for character input.
  • Display: Features a screen for displaying input characters, print media selection, and error messages.
  • Automatic Features: Automatic tube feeding and cutting.
  • Software Integration: Compatible with Partex software for file import (e.g., from Excel).

Partex ProMark T-1000 Specifications

General IconGeneral
BrandPartex
ModelProMark T-1000
CategoryPrinter
LanguageEnglish

Related product manuals