EasyManua.ls Logo

Partex ProMark T-2000 - User Manual

Partex ProMark T-2000
132 pages
Print Icon
To Next Page IconTo Next Page
Loading...
CABLE ID PRINTER
USER’S GUIDE
Please read through the safety instructions written down in this manual before using this product.
Keep the manual in a safe place so that you are able to refer to it whenever you need to.
* Please note that the contents of this manual are subject to change without notice.
All functions and operations of this product are described in the
user’s guide. Please check our website below. www.partex.nu

Table of Contents

Other manuals for Partex ProMark T-2000

Question and Answer IconNeed help?

Do you have a question about the Partex ProMark T-2000 and is the answer not in the manual?

Summary

Before You Begin

Viewing This Manual

Explains how to read the manual.

Trademarks

Lists company and product trademarks.

Names of Components

1. Preparation; Setup

Preparing the Power Supply

Details how to connect power.

Turning the Printer On;Off

Explains how to power the printer on and off.

Installing the Ribbon Cassette

Guides on installing the ribbon.

2. Input; Edit

Basic Input Operations

Basic operations for entering text and data.

Editing Characters and Lines

Modifying text properties like size and spacing.

Setting the Cut Length

Configuration of print media cutting.

3. Print; Save

Basic Printing Operations

Core printing functions.

Adjustment of Printing Results

Fine-tuning print output.

Cutter Settings

Adjusting cutter behavior.

4. Print Using a Computer

Installing the Software

Software installation steps.

Connecting to a Computer

Establishing PC connection.

5. Maintenance; Printer Settings

Cleaning the Printer

Procedures for cleaning printer parts.

Replacing the Cutter

How to replace the cutter assembly.

Changing the Printer Settings

Customizing printer operational settings.

6. Troubleshooting

If a Tube or Label Tape Becomes Jammed

Handling print media jams.

What to Do in Case of Trouble

General troubleshooting guidance.

Updating the Firmware

Process for updating printer firmware.

7. Appendix

Specifications

Technical details of the printer.

Consumable Supplies and Options

Information on compatible supplies.

Before You Begin

Marks

Explanation of warning and information symbols.

About the Text

Notes on text conventions and copyright.

Names of Components

External View

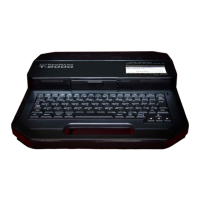
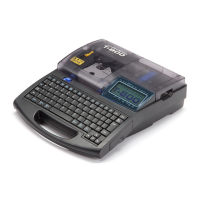
Visual overview of the printer's exterior.

Names of Components

Inside View

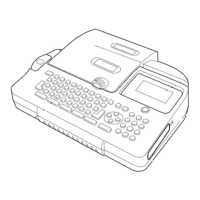
Detailed view of internal printer components.

Tube Attachment

Description of the tube attachment accessory.

Names and Functions of Keys

How to Read the Display

CHAPTER1 Preparation; Setup

Preparing the Power Supply

Details how to connect power.

Turning the Printer On;Off

Explains how to power the printer on and off.

Installing the Ribbon Cassette

Guides on installing the ribbon.

PREPARING THE POWER SUPPLY

Connecting the AC Adapter

Steps for connecting the AC adapter.

Use with Batteries

Instructions for using batteries.

TURNING THE PRINTER ON;OFF

Turning the Printer On

Steps to turn the printer on.

TURNING THE PRINTER ON;OFF

Turning the Printer Off

Steps to turn the printer off.

INSTALLING THE RIBBON CASSETTE

LOADING THE PRINT MEDIA

Loading a Tube or Plate

How to load tubes or plates.

LOADING THE PRINT MEDIA

REPLACING THE PRINT MEDIA

For Thin Tubes (Φ1.5 mm)

Replacing media for thin tubes.

For Other Print Media

Replacing other types of print media.

REPLACING THE PRINT MEDIA

(When using a tube or plate)

Removing tubes or plates.

Using the (Optional) Tube Warmer

Set the Tube in the Tube Warmer

How to insert a tube into the warmer.

Set the Tube in the Tube Warmer

Changing the Temperature Setting of the Tube Warmer

CHAPTER2 Input; Edit

Basic Input Operations

Basic operations for entering text and data.

Editing Characters and Lines

Modifying text properties like size and spacing.

Setting the Cut Length

Configuration of print media cutting.

BASIC INPUT OPERATIONS

About Pages

Explanation of page concept and navigation.

How to Use the Cursor

How to navigate the cursor for text input.

Before Input

Insert Mode and Overwrite Mode

Switching between text insertion modes.

Entering Text

Entering Symbols

Deleting Characters

Deleting with the [Back Space] key

Using Backspace to delete.

Deleting with the [Del] key

Using the Delete key to remove characters.

Deleting All Characters That Have Been Entered

EDITING CHARACTERS AND LINES

Setting the Character Size

Adjusting the size of printed characters.

Surround Text with a Frame

Specifying the Orientation and Character Direction

Specify the Character Spacing

Specifying the Number of Lines

Numbering

Numbering

Underline 6, 9

Underlining numbers 6 and 9 for distinction.

Adding a Line Between Lines

SETTING THE CUT LENGTH

About Cut Length

Definition of cut length.

Specify the Cut Length and Alignment

How to set cut length and text alignment.

Expanding the Print Area of the Plate

Align Multiple Lines of Text to the Center

Setting the Cut Length Settings for All Pages.

CREATING AND EDITING PAGES

Creating a New Page

How to create a new page.

Copying a Page

Moving Pages

Inserting a Page

Delete a Page

Page Division

Page Combining

CHAPTER3 Input; Edit

Basic Printing Operations

Core printing functions.

Adjustment of Printing Results

Fine-tuning print output.

Cutter Settings

Adjusting cutter behavior.

BASIC PRINTING OPERATIONS

Printing

Steps for initiating a print job.

Checking the Print Preview

Printing by Specifying a Print Range

Setting Up Repeat Printing of a Page

ADJUSTMENT OF PRINTING RESULTS

Fine Adjustment of Print Position and Cut Length

Fine-tuning print position and cut length.

Fine Adjustment of Print Position and Cut Length

Fine Adjustment of Print Position and Cut Length

Changing the Print Density

Changing the Print Speed

CUTTER SETTINGS

Changing the Set Cut

Modifying the cut settings.

Changing the Half Cut Settings

Adjusting half-cut behavior.

Changing the Set Cut

Changing the Full Cut Settings

Adjusting full-cut behavior.

Changing the Set Cut

Changing the Plate Full Cut

Specific setting for plate full cuts.

Adjusting the Cutter Depth

Changing the Cut Depth for Half Cut

Adjusting half-cut depth.

Adjusting the Cutter Depth

Changing the Cut Depth for Full Cut

Adjusting full-cut depth.

Using Forced Full Cut

Adjusting the Cutter Speed

Changing the Speed of the Half Cut

Adjusting half-cut speed.

SAVING AND LOADING TEXT DATA

Saving a File

Procedures for saving text data.

Loading a File

Deleting a File

Changing the Folder Name

CHAPTER4 Print Using a Computer

Installing the Software

Software installation steps.

Connecting Multiple Printers

Connecting more than one printer.

Uninstalling the Printer Driver

Removing printer drivers.

Connecting to a Computer

Establishing PC connection.

INSTALLING THE SOFTWARE

Installing the Printer Driver

Steps for installing the printer driver.

Connecting Multiple Printers

Uninstalling the Printer Driver

Connecting to a Computer (Switching To PC Connection Standby Mode)

VIEW THE STATUS MONITOR

View Settings for the Status Monitor

Configuring status monitor display.

View Printer Status

Checking current printer operational status.

List of Message

PROMARK CREATOR

Requirements

System requirements for Promark Creator.

How to instal the software:

Steps for installing the software.

How to create markers content?

Manual creation of markers

Creating markers manually.

Creating a new project

Steps to start a new project.

Advanced sequences

Basic data import

Import data from an Excel file

Importing data from Excel files.

Import data from CSV file

Importing data from CSV files.

Import data from the Clipboard

Importing data from clipboard.

Advanced data import

Fixing marker errors

Identifying errors in marker settings

Locating errors in marker settings.

Filtering and fixing marker errors

Methods for correcting marker errors.

Printing

Markers printed out on your Promark printer

Details on printing from the printer.

Saving to printer

Saving customized markers to the printer.

CHAPTER5 Maintenance;Printer Settings

Cleaning the Printer

Procedures for cleaning printer parts.

Replacing the Cutter

How to replace the cutter assembly.

Changing the Printer Settings

Customizing printer operational settings.

CLEANING THE PRINTER

Cleaning the Outside of the Printer

Steps for cleaning the printer exterior.

Cleaning the Inside of the Printer

Steps for cleaning the printer interior.

Cleaning the Transport Roller

Cleaning the Print Head

Cleaning;Replacing the Cleaners

REPLACING THE CUTTER

CHANGING THE PRINTER SETTINGS

Changing the Display Settings

Adjusting the display density

Modifying display contrast and brightness.

Changing the Display Settings

Changing the Language

Setting the printer's display language.

Turning Off Sounds

Speeding Up the Time until Printing Starts

Change the Rewind Movement Settings

Changing the Function Assignment of the Connect Key

Initializing this Printer

BLUETOOTH

Connecting a Tablet Device to the Printer

Pairing a tablet device via Bluetooth.

CHAPTER6 Troubleshooting

If a Tube or Label Tape Becomes Jammed

Handling print media jams.

What to Do in Case of Trouble

General troubleshooting guidance.

Updating the Firmware

Process for updating printer firmware.

IF A TUBE OR LABEL TAPE BECOMES JAMMED

WHAT TO DO IN CASE OF TROUBLE

A MESSAGE IS COMING UP

UPDATING THE FIRMWARE

Checking the Firmware Version

Verifying the current firmware version.

Running the Firmware Update

Steps to perform the firmware update.

CHAPTER7 Appendix

Specifications

Technical details of the printer.

List of Function

Overview of printer functions and keys.

Consumable Supplies and Options

Information on compatible supplies.

Specifications

Printer

Technical specifications of the printer model.

Height limit table for each media and font size

LIST OF FUNCTION

CONSUMABLE SUPPLIES AND OPTIONS

Consumable Supplies

List of compatible printing materials.

Optional elements

ACCESSORIES

LIST OF SYMBOLS

INDEX

Partex ProMark T-2000 Specifications

General IconGeneral
BrandPartex
ModelProMark T-2000
CategoryPrinter
LanguageEnglish

Related product manuals