Ref. 11/676 PM2092/2-V
PMS2000 System8
Il led rosso ‘OK’ dopo circa 2 secondi
rimarrà acceso in modo fisso ad indicare la
corretta acquisizione dell’impedenza di linea.
3. Riportare la leva 1 e la leva 8 in posizione OFF:
il led rosso si spegne.
After about 2 seconds the red ‘OK’
LED will remain steadily on to indicate
correct acquisition of the line impedance.
3. Return levers 1 and 8 to the OFF position: the
red LED will extinguish.
• Impostazione dell’intervallo tra
un test ed il successivo
Per impostare l’intervallo di test desiderato,
devono essere utilizzate le levette da 4 a 8. La
levetta 2 identifica il modo ‘
test time’
. Impostiamo
ad esempio un intervallo di 5 secondi:
1. Portare la levetta 2 in posizione ON;
2. Portare in posizione ON la levetta 1 (Invio):
il led rosso ‘OK’ si accende in modo fisso.
3. Riportare in posizione OFF la leva 1 e
successivamente la leva 2; il led si spegne
indicando che l’impostazione è stata acquisita
correttamente.
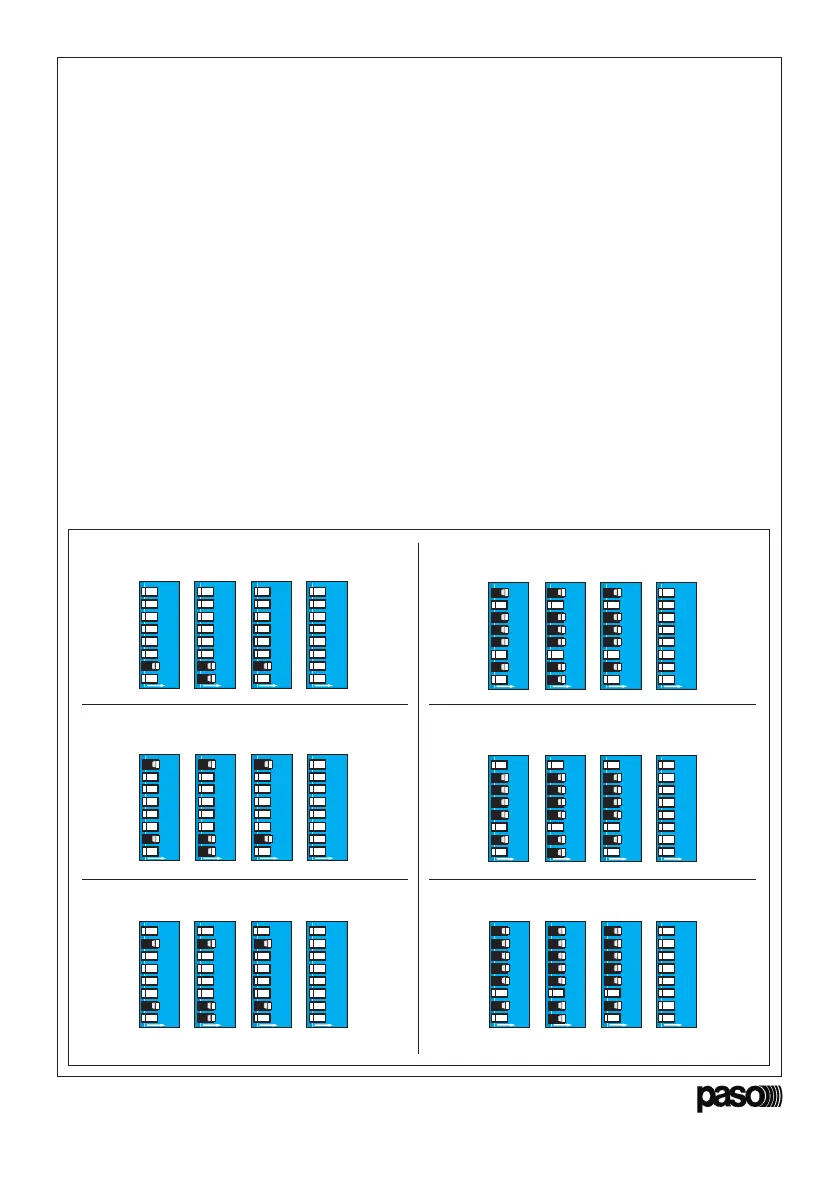
Riportiamo nella figura 4.1.2 gli esempi della
impostazione degli intervalli più comuni.
• Setting the interval between
one test and the next
Levers 4 to 8 have to be used for setting the
required testing interval.
Lever 2 identifies the ‘
test time
’ mode.
For example, to set an interval of 5 seconds:
1. Move lever 2 to the ON position;
2. Move lever 1 to the ON position (Enter): the
red ‘OK’ LED will light up steadily.
3. Return lever 1 and then lever 2 to the OFF
position. The LED will extinguish to show that
the setting has been correctly acquired.
Figure 4.1.2 shows examples referred to setting
the most commonly used intervals.
0 = 5 sec. (intervallo minimo/
minimum interval
) 29 = 29 min
30 = 1 h (intervallo massimo/
max. interval
)
31 = NO TEST
1 = 1 min
2 = 2 min
AB D
ON
12345678
C
ON
12345678
ON
12345678
ON
12345678
AB D
ON
12345678
C
ON
12345678
ON
12345678
ON
12345678
AB D
ON
12345678
C
ON
12345678
ON
12345678
ON
12345678
AB D
ON
12345678
C
ON
12345678
ON
12345678
ON
12345678
AB DC
ON
12345678
ON
12345678
ON
12345678
ON
12345678
D
ON
12345678
A
ON
12345678
B
ON
12345678
C
ON
12345678
Fig. 4.1.2