13
Remove the transport securing device
from the vacuum chamber
11
. Carefully
read the notes in the quick start guide and
keep this in a safe place.
Functions
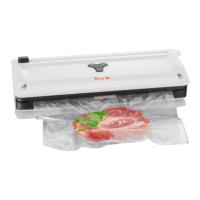
Vacuuming
Connect the device to the power supply
and place the opening of the vacuum bag
in the vacuum chamber
11
.
Close the device cover by rmly pressing
both sides of the cover down until you
hear “clicking” sound. Press the vacuum
button
2
to switch on the vacuum pump.
The LED
5
will light up blue during this
process. (The vacuum value reaches up
to -50 kPa.)
As soon as it has nished vacuuming, the
heat sealing process will begin automat-
ically. When this step has nished, the
device will switch off automatically and the
blue LED
5
will fade out.
Note: In the case of an emergency you can
switch off the device at any time using the
stop button
1
.
Note: The vacuuming process can take up to
2 minutes. If a complete vacuum cannot be
created within a vacuum bag, after 2 minutes
the display
5
will ash blue. Press the vacuum
button
2
again. The heat sealing process will
begin automatically after this.
Press the stop button
1
to interrupt the
process for products which are not meant
to be completely vacuumed.
Then, press the heat seal button
3
to
continue the process.
When the heat sealing process has nished,
the device will stop automatically.
Note: We recommend that you wait 20 seconds
between individual vacuuming and heat sealing
processes.
Heat sealing
Connect the device to the power supply
and place the opening of the bag to be
heat sealed in the vacuum chamber
11
.
Press the heat seal button
3
to close
the bag directly without vacuuming be-
forehand.
Note: We recommend that you wait
20 seconds between individual vacuuming
and heat sealing processes.
Cutting
The vacuum packaging device is equipped
with a cutter
9
. Lift up the cutter
9
and
insert the vacuum lm. Close the cutter
9
to hold the lm in place. Slide the
cutter
9
to the side and cut the lm.
Note: The cutter is sharp. To prevent cut
injuries do not touch it.
Creating a vacuum bag from a
roll of lm yourself
Open the cover and use the cutter
9
to
cut off the required amount of vacuum
lm.
Place each lm end at on the heat seal
surface
6
and hold the lm in place.
Close the device cover by rmly pressing
both sides of the cover down until you
hear “clicking” sound.
Connect the device to the power supply
and press the heat seal button
3
. The
LED
5
will light up blue. Heat sealing
takes about 6 to 8 seconds. The blue LED
goes off and the device will switch off au-
tomatically. It is recommended to open the
cover after a further approx. 10 seconds,
so that the welding seam can solidify
optimally.
English