A. GENERAL
1. PUREFIRE boilers are intended for installation in an
area with a floor drain or in a suitable drain pan. Do
not install any boiler where leaks or relief valve
discharge will cause property damage.
2. The P
UREFIRE boiler is not intended to support
external piping. All venting and other piping should
be supported independently of the boiler.
3. Install the boiler level to prevent condensate from
backing up inside the boiler.
4. P
UREFIRE boilers can be wall mounted or floor
standing. The following instructions provide guidance
for both configurations.
B. WALL MOUNTING
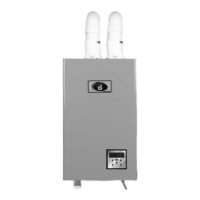
1. To wall mount the PUREFIRE boiler an optional wall
mounting bracket kit (54171) is available for models
up to PF140 (refer to Figure 2.1).
2. Mount the bracket level on the wall using 5/16" lag
bolts. Be sure that the lag bolts are supported by wall
studs.
3. Boiler will hang on bracket and can be leveled using
(2) 5/16 lag screws as shown.
4. The mounting bracket has (4) holes on 16" centers.
This is intended to give the installer the ability to
mount the bracket on two wall studs spaced at this
interval. If existing wall studs are spaced differently or
if the desired location is not in line with the wall studs,
additional support is required.
5. If the boiler is wall mounted, be sure that the wall
provides adequate support for the boiler.
6. Be sure to adequately support the boiler while
installing external piping or other connections.
7. Be sure that the condensate piping is routed to a
suitable drain or condensate pump.
C. FLOOR STANDING INSTALLATION
1. For floor standing installations, use the leveling feet to
assure that the boiler is completely level. This will
prevent condensate from backing up in the boiler.
2. Be sure to leave adequate space for condensate
piping or a pump if required.
4
BOILER SET-UP
2. BOILER SET-UP
This boiler must be installed level to prevent
condensate from backing up inside the boiler.
CAUTION
Make sure the boiler is adequately supported. Do not
install this boiler on drywall unless adequately
supported by wall studs.
WARNING
Figure 2.1