12
information is provided on the last page of
this manual.
• The assembly and installation operations
must be carried out by adults.
Do not use installation methods different
from those indicated. This would result in
the risk of detachment from the seat.
• Do not insert fingers into the mechanisms.
• When travelling by car, take special care
to ensure that luggage or other unsecured
items cannot injure the child sitting in the
car seat in the case of an accident.
• For more information, please contact the Peg
Perego Assistance Department by writing to:
customer.service@pegperego.com
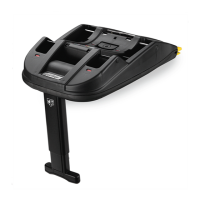
Attaching the Base Twist
1 Check the location of Isofix connectors and
Isofix or I-Size logos on the seats in your
vehicle.
2 Install this car seat only on seats facing the
normal direction of travel. If the vehicle has
rotating or repositionable seats, position the
seat so it faces the direction of travel.
3 Extend the Isofix connectors by using the two
levers on the side: press the safety tab (1) and
the release button (2) and, at the same time,
push the connectors as far out as they can (3).
4 Rotate the support foot from under the base.
5 Position the base on the vehicle seat as shown in
the figure, aligned with the Isofix connectors (a).
Push the base towards the vehicle seat’s Isofix
connectors, pushing evenly on both sides
of the base (b), checking there are no items
or anything else near the seat connectors
that could cause a malfunction. Connect
and continue pushing the base towards the
vehicle seat until you hear a click (c) and until
it touches the back of the seat.
Check the base is aligned with the direction of
the vehicle.
IMPORTANT: the two indicators on the
connector activation levers of the Base
Twist will turn from red to green to show
that it has been connected correctly.
IMPORTANT: after completing the
operation, try moving the base to verify
that both Isofix connectors have been
connected correctly.
6 Adjust the height of the supporting foot by
pressing the lever at the base of the foot until
it touches the vehicle floor (it is important that
the foot be resting firmly on the vehicle floor,
even if this means the base is raised slightly
above the vehicle seat).
If there is a storage compartment in the floor
of your vehicle in the area where the leg rests,
open the compartment lid and rest the leg on
the base of the compartment.
7 The base has a rotating attachment plate. To
place the plate in the desired position, press
the lever near the leg (1) and, at the same
time, rotate the plate until it clicks (2).
8 The indicators on the side of the lever are
green when the rotating plate is correctly
attached and positioned either forward-facing
or rear-facing. If they are red, the plate is
sideways or the attachment is not correct.
IMPORTANT: if the indicators are red, do
not use in a moving car.
Using with Primo Viaggio SLK
9 Hold the car seat from the handlebar and attach
it to the base by pressing down on the product
with both hands until it clicks into place.
IMPORTANT: the two indicators on the side
of the base will turn from red to green to
show that it has been connected correctly.
IMPORTANT: after completing the
operation, try moving the car seat to verify
it has been connected correctly.
10 The handlebar must be rotated all the way
forward, close to the back of the vehicle seat,
as shown in the figure. Press the two buttons
on the handlebar, rotate it and position it
towards the vehicle seat, as shown in the
figure, until it clicks.
11 To rotate the infant seat on the base (only for
sitting or removing the child from the seat),
press the lever near the leg (1) and, at the
same time, pull the car seat from one side so
that it rotates on the base plate (2).
IMPORTANT: if the indicators of the rotating
plate are red, do not use in a moving car.
12 To release the car seat from the base, put the
handlebar in the carry position and pull the
lever on the back while simultaneously lifting
the car seat.
Using with Primo Viaggio Lounge
13 Pull out the rebound bar from under the base
until fully extended, as shown in the picture.
14 Before attaching the car seat onto the base,
check that the backrest is in position 1 or 2,
acting on the handle on the top part of the
backrest.
IMPORTANT: do not attach Primo Viaggio
Lounge on the Base Twist with the backrest
in position 3.
15 Proceed with attaching the car seat onto the
Base Twist until it clicks into place. To rotate the
car seat on the base, proceed as in point 11.
16 The handlebar must be rotated all the way
forward, close to the back of the vehicle seat,
as shown in the figure. Press the two buttons
on the handlebar, rotate it and position it
towards the vehicle seat, as shown in the
figure, until it clicks.
17 To release the car seat from the base, put the
handlebar in the carry position and pull the
lever on the back while simultaneously lifting
the car seat.
Using with Viaggio Twist
in rear-facing position
18 Check the rebound bar is in the slot under
the base when using Viaggio Twist.
Attach Viaggio Twist by positioning it on the
Base Twist near the connectors (check the
base shape matches) and pushing downwards
until it clicks.
Make sure that the red/green indicators on
the side of the rotating plate are in the green
position.
IMPORTANT: the two indicators on the side
of the base will turn from red to green to
show that it has been connected correctly.
IMPORTANT: after completing the
operation, try moving the car seat to verify
that the Isofix fittings have been connected
correctly.
19 Rotate the infant seat to rear-facing position by
pressing the lever near the leg (1) and, at the
same time, pulling the car seat from one side
so that it rotates on the base plate (2).
20 When this step is complete, check that the
indicators on the side of the rotation lever
 Loading...