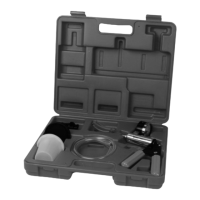
6
INTAKE MANIFOLD LEAK
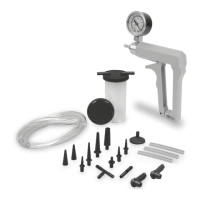
1. With the vacuum pump connected to an intake manifold
vacuum port.
2. Start engine, bring to normal temperature and let idle.
3. Look at the needle’s movement on the gauge.
• If you have a bad gasket, or cracked hose this could
cause air to leak into the intake system. If this happens,
the needle will read about 4 to 9 in. of Hg below normal,
and will remain steady.
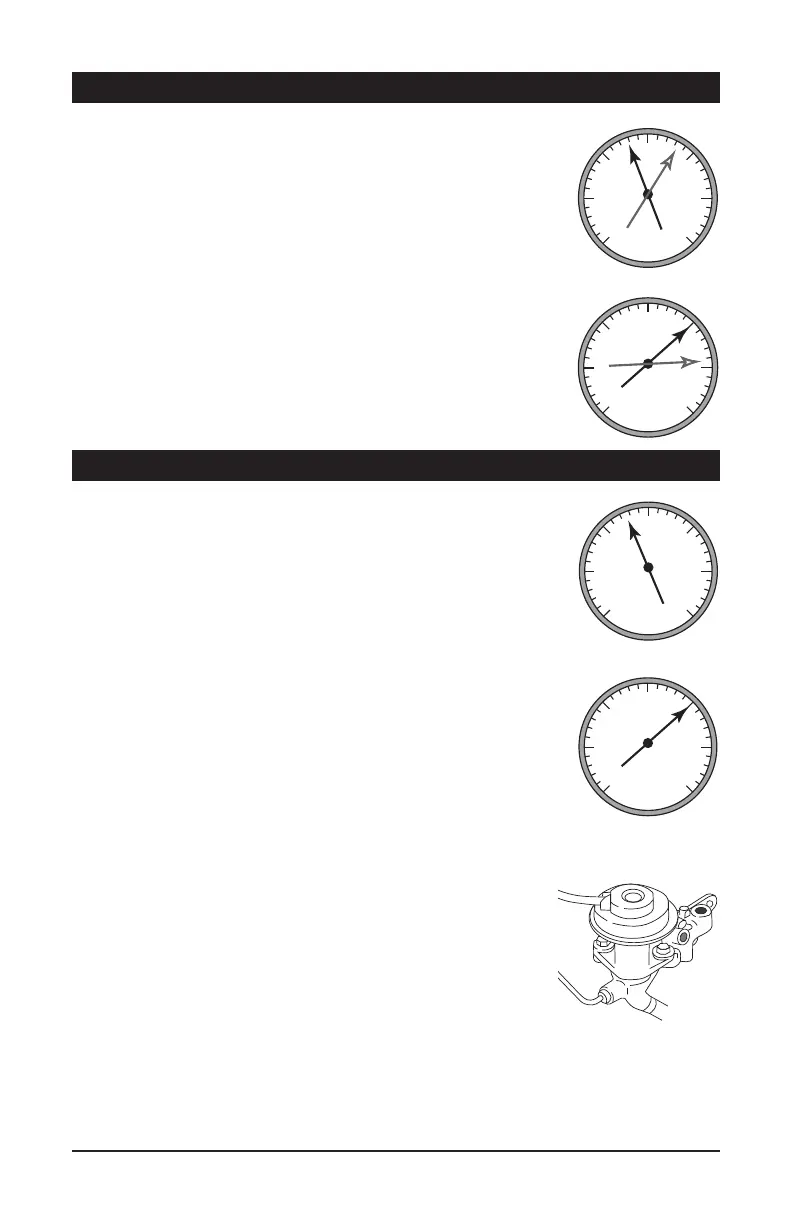
EXHAUST GAS RECIRCULATION (EGR)
1. With the vacuum pump connected to an intake manifold
vacuum port.
2. Start engine, bring to normal temperature and let idle.
3. Note the needle’s movement on the gauge.
• The needle should read 16-22 in. of Hg and hold steady.
and will remain steady.
4. Increase the engine speed to approx. 2000 RPM.
• As the speed increases slowly, so should the vacuum.
This indicates the EGR valve is operating properly.
• If the needle drops, moving toward zero you have a
malfunctioning EGR valve.
• To test:
1. Remove the EGR valve from the manifold.
2. Connect your vacuum tester to the diaphragm on the
EGR valve.
3. Pump the trigger of your tester building vacuum. The
needle should not move and hold steady. If the
needle starts to drop, your EGR valve has a crack/
hole in the diaphragm.
TESTING PROCEDURES
LEAKING PISTON RING
• If you experience leaking rings the vacuum at idle will be low
with the needle holding steady between 12 and 16 in. of Hg.
1. To test open the throttle.
2. Increase the engine speed to about 2000 RPM.
3. Then close the throttle quickly and watch the needle of the
gauge. It should jump 2 to 5 in. of Hg above its lowest reading.
A lesser gain may indicate faulty rings, and a complete cylinder
leakage or compression test should be done.
IDLE AIR/FUEL MIXTURE
• A sweeping change of 4 to 5 in. of Hg back and forth at idle
indicates a rich fuel mixture. With a lean mixture the needle
will drop irregularly over about the same range.
ENGINE DIAGNOSTICS CONT.
0
5
10
15
20
25
30
Hg Hg
Vacuum
Gauge
0
5
10
15
20
25
30
Hg Hg
Vacuum
Gauge
0
5
10
15
20
25
30
Hg Hg
Vacuum
Gauge
0
5
10
15
20
25
30
Hg Hg
Vacuum
Gauge
0
5
10
15
20
25
30
Hg Hg
Vacuum
Gauge
0
5
10
15
20
25
30
Hg Hg
Vacuum
Gauge
Nornal
Leaking Intake Valve Timing
Ignition Timing
Misre
Clogged Exhaust
0
5
10
15
20
25
30
Hg Hg
Vacuum
Gauge
Broken Valve Spring
0
5
10
15
20
25
30
Hg Hg
Vacuum
Gauge
0
5
10
15
20
25
30
Hg Hg
Vacuum
Gauge
0
5
10
15
20
25
30
Hg Hg
Vacuum
Gauge
Blown Head Gasket
Worn Valve Guides
Leaking Valve
0
5
10
15
20
25
30
Hg Hg
Vacuum
Gauge
0
5
10
15
20
25
30
Hg Hg
Vacuum
Gauge
Fuel mixture
Leaking Piston Ring
0
5
10
15
20
25
30
Hg Hg
Vacuum
Gauge
Vacuum Solenoid
0
5
10
15
20
25
30
Hg Hg
Vacuum
Gauge
0
5
10
15
20
25
30
Hg Hg
Vacuum
Gauge
0
5
10
15
20
25
30
Hg Hg
Vacuum
Gauge
0
5
10
15
20
25
30
Hg Hg
Vacuum
Gauge
0
5
10
15
20
25
30
Hg Hg
Vacuum
Gauge
0
5
10
15
20
25
30
Hg Hg
Vacuum
Gauge
0
5
10
15
20
25
30
Hg Hg
Vacuum
Gauge
0
5
10
15
20
25
30
Hg Hg
Vacuum
Gauge
0
5
10
15
20
25
30
Hg Hg
Vacuum
Gauge
Nornal
Leaking Intake Valve Timing
Ignition Timing
Misre
Clogged Exhaust
0
5
10
15
20
25
30
Hg Hg
Vacuum
Gauge
Broken Valve Spring
0
5
10
15
20
25
30
Hg Hg
Vacuum
Gauge
0
5
10
15
20
25
30
Hg Hg
Vacuum
Gauge
0
5
10
15
20
25
30
Hg Hg
Vacuum
Gauge
Blown Head Gasket
Worn Valve Guides
Leaking Valve
0
5
10
15
20
25
30
Hg Hg
Vacuum
Gauge
0
5
10
15
20
25
30
Hg Hg
Vacuum
Gauge
Fuel mixture
Leaking Piston Ring
0
5
10
15
20
25
30
Hg Hg
Vacuum
Gauge
Vacuum Solenoid
0
5
10
15
20
25
30
Hg Hg
Vacuum
Gauge
0
5
10
15
20
25
30
Hg Hg
Vacuum
Gauge
0
5
10
15
20
25
30
Hg Hg
Vacuum
Gauge
EXHAUST GAS RECIRCULATION (EGR)
FUEL PRESSURE REGULATOR
ELECTRICAL /VACUUM SOLENOID
 Loading...