[F]
[E]
[03]
[05]
04
06
[05]
04
04
G
[03]
04
G
H
E
E
F
I
J
K
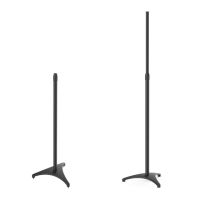
STEP 4
Secure speaker to stand
4 5
6 7
L
Speaker option B2: keyhole insert
OPT
C
OPT
B2
K
P
All of us at PERLESMITH do appreciate your product purchase. We hope that you
are as happy with your product as we are designing and manufacturing it for you.
We strive to provide you with the best quality products and services in the
industry. Please share your experience of our product with others at
www.perlesmith.com if you are satisfied. If you have any questions please don't
hesitate to contact us at
Technical Support: 1-800-556-6806 Mon-Fri 10am - 5pm (PST) (USA) (CAN)
Other Info: supportus@perlesmith.com (US)/supportca@perlesmith.com (CA)
Please check www.perlesmith.com for more products and company information.
Thank you again for
choosing this PERLESMITH product!
04
N
K
②
G
04
(Suitable for Samsung SWA-8500S,
SWA-9000S Speakers)
1.Slide the washer [O] into the bolt [M], then insert
them into the keyhole.
2.Tighten the nut [N] until the washer [K] is pulled
firmly against the 90 degree plate [04].
1.Slide the washer [O] into the bolt [M], then insert
them into the keyhole.
2.Tighten the nut [N] until the washer [K] is pulled
firmly against the 90 degree plate [04].
O
M
①
Speaker option A: two thread
inserts
Speaker option B1: keyhole insert
Note: The washers
[K] are only suitable
for bolts [J] and [H]
OPT
A
OPT
B1
1. Insert bolt [F] through 90 degree plate [04]
2. Thread plastic nut [E] to bolt [F]
3. Insert bolt [F] into keyhole and fasten the
plastic nut [E]
4. Use the washer [P] to adjust the length of the
bolt [F] if necessary.
STEP 5
Route the cables
(If Needed)