IMPORTANT SAFETY INSTRUCTIONS
• Readallinstructionsbeforeinstallingorusingthisproduct.
• Registeryourpurchaseon-lineatwww.pet-mate.com
(see guarantee).
• Donotallowchildrentoplaywiththisproduct.
• Inspectproductregularlyforcorrectoperationand
damage. Do not use if in doubt.
• Thisproductisdesignedforusewithpetsonly,as
described in these instructions.
• Disposeofallpackagingmaterialproperly.
NOTE: Plastic bags could cause suocation – keep away
from children and animals.
SAVE THESE INSTRUCTIONS
1. Battery installation / bowl alignment
1.1 Remove feeder lid by pressing down lid and pushing in the
sprungclipsonbothsides(Fig.3).Liftthefoodbowlothe
feeder base and remove the battery cover by releasing the
retaining clip (Fig. 4).
1.2 Insert 3 x AA batteries using the orientation symbols
marked on the inside of the compartment. Replace the
battery cover.
Afterashortperiodofselftesting,theclock(
3
,Fig.2)will
show 12:00 AM outlined by a highlight frame with four feeding
time indicators (
5
and
8
,Fig.2),showing––:––beneath.
Temporarily replace the food bowl and lid. If the lid and bowl
arenotcorrectlyaligned,removelidthenpressADJ/SETand
UP buttons together to 3 seconds to achieve alignment.
Good quality alkaline batteries should normally last
approximately 12 months (dependent on use). You may use
all popular batteries including rechargeable and 1.5v lithium
batteries but the low battery indicator will only work correctly
with standard alkaline batteries.
2. Setting the clock
NOTE: To change clock between 24 hour and 12 hour (AM/PM)
formats, press and hold the ADJ/SET button together with the
DOWN arrow button until the format changes.
If at any point during setting a button is not pressed within 30
seconds, all digits will stop ashing and any adjustments made
will revert to default/previous settings.
2.1Ifnecessary,movethehighlightframetooutlinetheclock
display using the UP or DOWN arrow buttons. To set the
clock,pressandholdtheADJ/SETbuttonfor5seconds
untilthehourgurestartstoash.PresstheUPorDOWN
arrow buttons to adjust the clock to the correct hour.
2.2PresstheADJ/SETbuttonandtheminutegurewillash.
Adjust using the UP or DOWN arrow buttons. Press ADJ/
SET to save the setting.
3. Meal time setting
The C500 feeder will automatically serve meals at the same
time(s) every day once you have set the required meal times.
Forexample,ifyourequireonemealadayyouneedonly
set the time for MEAL 1 to allow feeding up to 4 days. If you
require 2 meals in a day you will need to set the times of MEAL
1 and MEAL 2. You may set up to 4 meals per day.
Set your pet’s required daily meal times as follows:
NOTE: Meal times will automatically sort into chronological
order (earliest to latest time) on the display. The next meal will
be served at the next programmed meal time.
For example (see Fig. 5), the current time is 15:00, so the next
meal will be served at 17:00.
3.1 Press the UP or DOWN arrow buttons to move the highlight
frame to MEAL 1. Press and hold the ADJ/SET button for
3secondsuntiltheMEAL1hoursstartstoash.Setthe
hours for MEAL 1 using the UP or DOWN arrow buttons.
Press ADJ/SET to save setting.
3.2Theminutegurewillash.AdjustusingtheUPorDOWN
arrow buttons. Press ADJ/SET to save setting.
NOTE: Meal times can only be set in 10 minute increments.
Repeat 3.1 and 3.2 for remaining daily meals if required.
3.3 To cancel a meal time setting use the UP or DOWN arrow
buttons to highlight frame the relevant meal time. Press
andholdtheADJ/SETbuttonuntilmealtimeashes.Then
press the UP and DOWN arrow buttons together until the
timedisappearsanddisplayshows––:––.
4. Testing your C500 feeder
Your C500 feeder is manufactured from top quality materials
and is assembled to comply with rigorous quality standards.
Consequently,itshouldgiveyoumanyyearsdependableuse.
However,werecommendyouensureitscorrectoperationwith
your cat(s) while you are in attendance by completing set up as
follows:
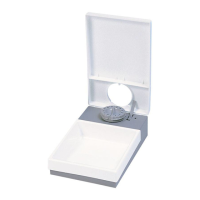
4.1Filltherequirednumberofbowls,startingclockwisefrom
‘1’(onlyllbowl‘0’ifanimmediatemealisrequired).Take
carenottooverllthefoodbowlsinorderthattherotating
lid is not fouled.
4.2 Insert two pre-frozen ice packs and replace food bowl
aligning‘0’onfoodbowl(B1,Fig.1)with‘0’onbaseunit
(D1,Fig.1).(Ifthe‘0’onthefoodbowldoesnotalignwith
the‘0’onthebaseunit,presstheADJ/SETandUParrow
buttons together for 3 seconds to achieve alignment.)
4.3Finally,replacefeederlidensuringthesprungclipsoneach
side click into position and place unit in required position.
The meal in the bowl numbered ‘1’ will be served at the
next programmed meal time.
4.4Alwaysturnfeederoafteruse(seeSection9below).
5. Especially for cats
Whenleavingyourcat,donotforgettomakeadequatetoilet
arrangementsforit.Catsandparticularlykittens,should
not be left alone for long periods without someone to check
periodically that all is well. We also recommend the use of a
CAT MATE fountain for supply of fresh water.
6. Especially for dogs
Mostsmalldogswillreadilyadapttoanautomaticfeeder,
butyouarerecommendedtosuperviseyourdog’srstfew
encounters to ensure that it is unlikely to damage the unit -
which may be a problem with puppies.
Whenleavingyourdog,donotforgettomakeadequatetoilet
arrangementsforit.Dogs,andparticularlypuppies,should
not be left alone for long periods without someone to check
periodically that all is well. We also recommend the use of a
DOG MATE fountain for supply of fresh water.
For extra stability the feeder may be attached to a wooden
baseplate as follows:
6.1 Remove the feeder lid and food bowl. Place feeder in
desiredpositiononwoodenboard,locatethemoulded-
inretainingclips(F,Fig.1)andmarkascrewholeusing
a suitable screw down through the centre of each hole.
(Fig 6).
 Loading...