Service Modes, Error Codes, and Fault Finding
EN 22 TPL16.1E LA5.
2016-Sep-23
back to
div.table
How to Exit the Factory mode
Use one of the following methods:
• Select EXIT_FACTORY from the menu and press the “OK”
button.
Note: When the TV is switched “off” by a power interrupt, or
normal switch to “stand-by” while in the factory mode, the TV
will show up in “normal operation mode” as soon as the power
is supplied again. The error buffer will not be cleared.
5.1.4 Customer Service Mode (CSM)
Purpose
The Customer Service Mode shows error codes and
information on the TVs operation settings.The call centre can
instruct the customer (by telephone) to enter CSM in order to
identify the status of the set.This helps the call centre to
diagnose problems and failures in the TV set before making a
service call.
The CSM is a read-only mode; therefore, modifications are not
possible in this mode.
Specifications
• Ignore “Service unfriendly modes”.
• Line number for every
line (to make CSM language independent).
• Set the screen mode to full
screen (all contents on screen is visible).
• After leaving the Customer Service Mode, the original
settings are restored.
• Possibility to use “CH+” or “CH-” for channel surfing, or
enter the specific channel number on the RC.
How to Activate CSM
To activate CSM, press the following key sequence on a
standard remote control transmitter: “123654” (do not allow the
display to time out between entries while keying the sequence).
After entering the Customer Service Mode, the following items
are displayed.
Note: Activation of the CSM is only possible if there is no (user)
menu on the screen!
Contents of CSM
• 1.1 Set Type This information is very helpful for a
helpdesk/workshop as reference for further diagnosis. In
this way, it is not necessary for the customer to look at the
rear of the TV-set. Note that if an NVM is replaced or is
initialized after corruption, this set type has to be re-written
to NVM.
• 1.2 Production code Displays the production
code (the serial number) of the TV. Note that if an NVM is
replaced or is initialized after corruption, this production
code has to be re-written to NVM.
• 1.3 Installation date Indicates the date of the first
installation of the TV. This date is acquired via time
extraction.
• 1.4 a Option Code 1 Gives the option codes of option
group 1 as set in SAM.
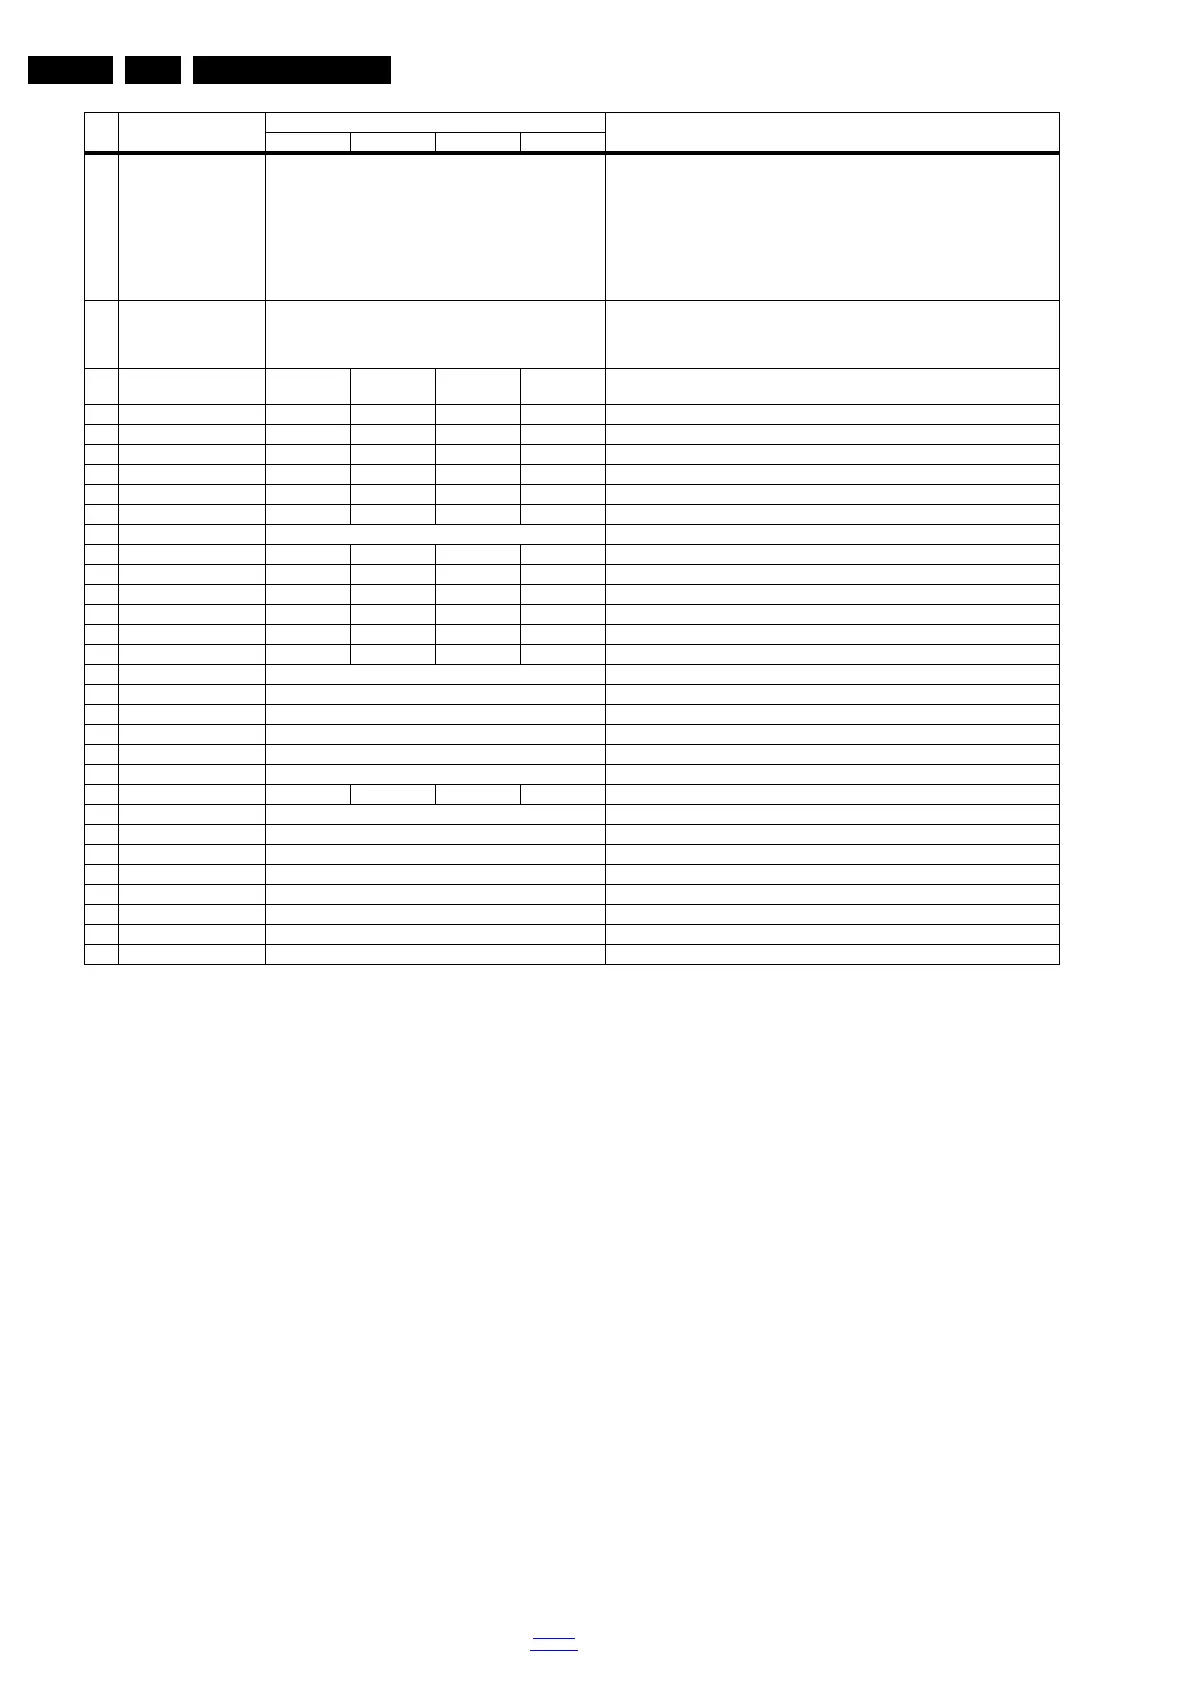
7 NVM COPY TV to USB Press OK Use this to store the NVM data to the REPAIR folder of a FAT formatted USB memory
stick. The TV will write two files in the REPAIR folder of the memory stick. It will create
this folder if it does not exist. The items are “Channel list”, “Personal settings”, “Option
codes”, “Display-related alignments” and “History list”. In case the download to the
USB stick was not successful “Failure” will appear. In this case, check if the USB stick
is connected properly. Now the settings are stored onto the USB stick and can be
used to download onto another TV or other SSB. Uploading is of course only possible
if the software is running and if a picture is available. This method is created to be
able to save the customer’s TV settings and to store them into another SSB.
8 NVM READ USB to TV Press OK Use this to store the NVM data from the USB memory stick to the TV. The TV will save
the two files which were created in item 8 to the NVM of the set. Use these options
when replacing a SSB. When “USB to TV Success” is displayed remove the power
and restart the TV
9 VIRGIN_MODE Off Off Off Off Use this to return the set to virgin mode. Depends whether the set has been used
already.
10 ORT_MODE Off Off Off Off ORT mode
11 DRMWARNING On On On On Warning the data rights management
12 AGEING MODE Off Off Off Off Use this for aging a new LCD panel
13 CLR_TEMP_R 118 127 128 128 Red colour temperature setting
14 CLR_TEMP_G 123 75 128 128 Green colour temperature setting
15 CLR_TEMP_B 128 0 128 128 Red colour temperature setting
16 Auto_COLOR Press OK COLOR TEMP MODE
17 ADC_GAIN_R 128 128 128 175 Red ADC gain
18 ADC_GAIN_G 128 128 128 174 Green ADC gain
19 ADC_GAIN_B 128 128 128 170 Blue ADC gain
20 ADC_OFFSET_R 127 127 127 127 Red ADC offset
21 ADC_OFFSET_G 127 127 127 127 Green ADC offset
22 ADC_OFFSET_B 127 127 127 127 Blue ADC offset
23 YPBPR_PHASE InValid YPBPR PHASE
24 AUD_GAIN_LINEIN 18 LINE_IN audio gain
25 AUD_GAIN_HDMI 17 HDMI audio gain
26 AUD_GAIN_ATV 18 Analogue TV audio gain
27 AUD_GAIN_DTV 17 Digital TV audio gain
28 AUD_GAIN_USB 17 USB audio gain
29 AQ_INDEX 1 2 3 5 Audio Quality index
30 DUMP PQ FROM TV Press OK Dump the picture quality data from a file “pq.bin” from the TV
31 LOAD PQ to TV Press OK Loads the picture quality data from a file “pq.bin” in to the TV
32 DUMP AQ FROM TV Press OK Dump the audio quality data from a file “AQ.bin” in to the TV
33 LOAD AQ to TV Press OK Loads the audio quality data from a file “AQ.bin” in to the TV
34 COPY BIN CHL to TV Press OK Copy the TV channel list to TV
35 COPY BIN CHL to USB Press OK Copy the USB channel list to USB
36 PANEL FLIP Off PANEL FLIP
37 EXIT_FACTORY Press OK Exits the Factory mode
Item Item value
Default value
Description43" 49" 55" 65"
 Loading...