Service modes, repair tips and faultfinding trees
GB 17CDR 3rd gen. 5.
Description of the tests
Focus control test
The focussing lens is continuously moving up and down. The
display reads “BUSY”.
Sledge control test
After pressing [F FWD] the sledge continuously moves up and
down. Pressing [REWIND] stops the sledge at the position it is
in and the focus control test resumes. The display reads
“BUSY”.
Tray control test
This test starts from within the focus control test routine.
Pressing [OPEN/CLOSE] moves the tray in or out. In the tray
open position one can initiate focus and sledge tests by
pressing [F FWD]. One has to stop these tests pressing
[REWIND] before it is possible to close the tray again.
Depending on the action the display reads “OPEN”,
“OPENED”, “CLOSE” or “BUSY”.
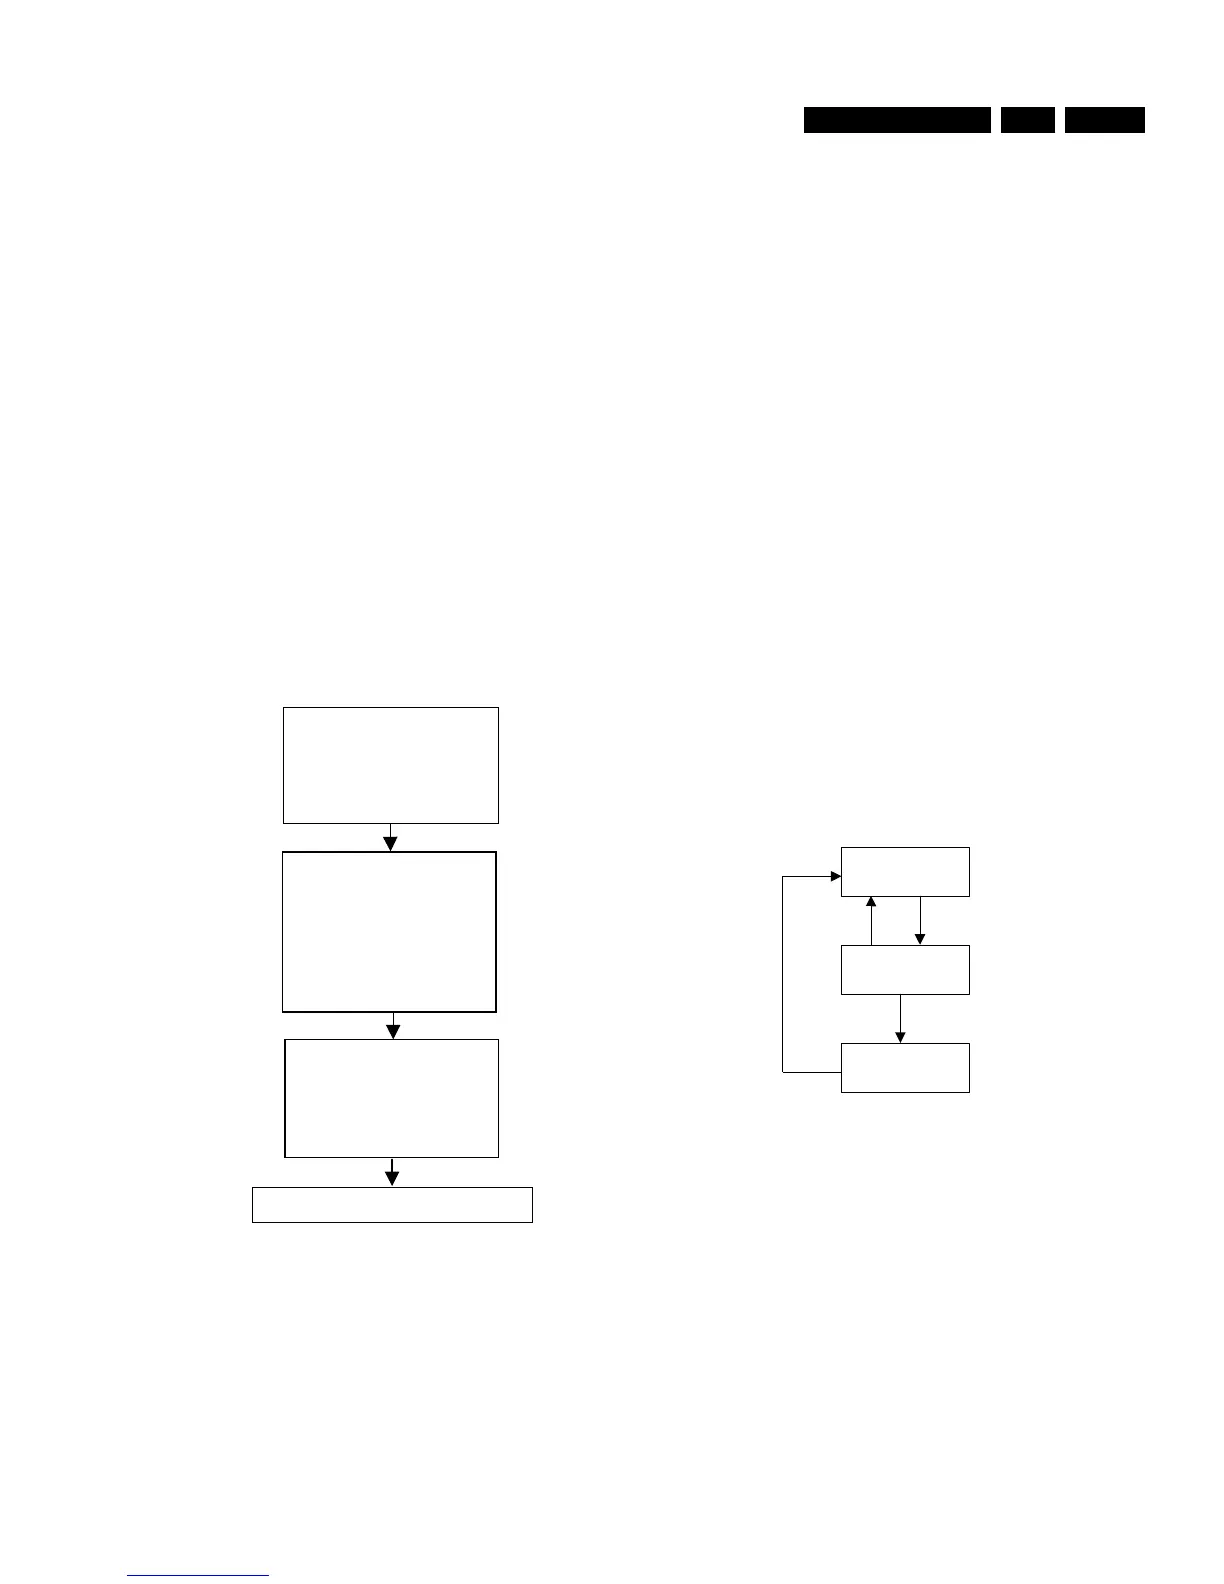
5.1.5 DC-erase service mode
Figure 5-4
Description
This test is initiated by pressing [ERASE] and [RECORD]
simultaneously while switching on the unit. The player will
erase a complete CD-RW disc (including PMA and ATIP lead
out area) at speed N=2. The display shows the countdown of
the remaining time required for the operation to complete. The
format is “ER mm:ss”, where “mm” are the remaining minutes
and “ss” the remaining seconds. After completion the message
“PASSED” is shown, and the player has to be switched off and
on again to start up in normal operating mode. Switching off the
unit before completion of the test, leaves the disc in an
unpredictable state. In such case only a complete DC-erase
procedure can recover the CD-RW disc.
Requirements to perform the test
• Functional CDR player.
• A CD-RW audio disc must be present in the tray.
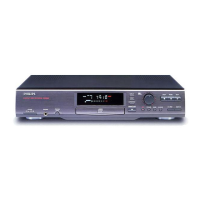
5.1.6 Burn in mode
Description:
The Burn In mode is an endless cycle of:
• DC-Erase to erase the CDRW disc with maximum laser
power.
• Recording a CDRW disc
• Finalising at double speed
The Burn In mode is used to test intermittent faults of the
loader.
Requirements to perform the test:
• Working Local Keyboard: needed to start up the test.
• Working Local Display: all output messages must be
displayed on the local display.
• Analog source connected to the CDR99 player
• CDRW disc in tray
Burn in sequence
– Initialisation
The ‘Burn In’ mode is initiated by pressing the PAUSE> and
key on the local keyboard at the same time, and then switching
the POWER switch on.
– Continuous loop
The following picture shows the burn in sequence.
Burn in sequence
Figure 5-5
Continuously do DC erase, record complete CDRW and then
finalise until the player is powered off.
When an error is detected during writing, the DC erase
procedure is called again., the disc will be DC erased and the
cycle starts again.
During the test the display shows the number of hours for which
the test is running and the number of errors detected during the
test. The display looks as follows : “HH BI RE FE”
HH : number of hours on
digits 1 and 2
“BI” : burn in mode, digits 3
and 4
RE : number of errors
detected during DC
erase and write
CDRW modes on
digits 7 and 8
Load CD-RW disc
Press
<ERASE> + <RECORD>
simultaneously and switch
ON unit
Display shows:
“
PASSED
”
when the erase function is
completed
“
ERROR
”
if DC ERASE fails
Display shows:
“
ER mm:ss
”
mm
:remaining minutes
ss :remaining seconds
TOTAL
and
REM
are also
illuminated
DC ERASE SERVICE MODE
(erasement of complete CD-RW)
To end test, switch OFF unit
CL96532086_027.eps
080999
Write CDRW
Finalise
DC erase
Write com